Statement Setup
Collection Manager - Statement Setup Guide
Statement Setup
Description
Statement Setup provides a set of default options for all patient statements. These options control what
information is shown on printable statements and how to format it. For example, the practice's address, past due
messages, statement address to, page offsets, font sizes, word wrapping and more. A user can choose from an existing
Statement Setup or create a new one.
Note: Level 5 (Management) user access level is required to access and make changes to this area.
Note: Some default options can be overridden by the Collection Manager's filtering options in Advanced Mode.
Note: At least one Statement Setup must exist in order to create statements through the Collection Manager.
Instructions
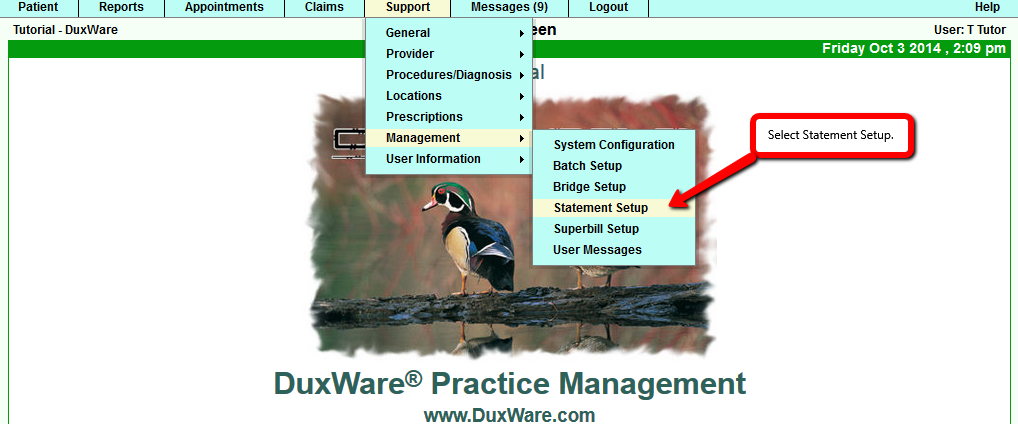
1) Statement Setup can be found through the Duxware Menu by navigating to Support>Management>Statement Setup.
[ Navigating to Statement Setup page ]
2) Selecting Statement Setup from the menu displays the Statement Setup page. This is where a Statement Setup can be added or edited.
- To edit an existing Statement Setup, click the Search button to display a list of all available setups or search for an existing setup by
name or record ID. Select a statement setup from the list of search results.
- To add a new Statement Setup, click the Add New button as shown in the image below. The new Statement Setup will appear in the
Statement Setup list after it is saved.
[Finding and selecting Statement Setups]
3) Selecting a Statement Setup displays the Statement Setup Add/Edit page. This is where to set the default options for a particular Statement Setup. Click the Save button when finished.
Section 1 of Statement Setup Add/Edit- Statement Setup and Configuration
The following is a list of all fields and options in section 1 (Statement Setup and Configuration) of the Statement Setup Add/Edit.
Statement Setup configuration options
- Setup Name: Input field for the internal setup name. The setup name should be easily recognized by users.
- Display Order: Number field to display order that the setup appears in the drop down listing. The number must be equal or greater than zero.
- Statement Mode Address to:
Guarantor - Statements are grouped by guarantor. Guarantor gets one statement that shows claims for all patients the guarantor is responsible for.
Patient - Statements are grouped by patient.
Claim - One Statement per claim.
Statement Address To: Address Statements to Guarantor or Patient
Balance Forward Mode On/Off"""
- On - Outstanding claims that were listed on previous statements will not appear on this statement, only the forward balance will be listed instead.
- Off - Outstanding claims that were listed on previous statements will appear on this statement
Section 2 of Statement Setup Add/Edit- Statement Setup and Configuration - Single Patient Statement Setup
Select "Yes" to enable your setup to perform a single patient statement with additional options for Instant Print: Off, Preview, or Print PDF.
Note: by selecting "Yes" for this option, it will not affect your batching for a monthly statement run.
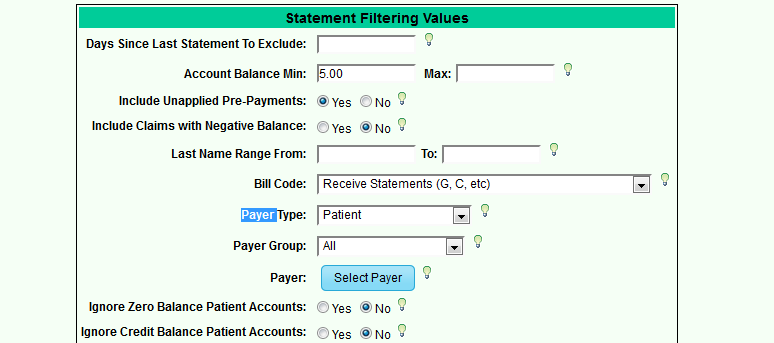
Section 3 of Statement Setup Add/Edit- Statement Setup and Configuration - Statement Filtering Values Predefined Statement filters that define a set of Search Criteria to filter Statements.
- Days of last statement to exclude
- Account Balance Min, Max - Filter by Statement Balance
- Include Unapplied Pre-payment - whether or not Unapplied Pre-payments count in calculating Statement balance.
- Include Claims with Negative Balance - Select "Yes" to include claims with negative balances to appear on the statement.
- Last Name Range
- Bill Code
- Payer Type
- Payer Group
- Payer (single payer look-up)
- Ignore Zero Balance Patient Accounts
- Ignore Credit Balance Accounts
NOTE REGARDING SELECTIONS HANDLING UNAPPLIED PAYMENTS, CREDIT BALANCES, REFUNDS
Best Practice Tip:
The best practice for handling unapplied money, credit balances, and/or refunds is for the practice to make sure that all unapplied
payments,credits that should be applied to services, are done before a statement run.
Section 4 of Statement Setup Add/Edit- Statement Setup and Configuration - Statement Content
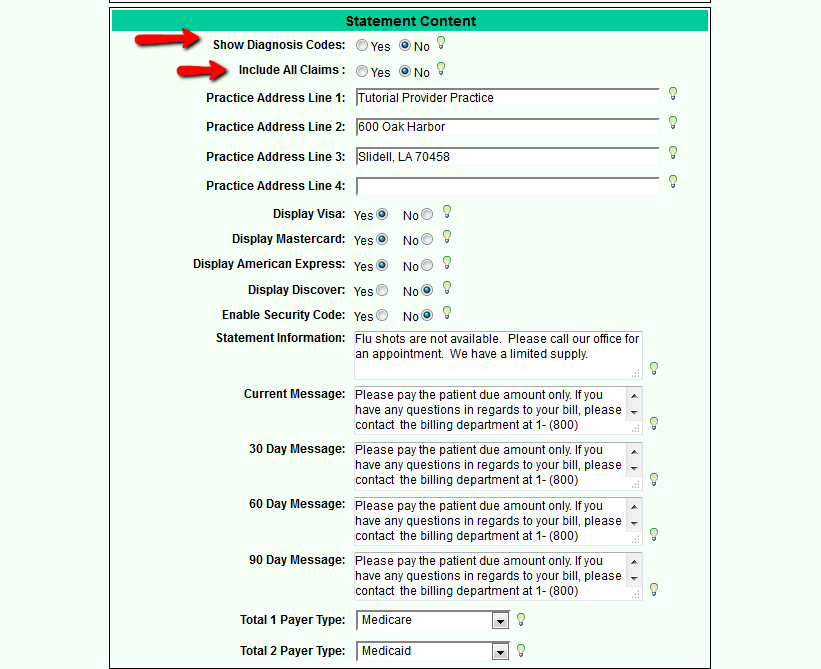
Show Diagnosis Yes/No:
- Yes - to display Diagnosis codes in the Description section of each claim line in PDF Statements.
- No - to not display Diagnosis Codes in PDF Statements.
Include All Claims
- Yes - to include claims currently on file to insurance on Patient's statement
- No - will only include claims on file to Patient responsibility.
Practice Address: Enter Practice Name on Line 1. Practice Address lines 1-3 are required. The Practice Address will appear on
each Statement in the top left corner of the printed page.
Display Credit Card Image on PDF: Display the credit card images on PDF statements Yes or No. Selected credit card images are
displayed in the top right corner of each PDF Statement above the Credit Card Section.
Enable Security Code Yes/No: Display a field on the PDF Statements to enter a Credit Card Verification Number (CVN) Yes or No.
The CVN is usually a three digit number displayed on the back of a credit card. The CVN field is displayed on PDF Statements in the
Credit Card Section. **Note** Check your state and local laws regarding adding CVN request to your statement.
Statement Information: Statement Information is a message that will be displayed near the top right corner of each Statement near
the top right corner of each Statement below the Credit Card Payment section.
Past Due Messages:
- Current Message: Message to display for accounts that are not considered past due (1-29 days).
- 30 Day Message: Message to display for accounts that are past due (30-59 days).
- 60 Day Message: Message to display for accounts that are past due (60-89 days).
- 90 Day Message: Message to display for accounts that are past due (90 plus days).
Total 1 Payer Type:
Display total for this Payer Type in Total Row 1. Total Row 1 is the first line below the row for Insurance Balance at the bottom
right corner of PDF Statements in the Balance Due Now Section.
Total 2 Payer type:
Display total for this Payer Type in total row 2. Total Row 2 is the scond line below the row for Insurance Balance at the bottom
right corner of PDF Statements in the Balance Due Now Section.
[Section 3 of Statement Add/Edit - Collection Manager Statements]
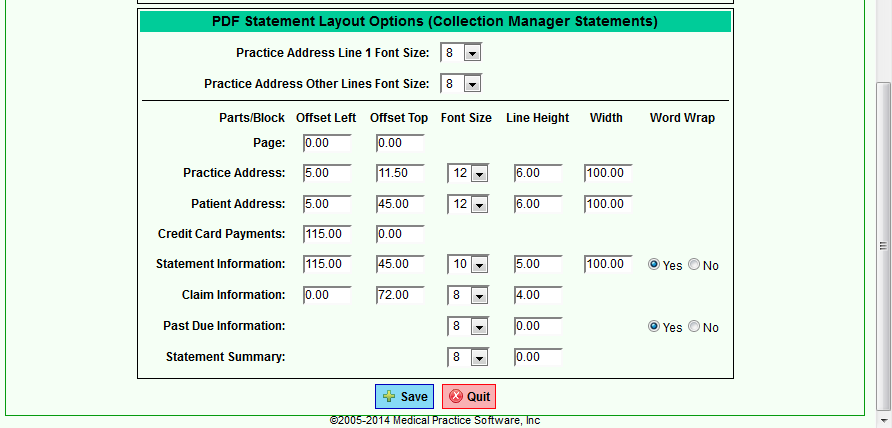
PDF Statement Layout Options
- Controls offsets, font sizes, line height, width, and word wrap for each statement section for the entire page.


