Difference between revisions of "DuxWare Release Note - 03/27/2016"
| (26 intermediate revisions by the same user not shown) | |||
| Line 14: | Line 14: | ||
<br> | <br> | ||
<br> | <br> | ||
| + | [[File:Auth1.png]] | ||
| + | <br> | ||
| + | <br> | ||
| + | '''Dunning Letters'''<br> | ||
| + | |||
| + | An option to retrieve and print a Single Dunning letter has been added to the Dunning Letter Criteria. | ||
| + | <br> | ||
| + | To access Dunning Letters: Reports>Letters>Patient Dunning Letters<br> | ||
| + | <br> | ||
| + | <br> | ||
| + | [[File:DunningLtrcriteria.png]] | ||
| + | <br> | ||
| + | <br> | ||
| + | <br> | ||
| + | ===Collection Manager and Patient Statements=== | ||
| + | |||
| + | '''Collection Manager'''<br> | ||
| + | <br> | ||
| + | Additional options added to include Location Groups and Provider Groups have been added to the Collection Manager Search Criteria. | ||
| + | * To set up Provider Groups, go to the Support >Provider>Provider Group Setup | ||
| + | * To set up Location Groups, go to Support >Location> Location Group Setup | ||
| + | If you don’t have any provider groups or location groups set up, the system defaults to “Any”. | ||
| + | <br> | ||
| + | <br> | ||
| + | [[File:CollMgr.png]] | ||
| + | <br> | ||
| + | <br> | ||
| + | '''Single Print Statements from the Patient’s Account'''<br> | ||
| + | <br> | ||
| + | Statement action button will appear as a selection at the bottom of the Patient Information Screen and the Patient Ledger.<br> | ||
| + | |||
| + | '''Practices that are a single business entity in a single database:'''<br> | ||
| + | Example: Practice has 1 or more providers who bill claims under one Group NPI and a single Tax ID. These type practices will normally have one Statement Setup and can set the Instant Print Option to “Yes” in the statement setup.<br> | ||
| + | Statement Setup Example for Single Print option:<br> | ||
| + | <br> | ||
| + | <br> | ||
| + | [[File:Setup1.png]] | ||
| + | <br> | ||
| + | <br> | ||
| + | When the Single Patient Statement is set to “Yes” in the Patient Setup, and the Print PDF is selected, the PDF of the patient’s statement will instantly display once the “Statement” button is selected in either the Patient Information Screen or the Patient Ledger. | ||
| + | |||
| + | '''Practices that have more than one Billing Provider/Business Entity in a single database:'''<br> | ||
| + | <br> | ||
| + | A '''new''' system configuration item is now available for multiple Billing Provider practices to be used in conjunction with Provider Groups and Location Groups. | ||
| + | Previously, practices that billed claims with more than one Tax ID could not enable the Statement Setup Option to use the Single/instant print option for printing statements from the patient’s account. Now, you do have the option. | ||
| + | Example: Practice has providers who bill claims under separate Group NPIs and Tax IDs. These type practices will typically have a separate statement setup for each business entity. | ||
| + | To take advantage of this new feature, you will need to sort your providers in to their respective entity by creating and adding them into their respective provider group. | ||
| + | For Example, you have two business entities: | ||
| + | * Tutorial Eye Physicians Group | ||
| + | * Tutorial Eye Surgery Center | ||
| + | You already bill to payers under each entity, you can now setup up a Provider Group to sort and print Statements as well. | ||
| + | <br> | ||
| + | To add a Provider Group, go the top tab menu: | ||
| + | Support>Provider>Provider Group Setup | ||
| + | Select the “+ Add” button<br> | ||
| + | For this example, we are adding a Provider Group called “Surgery Center”, and we are adding the provider: “Tutorial Eye Surgery Center” as the Provider in this group. Once you select and move the provider(s) to be included in the group, be sure to select the “Save” button at the bottom of your screen. | ||
| + | <br> | ||
| + | <br> | ||
| + | [[File:ProviderGrp.png]] | ||
| + | <br> | ||
| + | <br> | ||
| + | For this example, we will also need a Provider Group added for the Physician Group:<br> | ||
| + | <br> | ||
| + | <br> | ||
| + | [[File:ProvGrp1.png]] | ||
| + | <br> | ||
| + | <br> | ||
| + | If separate locations are involved, then we will need to add Location Groups so that we can link them in the Statement Setup. | ||
| + | To add a Location Group, go to the top tab menu: Support>Location>Location Group Setup | ||
| + | Select the “+ Add” button. | ||
| + | <br> | ||
| + | <br> | ||
| + | [[File:LogGrp1.png]] | ||
| + | <br> | ||
| + | <br> | ||
| + | Add Location Group for the Physicians’ locations:<br> | ||
| + | <br> | ||
| + | <br> | ||
| + | [[File:Locgrp2.png]] | ||
| + | <br> | ||
| + | <br> | ||
| + | To access your statement setup, please go to the top tab menu: Support>Management>Statement Setup. Select “Search” to see your list of statement setups that are currently in your database. | ||
| + | |||
| + | Statement setup after System option has been turned on: | ||
| + | The Single Patient Statement option is set to “Yes” with Instant Print set to “PDF”. | ||
| + | Under the Providers and Locations section, select the Provider and Location Group that you wish to link with this statement setup. | ||
| + | <br> | ||
| + | <br> | ||
| + | [[File:Grpsetup1.png]] | ||
| + | <br> | ||
| + | <br> | ||
| + | Patient Statement Example to Print Surgery Center Statement: | ||
| + | <br> | ||
| + | <br> | ||
| + | [[File:Stmtmultientityledger.png]] | ||
| + | <br> | ||
| + | <br> | ||
| + | With properly setup provider and location groups, the statement setup above will pull in the claims linked to the setup selected and produce a statement. In the above example, we only want to include claims linked to the Surgery Center Statement Setup. The option is there to pull all claims on file to the patient regardless of the statement setup. We suggest printing only the claims associated to the Statement Setup.<br> | ||
| + | <br> | ||
| + | If you or have any questions regarding the recent updates, please don't hesitate to call your Support Team at 1-800-248-4298 or email at support@duxware.com. | ||
Latest revision as of 18:19, 4 May 2016
System Updates
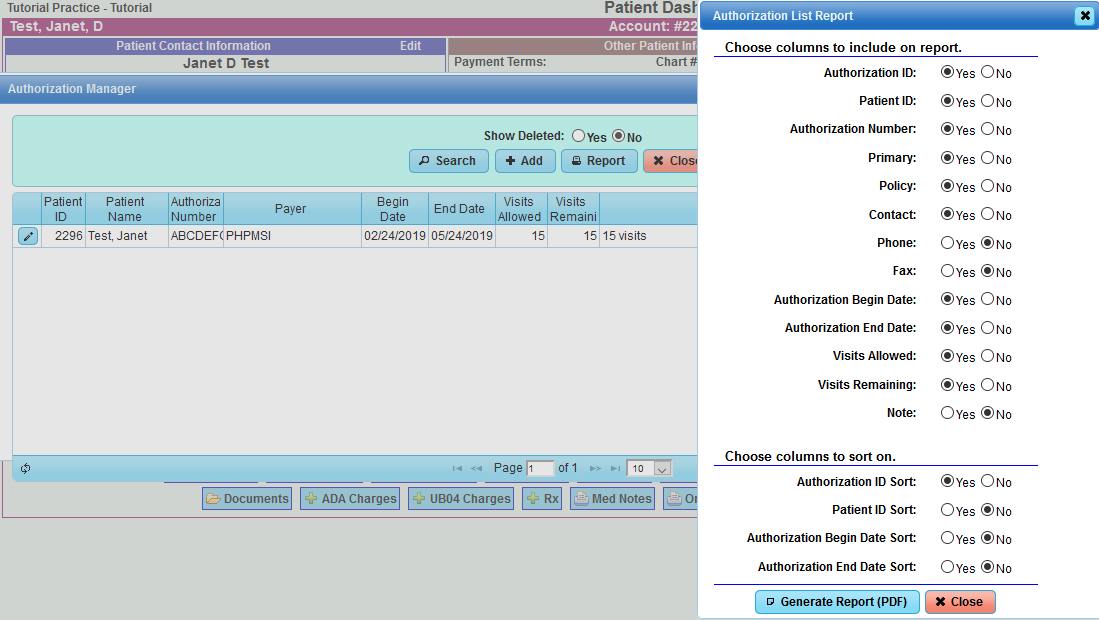
Claim Entry - Authorizations
An attempt to create a claim with an expired authorization will now produce an error which should cause the user to either correct or add a valid date or select the correct authorization that belongs to the claim.
Example: A patient has an authorization for 3/1/2016 through 3/10/2016 with 3 visits. Staff goes to create a claim for service date 3/24/2016. Once the charge has been entered, and “Save” is selected, the following message will appear:
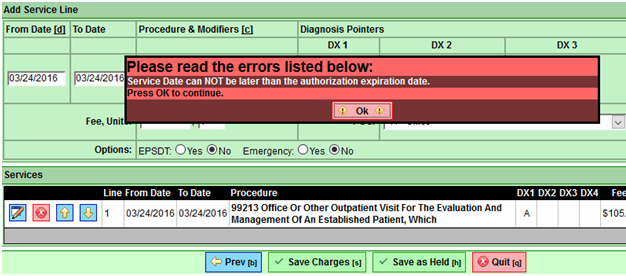
The user will need to select, “Ok”, to edit the authorization that is linked to the current claim, or select “None” for no authorization required.
Dunning Letters
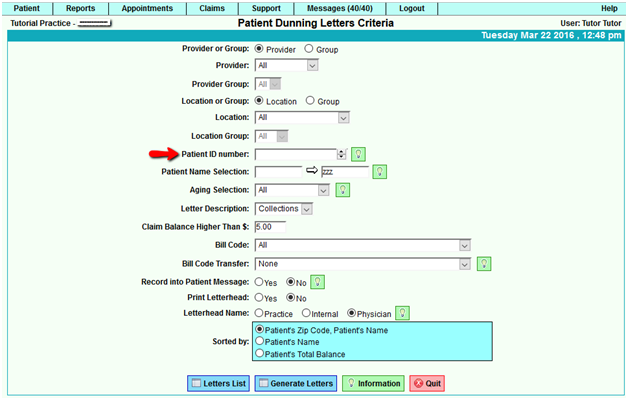
An option to retrieve and print a Single Dunning letter has been added to the Dunning Letter Criteria.
To access Dunning Letters: Reports>Letters>Patient Dunning Letters
Collection Manager and Patient Statements
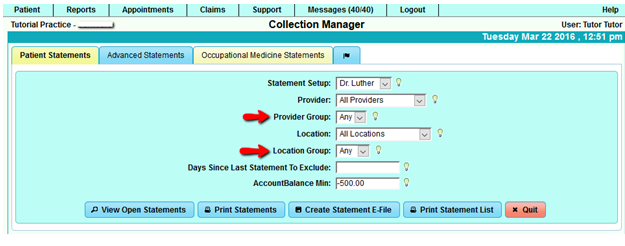
Collection Manager
Additional options added to include Location Groups and Provider Groups have been added to the Collection Manager Search Criteria.
- To set up Provider Groups, go to the Support >Provider>Provider Group Setup
- To set up Location Groups, go to Support >Location> Location Group Setup
If you don’t have any provider groups or location groups set up, the system defaults to “Any”.
Single Print Statements from the Patient’s Account
Statement action button will appear as a selection at the bottom of the Patient Information Screen and the Patient Ledger.
Practices that are a single business entity in a single database:
Example: Practice has 1 or more providers who bill claims under one Group NPI and a single Tax ID. These type practices will normally have one Statement Setup and can set the Instant Print Option to “Yes” in the statement setup.
Statement Setup Example for Single Print option:
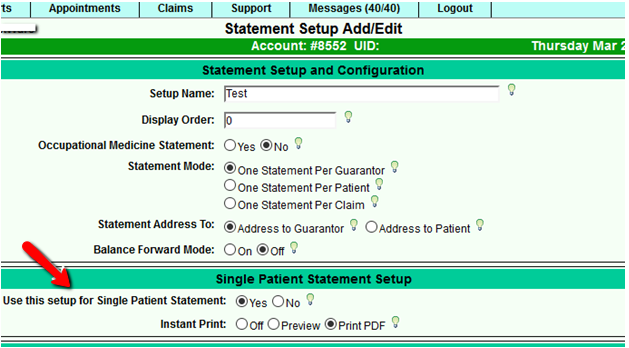
When the Single Patient Statement is set to “Yes” in the Patient Setup, and the Print PDF is selected, the PDF of the patient’s statement will instantly display once the “Statement” button is selected in either the Patient Information Screen or the Patient Ledger.
Practices that have more than one Billing Provider/Business Entity in a single database:
A new system configuration item is now available for multiple Billing Provider practices to be used in conjunction with Provider Groups and Location Groups.
Previously, practices that billed claims with more than one Tax ID could not enable the Statement Setup Option to use the Single/instant print option for printing statements from the patient’s account. Now, you do have the option.
Example: Practice has providers who bill claims under separate Group NPIs and Tax IDs. These type practices will typically have a separate statement setup for each business entity.
To take advantage of this new feature, you will need to sort your providers in to their respective entity by creating and adding them into their respective provider group.
For Example, you have two business entities:
- Tutorial Eye Physicians Group
- Tutorial Eye Surgery Center
You already bill to payers under each entity, you can now setup up a Provider Group to sort and print Statements as well.
To add a Provider Group, go the top tab menu:
Support>Provider>Provider Group Setup
Select the “+ Add” button
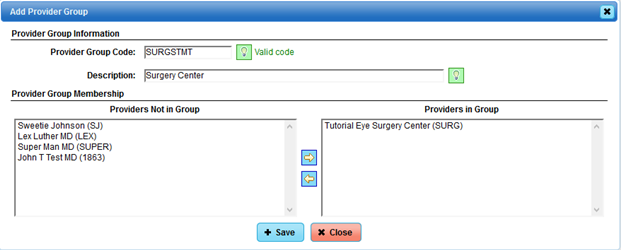
For this example, we are adding a Provider Group called “Surgery Center”, and we are adding the provider: “Tutorial Eye Surgery Center” as the Provider in this group. Once you select and move the provider(s) to be included in the group, be sure to select the “Save” button at the bottom of your screen.
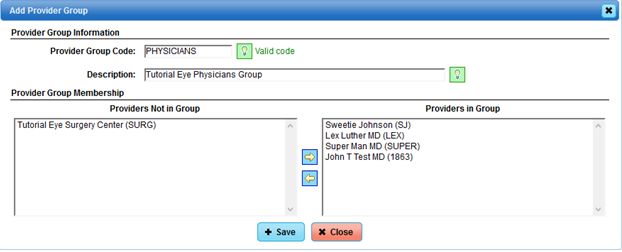
For this example, we will also need a Provider Group added for the Physician Group:
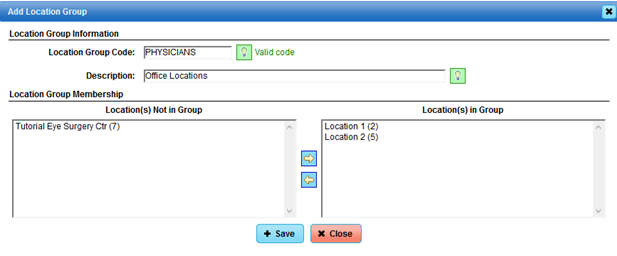
If separate locations are involved, then we will need to add Location Groups so that we can link them in the Statement Setup.
To add a Location Group, go to the top tab menu: Support>Location>Location Group Setup
Select the “+ Add” button.
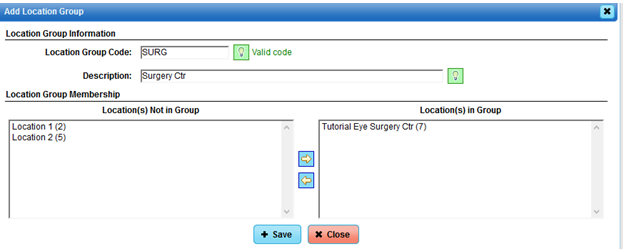
Add Location Group for the Physicians’ locations:
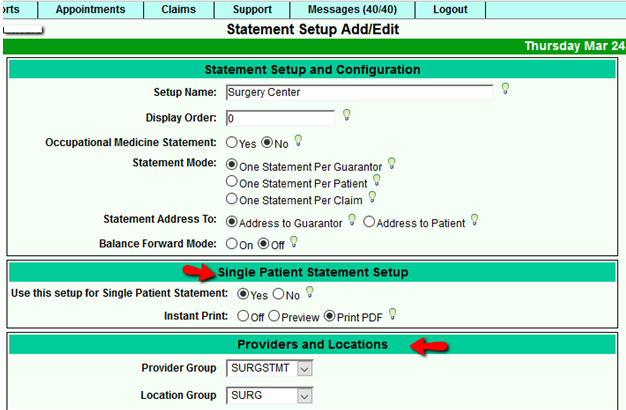
To access your statement setup, please go to the top tab menu: Support>Management>Statement Setup. Select “Search” to see your list of statement setups that are currently in your database.
Statement setup after System option has been turned on:
The Single Patient Statement option is set to “Yes” with Instant Print set to “PDF”.
Under the Providers and Locations section, select the Provider and Location Group that you wish to link with this statement setup.
Patient Statement Example to Print Surgery Center Statement:
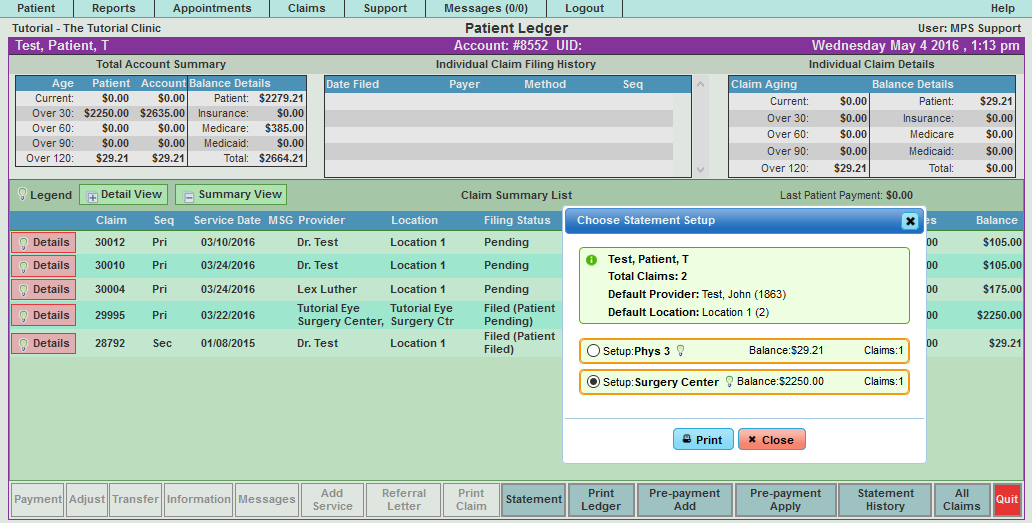
With properly setup provider and location groups, the statement setup above will pull in the claims linked to the setup selected and produce a statement. In the above example, we only want to include claims linked to the Surgery Center Statement Setup. The option is there to pull all claims on file to the patient regardless of the statement setup. We suggest printing only the claims associated to the Statement Setup.
If you or have any questions regarding the recent updates, please don't hesitate to call your Support Team at 1-800-248-4298 or email at support@duxware.com.