Difference between revisions of "Pay Account"
| (6 intermediate revisions by 2 users not shown) | |||
| Line 1: | Line 1: | ||
===Prepayment Apply is now Pay Account with a host of added features.=== | ===Prepayment Apply is now Pay Account with a host of added features.=== | ||
| − | Accessing “Pay Account”: | + | |
| + | The old way with Pre-Payment Apply only allowed posting of money to a patient’s account from payment type entity: Patient. With the new way under “Pay Account”, you have the ability to post payments from multiple payment sources from a single screen. For Example, for those of you who receive payments from Worker’s Comp, Attorneys, or Occupational Medicine, you can quickly pay out an entire account and also quickly write-off remaining balances in one swoop. | ||
| + | |||
| + | |||
| + | |||
| + | '''Accessing “Pay Account”:''' | ||
* Visit menu Patient Dashboard | * Visit menu Patient Dashboard | ||
| Line 7: | Line 12: | ||
* Click Ledger (Patient or Guarantor) | * Click Ledger (Patient or Guarantor) | ||
* Click Pay Account (Bottom row of buttons) | * Click Pay Account (Bottom row of buttons) | ||
| − | |||
| − | SELECT PAYER | + | Select the Pay Account button from the bottom of the Patient’s Ledger, and let’s get started! |
| + | |||
| + | |||
| + | [[File:Payaccount1.png]] | ||
| + | |||
| + | |||
| + | In this example, you see that we have $60.00 in Prepayments to apply to open claims. Once you select "Pay Account", you will see the following screen: | ||
| + | |||
| + | |||
| + | [[File:Payaccount22.png]] | ||
| + | |||
| + | |||
| + | [[File:Payaccount3.png]] | ||
| + | |||
| + | |||
| + | The following example is posting a combination of an insurance payment and applying unapplied payments: | ||
| + | |||
| + | |||
| + | [[File:Payaccount4.png]] | ||
| + | |||
| + | |||
| + | [[File:Payaccount5.png]] | ||
| + | |||
| + | |||
| + | [[File:Payaccount6.png]] | ||
| + | |||
| + | |||
| + | |||
| + | '''SELECT PAYER''' | ||
* Select payer allows user to select payers (that they have a policy for) or patient | * Select payer allows user to select payers (that they have a policy for) or patient | ||
| Line 16: | Line 48: | ||
* Users may "Select Other" and will bring up selector for payers. | * Users may "Select Other" and will bring up selector for payers. | ||
* Select Other Dialog | * Select Other Dialog | ||
| − | * User may search | + | * User may search for payers in the system. |
* Filtering options are available such as Name, Code, ID, Address, City, State, Payer ID, Group, Type and Show Deleted. | * Filtering options are available such as Name, Code, ID, Address, City, State, Payer ID, Group, Type and Show Deleted. | ||
* On click of payers name(Click of row) claims will appear by that payer if available. | * On click of payers name(Click of row) claims will appear by that payer if available. | ||
* If a payer does not have a policy with patient an error message (Warning: Patient does not have a policy with this payer.) will display | * If a payer does not have a policy with patient an error message (Warning: Patient does not have a policy with this payer.) will display | ||
| + | |||
'''FILTERING OPTIONS''' | '''FILTERING OPTIONS''' | ||
| Line 27: | Line 60: | ||
* Will filter claims and pre-payments by provider | * Will filter claims and pre-payments by provider | ||
* Default is "All" | * Default is "All" | ||
| + | |||
Filter by Location: | Filter by Location: | ||
| Line 35: | Line 69: | ||
* Will only show claim that's typed if other filtering options allow, this only allows for one claim number. | * Will only show claim that's typed if other filtering options allow, this only allows for one claim number. | ||
* Default is "Blank" | * Default is "Blank" | ||
| + | |||
Filter by Payer: | Filter by Payer: | ||
| + | |||
*This option will only show the selected payer if payer selected is not patient. If patient is selected a second option "None (Shows all claims)" will become available. | *This option will only show the selected payer if payer selected is not patient. If patient is selected a second option "None (Shows all claims)" will become available. | ||
* If "None (Shows all claims)" it will show claims from all payers that other filtering options allow. | * If "None (Shows all claims)" it will show claims from all payers that other filtering options allow. | ||
* Default is current selected payer only | * Default is current selected payer only | ||
| − | * Show All | + | * Show All or Open Claims |
| − | * "Open Claims" will show only claims that have a | + | * "Open Claims" will show only claims that have a balance that other filtering options allow. |
* "All" will show all claims for patient that other filtering options allow. | * "All" will show all claims for patient that other filtering options allow. | ||
* Default is "Open Claims" | * Default is "Open Claims" | ||
| + | |||
'''NOTE''' - All Filtering options and selected payers can be combined with each other to filter Claims/Pre-payments. | '''NOTE''' - All Filtering options and selected payers can be combined with each other to filter Claims/Pre-payments. | ||
| − | PAYMENT OPTIONS | + | '''PAYMENT OPTIONS''' |
There are two different payment forms. | There are two different payment forms. | ||
* If "patient" is payer selected payments form should only have (Payment Type, Check Date, Check Number, Amount). | * If "patient" is payer selected payments form should only have (Payment Type, Check Date, Check Number, Amount). | ||
| − | ** This form also allows for multiple | + | ** This form also allows for multiple payments at a single time. With a click of the "+" icon to right of first payment row. |
* If anyone other than patient is selected a different form will show with the same inputs as above but will also add a Write Off and Interest input | * If anyone other than patient is selected a different form will show with the same inputs as above but will also add a Write Off and Interest input | ||
** Write Off and Interest will have a validate on save that will require total remaining of both is 0.00 (Just like "Batch Payment" entry) | ** Write Off and Interest will have a validate on save that will require total remaining of both is 0.00 (Just like "Batch Payment" entry) | ||
| − | |||
| − | * If Prepayments exists they will show up | + | '''PRE-PAYMENTS/Unapplied Payments''' |
| + | |||
| + | * If Prepayments exists, they will show up Pay Account. | ||
* User may select more than one prepayment to apply. (Just like pre-payment apply) | * User may select more than one prepayment to apply. (Just like pre-payment apply) | ||
* User do not have to use all prepayments selected, but they can't use more than selected. | * User do not have to use all prepayments selected, but they can't use more than selected. | ||
| − | APPLY TO ALL/WRITE-OFF REMAINING | + | |
| − | * Two buttons Apply to all & Write-off Remaining will show if selected payer is patient | + | |
| − | + | '''APPLY TO ALL/WRITE-OFF REMAINING''' | |
| − | + | ||
| − | + | * Two buttons: Apply to all & Write-off Remaining will show if selected payer is patient. | |
| − | + | '''Apply To All will pay claims with payment(s) and Prepayments selected.''' | |
| − | + | ||
| − | + | It will work as follows: | |
| − | + | ||
| − | + | 1. Will make a pass over claims writing pre-payments to claims only up to Patient Responsible if no Patient Responsible then Copay, claim and prepayment must match provider and location<br> | |
| − | + | 2. Will make a second pass to write off remaining pre-payment that match a provider and location.<br> | |
| − | DEFAULT ADJUSTMENT TYPE | + | 3. New payments will not be added to claims paying up to line bal until money is out.<br> |
| − | + | 4. If money is still available on selected prepayments and claims still have a balance, the user will be asked if they wish to transfer pre-payment to new location/provider. If yes, pre-payments will be added.<br> | |
| − | APPLY PAYMENT TO CLAIM | + | |
| − | + | ||
| − | + | "'Write-off Remaining"' | |
| − | + | ||
| − | + | If selected, it will write off up to line balance on each claims loaded. | |
| − | + | * It will not overwrite user imputed adjustment amount. | |
| − | + | ||
| − | + | ||
| − | + | '''DEFAULT ADJUSTMENT TYPE''' | |
| − | + | ||
| − | + | ||
| − | + | * This selection will change the default adjustment type for all claims on page. | |
| − | + | ||
| − | + | ||
| − | + | '''APPLY PAYMENT TO CLAIM''' | |
| − | + | ||
| − | + | * This section will show all claims that meet filtering options | |
| − | + | * Green area indicates beginning of claims and show claim level information such as Provider, Location, Payer, Co-pay, Deductible, Age etc. | |
| − | + | * Gray area indicates the claim lines and will hold information about that line such as line number, diagnosis, procedure, service date, charges. | |
| − | + | * Blue arrows | |
| − | + | ** Next to payment amount will move line balance remaining over to payment input, not to exceed payments amount added above. | |
| − | + | ** Next to Adjustment will move line balance remaining over to payment input. | |
| − | + | * Adjustments allows for multiple adjustments with different codes. | |
| − | + | * Line level Reason Codes | |
| − | + | ** These are for reporting reason only and do not affect the claims balance. | |
| − | + | ** Multiple remittance advice reason codes may be added per service line. | |
| − | + | * Type select is a quick way of selecting common Reason Codes Like PR1, PR2, PR3. However you are not limited to just those codes. | |
| − | + | ||
| − | + | * Search Button | |
| − | + | ** On click, it will display a reason code select dialog. | |
| − | BUTTON BAR | + | ** You can search for codes by code, description,type, Record Id, Group, and Deleted. |
| − | + | ** Pencil Icon will let you edit code. | |
| − | + | ** Clicking on a row will select row and fill in input back on line selected where Search Button was clicked. | |
| − | + | ** If invalid Reason Code is typed in Remit Code box, the same dialog box and function that appear for clicked Search Button. | |
| − | + | ** Claim Totals provides a sum from category in input area for the whole claim. | |
| − | + | ** Adjustment Credit and Debit, breaks out Adjustments totals by type Credit or Debit. | |
| − | + | ||
| − | + | ||
| − | + | '''Add Claim Level Reason Codes'''<br> | |
| − | + | ||
| − | + | * Acts just like Line level reason codes from above. | |
| − | + | * Claim level codes are also just for reporting. Please note all reason codes can be viewed after save in Claim Information screen under Messages tab. | |
| − | + | ||
| − | + | ||
| − | + | '''Transfer To'''<br> | |
| − | + | ||
| − | + | * "Transfer to" Is a list of current payers in this claim's sequence. | |
| − | + | * "Yes" Claim will transfer to the selected payer after the batch has been finalized. | |
| − | + | * "Yes, marked as filed" Claim will be marked as filed when transferred. | |
| − | + | * "No" Claim will stay with current payer. | |
| − | + | ||
| − | + | ||
| − | + | '''BUTTON BAR'''<br> | |
| − | + | ||
| − | + | * Save | |
| − | + | * Validations(Error Dialog) Here are possible error messages before payments are saved. | |
| − | + | ** No changes have been made. | |
| − | + | ** This will only show if user clicks save but never made any changes like applying a payment or adjustment, or entering a payment. | |
| − | + | ** Remaining interest amount must be $0.00. | |
| − | + | ** Checks to see if typed in interest from payment field balances to 0.00 with amounts applied to claims | |
| − | + | ** Remaining Write-off amount must be $0.00. | |
| − | + | ** Checks to see if typed in Write-off from payment field balances to 0.00 with amounts applied to claims | |
| − | + | ** You are using more than Pre-Payment available. | |
| + | ** If user has $20 in prepayment selected and tries to use $30 this message will occur. | ||
| + | *** You are using more than payment available. | ||
| + | ** If user has $20 in payments and tries to use $30, this message will occur. | ||
| + | *** Check number and check date are required when payment type is check. | ||
| + | ** If the user selects check as the payment type and does not add a check number or check date this message will occur. | ||
| + | *** Please select a payment type for your payment. | ||
| + | *** If the user adds a payment amount but does not have a payment type selected. | ||
| + | |||
| + | |||
| + | '''Confirmation messages'''<br> | ||
| + | |||
| + | * Continuing will cause money to be transferred between different Providers and/or Locations. Do you wish to continue? | ||
| + | * his confirmation will show if a pre-payment transfer will occur in order to post prepayment like use wishes | ||
| + | * This payer does not have an active policy with this patient. Do you wish to continue? | ||
| + | * If payer selected does not have a policy with this patient this message will occur to make sure user is aware. | ||
| + | * Save over-payment amount as pre-payment? | ||
| + | * If there is a payment that was added but did not get fully used to pay a claim the user will be asked to save the remaining amount as a new pre-payment. | ||
| + | * The dialog will ask for location and physician and allow user to add note. | ||
| + | |||
| + | Once all is cleared (No errors, confirmations made), payments will be posted. | ||
| + | |||
| + | * A confirmation message of "Payments have been saved successfully." will be displayed in green box when payments are saved. | ||
| + | * On selection of Close, it will bring the user back to Patient Ledger. | ||
| + | * Save & Receipt | ||
| + | ** Does same as above, but after save will bring a dialog to allow user to print receipt just like the "Receipt Button" does on the Patient Dashboard. | ||
| + | |||
| + | |||
| + | '''Guarantor View/Patient View'''<br> | ||
| + | |||
| + | * Button will only show up if patient has or is a guarantor. | ||
| + | * Button will toggle what view will show. | ||
| + | |||
| + | |||
| + | |||
| + | If you need any assistance, please call your DuxWare Support Team at 1-800-248-4298. | ||
| + | |||
| + | [[DuxWare Release Note - 01/19/2020|Previous Release Note - 01/19/2020]] | ||
Latest revision as of 19:15, 7 April 2020
Prepayment Apply is now Pay Account with a host of added features.
The old way with Pre-Payment Apply only allowed posting of money to a patient’s account from payment type entity: Patient. With the new way under “Pay Account”, you have the ability to post payments from multiple payment sources from a single screen. For Example, for those of you who receive payments from Worker’s Comp, Attorneys, or Occupational Medicine, you can quickly pay out an entire account and also quickly write-off remaining balances in one swoop.
Accessing “Pay Account”:
- Visit menu Patient Dashboard
- Click Search
- Click Any Patient Row
- Click Ledger (Patient or Guarantor)
- Click Pay Account (Bottom row of buttons)
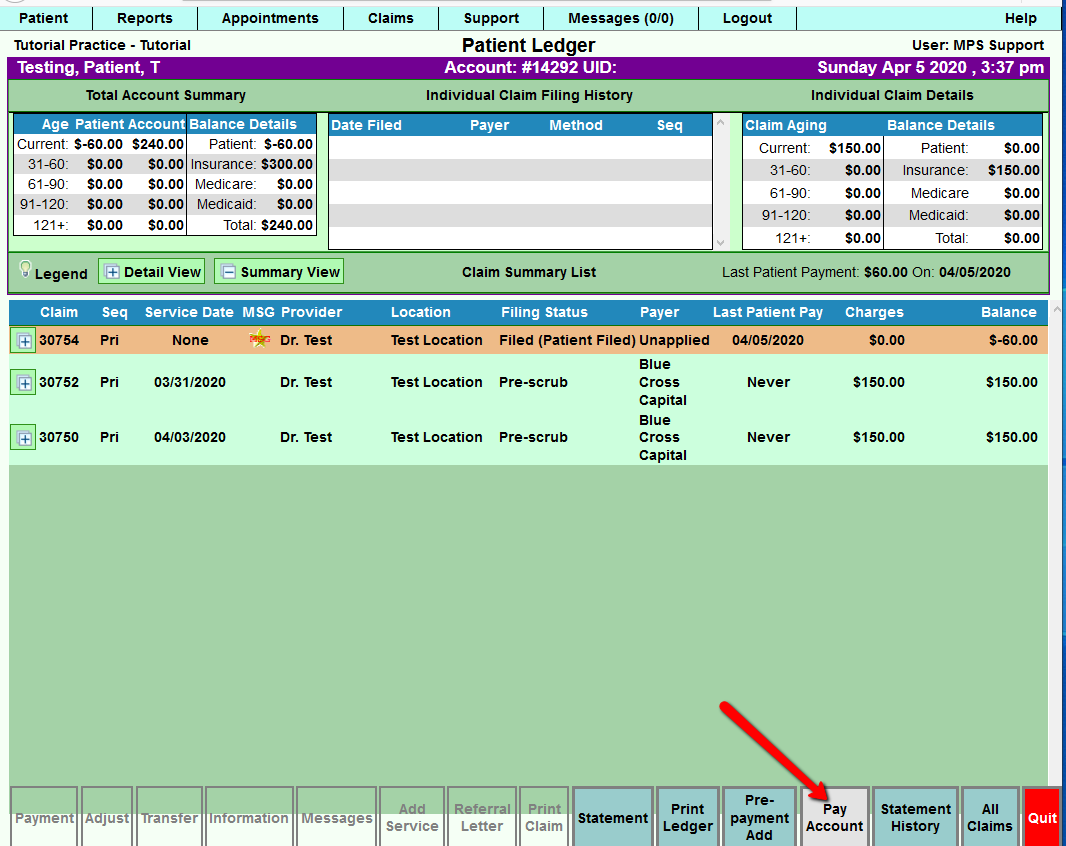
Select the Pay Account button from the bottom of the Patient’s Ledger, and let’s get started!
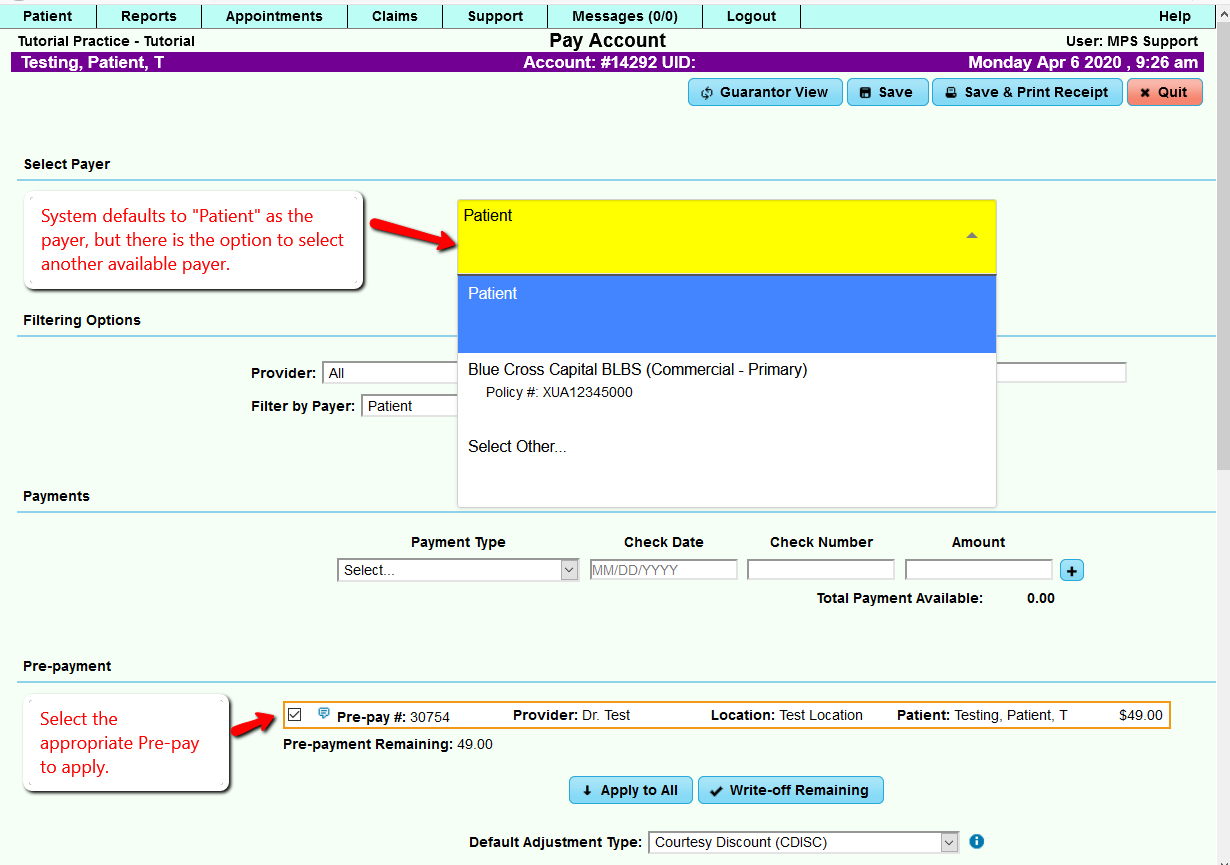
In this example, you see that we have $60.00 in Prepayments to apply to open claims. Once you select "Pay Account", you will see the following screen:
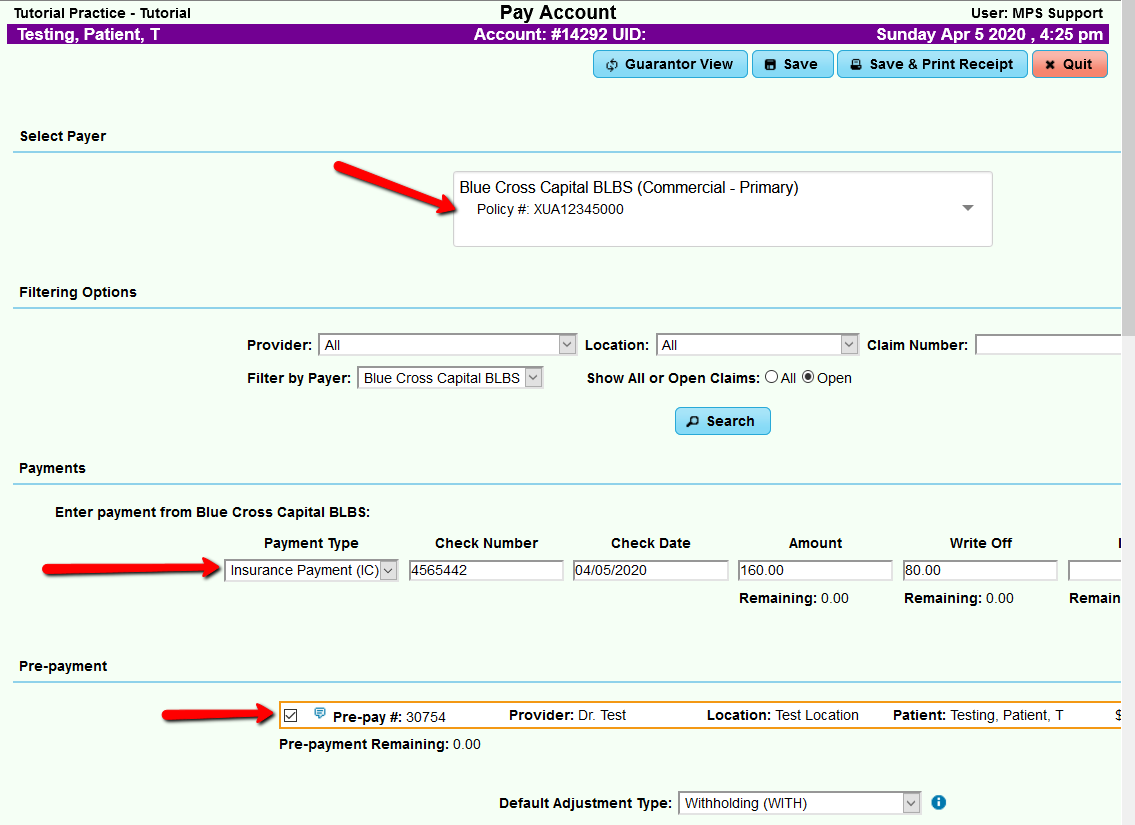
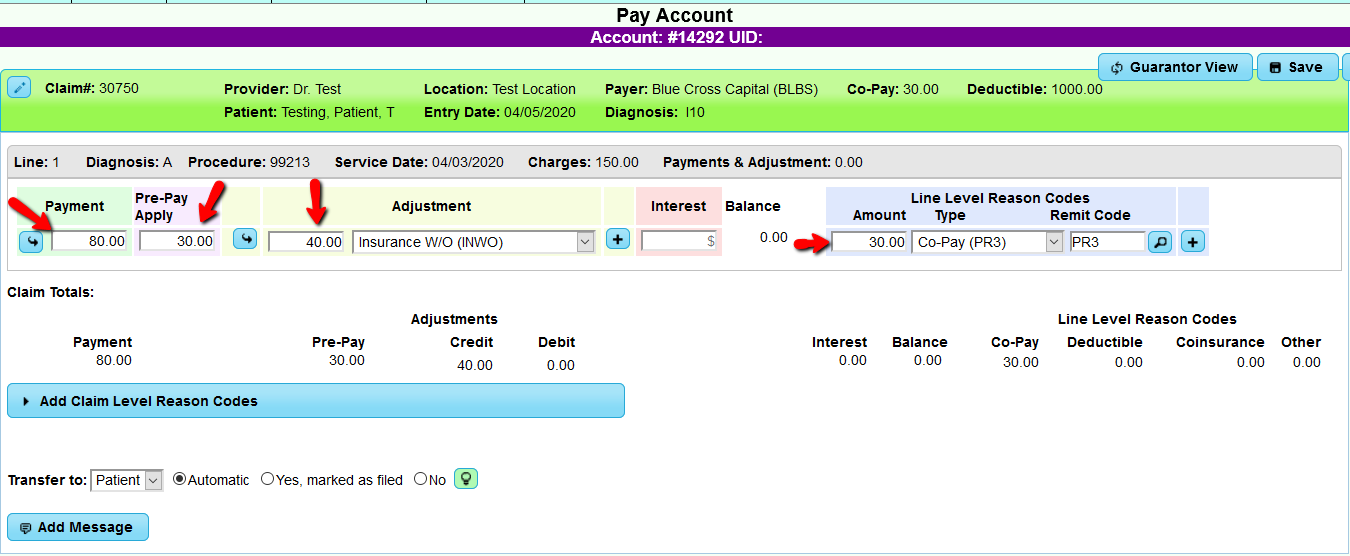
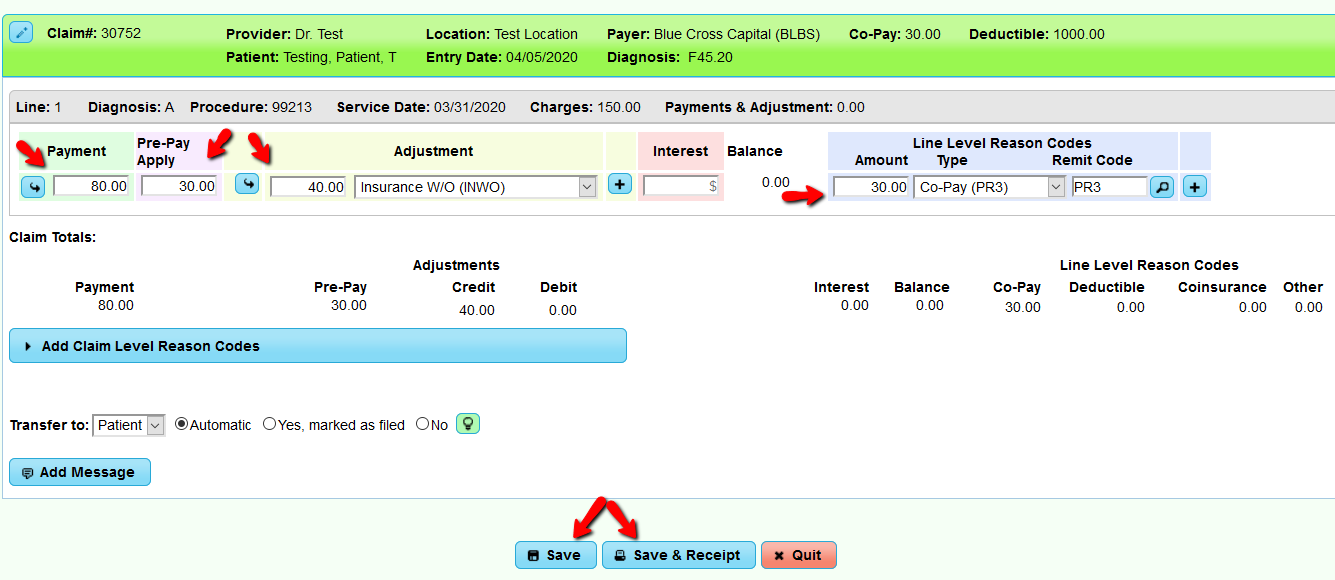
The following example is posting a combination of an insurance payment and applying unapplied payments:
SELECT PAYER
- Select payer allows user to select payers (that they have a policy for) or patient
- Based on selection claims will be loaded that match the payer.
- Users may "Select Other" and will bring up selector for payers.
- Select Other Dialog
- User may search for payers in the system.
- Filtering options are available such as Name, Code, ID, Address, City, State, Payer ID, Group, Type and Show Deleted.
- On click of payers name(Click of row) claims will appear by that payer if available.
- If a payer does not have a policy with patient an error message (Warning: Patient does not have a policy with this payer.) will display
FILTERING OPTIONS
Filter by Provider:
- Will filter claims and pre-payments by provider
- Default is "All"
Filter by Location:
- Will filter claims and pre-payments by location
- Default is "All"
- Claim Number
- Will only show claim that's typed if other filtering options allow, this only allows for one claim number.
- Default is "Blank"
Filter by Payer:
- This option will only show the selected payer if payer selected is not patient. If patient is selected a second option "None (Shows all claims)" will become available.
- If "None (Shows all claims)" it will show claims from all payers that other filtering options allow.
- Default is current selected payer only
- Show All or Open Claims
- "Open Claims" will show only claims that have a balance that other filtering options allow.
- "All" will show all claims for patient that other filtering options allow.
- Default is "Open Claims"
NOTE - All Filtering options and selected payers can be combined with each other to filter Claims/Pre-payments.
PAYMENT OPTIONS
There are two different payment forms.
- If "patient" is payer selected payments form should only have (Payment Type, Check Date, Check Number, Amount).
- This form also allows for multiple payments at a single time. With a click of the "+" icon to right of first payment row.
- If anyone other than patient is selected a different form will show with the same inputs as above but will also add a Write Off and Interest input
- Write Off and Interest will have a validate on save that will require total remaining of both is 0.00 (Just like "Batch Payment" entry)
PRE-PAYMENTS/Unapplied Payments
- If Prepayments exists, they will show up Pay Account.
- User may select more than one prepayment to apply. (Just like pre-payment apply)
- User do not have to use all prepayments selected, but they can't use more than selected.
APPLY TO ALL/WRITE-OFF REMAINING
- Two buttons: Apply to all & Write-off Remaining will show if selected payer is patient.
Apply To All will pay claims with payment(s) and Prepayments selected.
It will work as follows:
1. Will make a pass over claims writing pre-payments to claims only up to Patient Responsible if no Patient Responsible then Copay, claim and prepayment must match provider and location
2. Will make a second pass to write off remaining pre-payment that match a provider and location.
3. New payments will not be added to claims paying up to line bal until money is out.
4. If money is still available on selected prepayments and claims still have a balance, the user will be asked if they wish to transfer pre-payment to new location/provider. If yes, pre-payments will be added.
"'Write-off Remaining"'
If selected, it will write off up to line balance on each claims loaded.
- It will not overwrite user imputed adjustment amount.
DEFAULT ADJUSTMENT TYPE
- This selection will change the default adjustment type for all claims on page.
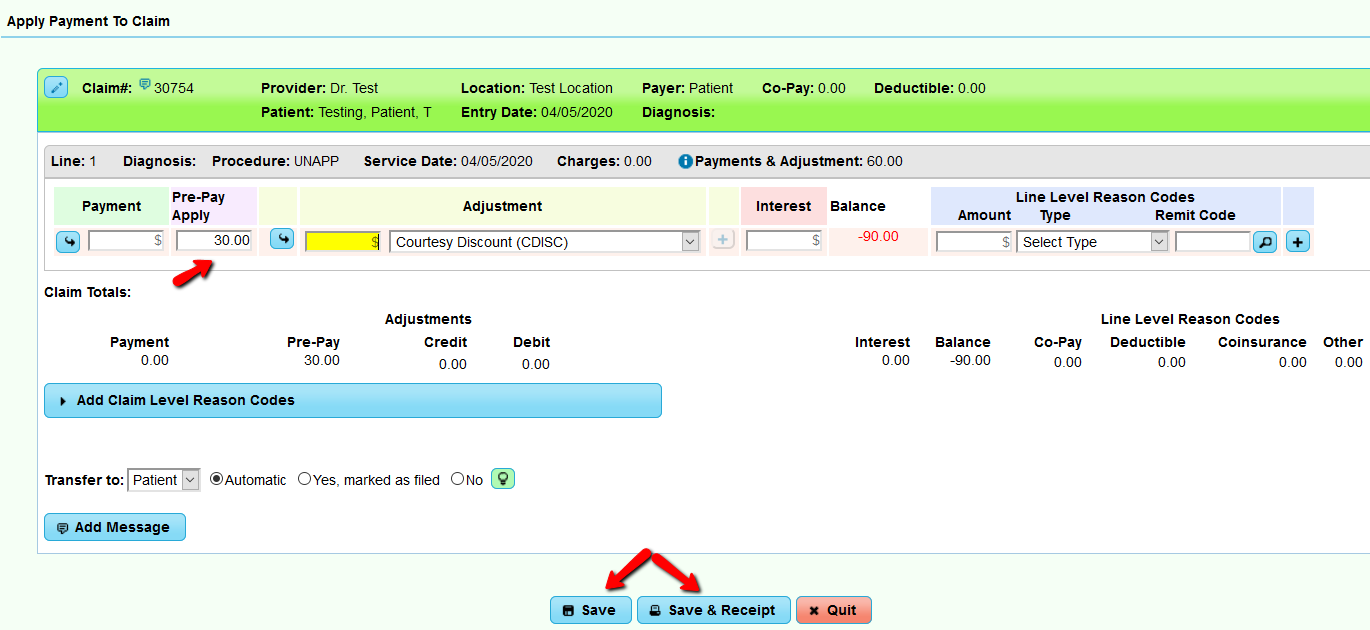
APPLY PAYMENT TO CLAIM
- This section will show all claims that meet filtering options
- Green area indicates beginning of claims and show claim level information such as Provider, Location, Payer, Co-pay, Deductible, Age etc.
- Gray area indicates the claim lines and will hold information about that line such as line number, diagnosis, procedure, service date, charges.
- Blue arrows
- Next to payment amount will move line balance remaining over to payment input, not to exceed payments amount added above.
- Next to Adjustment will move line balance remaining over to payment input.
- Adjustments allows for multiple adjustments with different codes.
- Line level Reason Codes
- These are for reporting reason only and do not affect the claims balance.
- Multiple remittance advice reason codes may be added per service line.
- Type select is a quick way of selecting common Reason Codes Like PR1, PR2, PR3. However you are not limited to just those codes.
- Search Button
- On click, it will display a reason code select dialog.
- You can search for codes by code, description,type, Record Id, Group, and Deleted.
- Pencil Icon will let you edit code.
- Clicking on a row will select row and fill in input back on line selected where Search Button was clicked.
- If invalid Reason Code is typed in Remit Code box, the same dialog box and function that appear for clicked Search Button.
- Claim Totals provides a sum from category in input area for the whole claim.
- Adjustment Credit and Debit, breaks out Adjustments totals by type Credit or Debit.
Add Claim Level Reason Codes
- Acts just like Line level reason codes from above.
- Claim level codes are also just for reporting. Please note all reason codes can be viewed after save in Claim Information screen under Messages tab.
Transfer To
- "Transfer to" Is a list of current payers in this claim's sequence.
- "Yes" Claim will transfer to the selected payer after the batch has been finalized.
- "Yes, marked as filed" Claim will be marked as filed when transferred.
- "No" Claim will stay with current payer.
BUTTON BAR
- Save
- Validations(Error Dialog) Here are possible error messages before payments are saved.
- No changes have been made.
- This will only show if user clicks save but never made any changes like applying a payment or adjustment, or entering a payment.
- Remaining interest amount must be $0.00.
- Checks to see if typed in interest from payment field balances to 0.00 with amounts applied to claims
- Remaining Write-off amount must be $0.00.
- Checks to see if typed in Write-off from payment field balances to 0.00 with amounts applied to claims
- You are using more than Pre-Payment available.
- If user has $20 in prepayment selected and tries to use $30 this message will occur.
- You are using more than payment available.
- If user has $20 in payments and tries to use $30, this message will occur.
- Check number and check date are required when payment type is check.
- If the user selects check as the payment type and does not add a check number or check date this message will occur.
- Please select a payment type for your payment.
- If the user adds a payment amount but does not have a payment type selected.
Confirmation messages
- Continuing will cause money to be transferred between different Providers and/or Locations. Do you wish to continue?
- his confirmation will show if a pre-payment transfer will occur in order to post prepayment like use wishes
- This payer does not have an active policy with this patient. Do you wish to continue?
- If payer selected does not have a policy with this patient this message will occur to make sure user is aware.
- Save over-payment amount as pre-payment?
- If there is a payment that was added but did not get fully used to pay a claim the user will be asked to save the remaining amount as a new pre-payment.
- The dialog will ask for location and physician and allow user to add note.
Once all is cleared (No errors, confirmations made), payments will be posted.
- A confirmation message of "Payments have been saved successfully." will be displayed in green box when payments are saved.
- On selection of Close, it will bring the user back to Patient Ledger.
- Save & Receipt
- Does same as above, but after save will bring a dialog to allow user to print receipt just like the "Receipt Button" does on the Patient Dashboard.
Guarantor View/Patient View
- Button will only show up if patient has or is a guarantor.
- Button will toggle what view will show.
If you need any assistance, please call your DuxWare Support Team at 1-800-248-4298.
