Difference between revisions of "DuxWare Release Note - 12/20/2015"
| (3 intermediate revisions by the same user not shown) | |||
| Line 10: | Line 10: | ||
[[File:Payerseparator.png]] | [[File:Payerseparator.png]] | ||
| − | |||
| − | |||
| − | |||
| − | |||
| Line 32: | Line 28: | ||
* Schedule setups can now be copied. For example, if you add a provider to your practice, and the schedule is basically the same, you can now copy an existing schedule to a new template. | * Schedule setups can now be copied. For example, if you add a provider to your practice, and the schedule is basically the same, you can now copy an existing schedule to a new template. | ||
| − | If you are not familiar with this area of your Practice Management System software, please call | + | To access the Schedule Setup: Appointments tab>Schedule Setup>Schedule Setup. You will notice a new look and some added functionality. From this area, you can build a new default or weekly schedule or edit existing schedules. |
| + | |||
| + | * Default column - select the icon to load an existing schedule | ||
| + | * Weekly column - select the plus icon to add a weekly template schedule to the default schedule | ||
| + | * Multi-slot rules column - select the icon to edit the rules for overbooking | ||
| + | |||
| + | If you are not familiar with this area of your Practice Management System software, please call or email your PM Support Team, and we will be glad to give you a short tutorial. | ||
| + | |||
| + | |||
| + | '''Occupational Medicine Statements Setup Options:'''<br> | ||
| + | |||
| + | To access the Statement setup: Support>Management>Statement Setup. | ||
| + | |||
| + | There are two additional items added to the Statement Setup to accommodate Occupational Medicine Statements: | ||
| + | |||
| + | [[File:Occmedstatement.png]] | ||
| + | '''4 Line Statement Address: __Yes __No'''<br> | ||
| + | Normally: No. | ||
| + | If there are 2 lines in the address, then place them on separate lines. | ||
| + | This may cause 4 lines to appear in the address window. | ||
| + | If Yes is selected, it is recommended to: | ||
| + | Set - Patient Address: Font to 8 | ||
| + | Set - Patient Address: Line Height to 4 | ||
| − | ''' | + | '''Mask Provider Information: __Yes __No'''<br> |
| + | Normally: No. | ||
| + | If you need to mask Group, Provider, and Diagnosis Codes. This is normally for OccMed statements. | ||
Latest revision as of 19:27, 18 December 2015
Claims Filing:
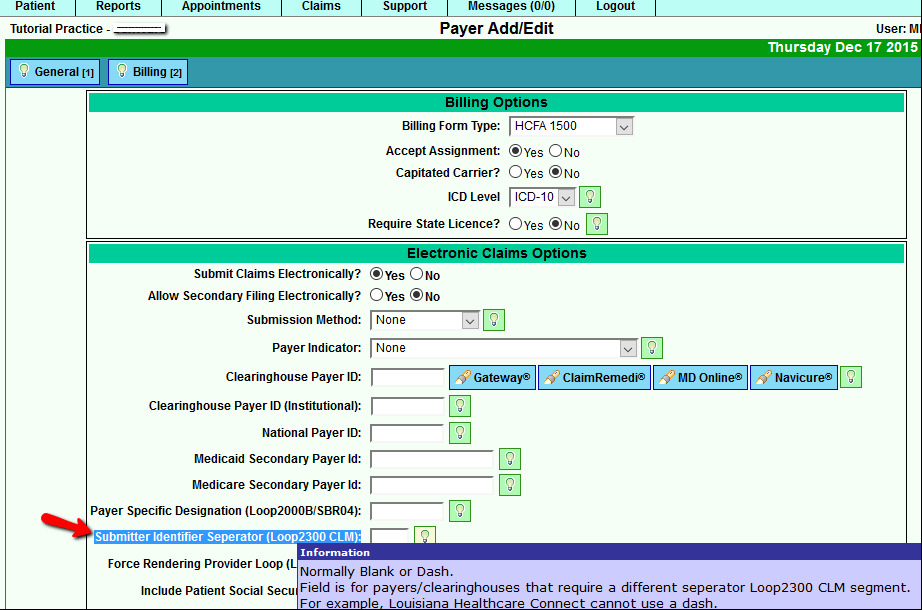
There are a very limited number of payers/insurance carriers that are rejecting electronic claims due to the formatting of our claim number that includes a dash "-". To accommodate payers who require only alphanumeric characters, an additional option has been added in the Payer Setup. If you receive a clearinghouse rejection such as: "**Warning** Patient account number must be < or = 20 alpha numeric characters (no spaces), invalid field value", then you will need to change the value from a "-" to an alphanumeric character such as an "X" or a "5". See illustration below:
Go to the Billing tab and you will find the "Submitter Identifier Separator (Loop2300 CLM):" under the Electronic Claims Options. You can type any alphanumeric character that you wish to replace the dash.
Appointments:
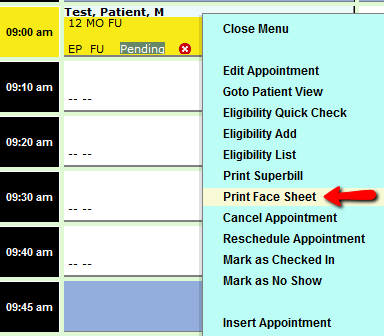
- Print Face Sheets is now an option from the appointment menu. Just right click on the appointment and select, "Print Face Sheet".
Appointment Schedule Setup
For those of you who setup and maintain your own appointment schedules, we have added the following updates:
- User Interface has been updated
- Extended slots and overbooking can now be schedule specific.
- Schedule setups can now be copied. For example, if you add a provider to your practice, and the schedule is basically the same, you can now copy an existing schedule to a new template.
To access the Schedule Setup: Appointments tab>Schedule Setup>Schedule Setup. You will notice a new look and some added functionality. From this area, you can build a new default or weekly schedule or edit existing schedules.
- Default column - select the icon to load an existing schedule
- Weekly column - select the plus icon to add a weekly template schedule to the default schedule
- Multi-slot rules column - select the icon to edit the rules for overbooking
If you are not familiar with this area of your Practice Management System software, please call or email your PM Support Team, and we will be glad to give you a short tutorial.
Occupational Medicine Statements Setup Options:
To access the Statement setup: Support>Management>Statement Setup.
There are two additional items added to the Statement Setup to accommodate Occupational Medicine Statements:
4 Line Statement Address: __Yes __No
Normally: No.
If there are 2 lines in the address, then place them on separate lines.
This may cause 4 lines to appear in the address window.
If Yes is selected, it is recommended to:
Set - Patient Address: Font to 8
Set - Patient Address: Line Height to 4
Mask Provider Information: __Yes __No
Normally: No.
If you need to mask Group, Provider, and Diagnosis Codes. This is normally for OccMed statements.


