Difference between revisions of "DuxWare Release Note - 05/12/2019"
(Created page with " Previous Release Note - 04/07/2019") |
|||
| (6 intermediate revisions by the same user not shown) | |||
| Line 1: | Line 1: | ||
| + | ===Reports=== | ||
| + | Reports>Patient>Patient Demographics: This report has been updated to perform an '''Authorization Related Search'''. | ||
| + | Search by: | ||
| + | * Single Payer/Payer Group. | ||
| + | * Date Range | ||
| + | Output Selections: | ||
| + | * Authorization Number | ||
| + | * Authorization Payer | ||
| + | * Authorization Policy Number | ||
| + | * Authorization Begin Date | ||
| + | * Authorization End Date | ||
| + | * Visits Allowed | ||
| + | * Visits Remaining | ||
| + | Example Criteria Selections for Patient>Patient Demographics Report: | ||
| + | [[File:Ptdemoauth1.png]] | ||
| + | This report will export in PDF or CSV (open in Excel) Formats. | ||
| + | PDF output example: | ||
| + | |||
| + | [[File:Ptdemoauth2.png]] | ||
| + | |||
| + | |||
| + | |||
| + | |||
| + | |||
| + | Excel output example: | ||
| + | |||
| + | [[File:Ptdemoauth3.png]] | ||
| + | |||
| + | |||
| + | |||
| + | |||
| + | ===Claims=== | ||
| + | '''Charge Entry:''' | ||
| + | |||
| + | For our clients that file Institutional – CMS 1450 – UB04 Form & 837I Electronic UB: | ||
| + | Value Codes – Value Codes are located under the UB04 fields of Charge Entry , Section 4. | ||
| + | • Value code fields will now support currency amounts to be reported under a value code with two decimal places on the form and per 5010 837I specifications. | ||
| + | |||
| + | |||
| + | ===Appointments=== | ||
| + | Appointments>Printing>Letters/Forms by Appointment. | ||
| + | |||
| + | The ability to print letters and forms by appointment is now available under the Appointments tab under “Printing”. The Letters/Forms will generate the same as Superbills as in they will generate by appointment with each patient’s information header at the top of your created form. | ||
| + | |||
| + | To create a form, go to Support tab>General>Letter/Form Body Setup>Select, "Add + New". | ||
| + | |||
| + | [[File:Orders1.png]] | ||
| + | |||
| + | |||
| + | |||
| + | Letter/Form Type: {Select Orders Form Body} | ||
| + | Description of Form: {Free form name of your form} | ||
| + | Body of the form: Keep in mind that when you are creating your form, you will need to allow space on the printed paper for the Orders Header of which is pre-built for you. | ||
| + | |||
| + | Example Order Body: | ||
| + | |||
| + | |||
| + | [[File:Orders2.png]] | ||
| + | |||
| + | |||
| + | |||
| + | |||
| + | '''How to generate your forms by appointment:''' | ||
| + | |||
| + | Go to Appointments tab>Printing>Letters/Forms by Appointment. | ||
| + | |||
| + | Select your criteria as illustrated below: | ||
| + | Make sure that “Letterhead – Orders” is selected as Letterhead. | ||
| + | Select the form that you would like to print by appointment. | ||
| + | |||
| + | |||
| + | [[File:Orders3.png]] | ||
| + | |||
| + | Output: | ||
| + | |||
| + | [[File:Orders4.png]] | ||
| + | |||
| + | |||
| + | |||
| + | Patient Dashboard: | ||
| + | |||
| + | We have the ability to add an “Orders” button on your Patient Dashboard as well. Please call Customer Support and we will be glad to add the button for you. | ||
| + | |||
| + | ===Patient=== | ||
| + | '''Patient Add/Edit:''' | ||
| + | Gender: Only Level 4 and Level 5 users will have the ability to select “Organization” to add this type of account. | ||
| + | |||
| + | If you have any questions, please do not hesitate to contact your PM Customer Support Team. We are glad to assist you. | ||
[[DuxWare Release Note - 04/07/2019|Previous Release Note - 04/07/2019]] | [[DuxWare Release Note - 04/07/2019|Previous Release Note - 04/07/2019]] | ||
Latest revision as of 21:32, 10 May 2019
Contents
Reports
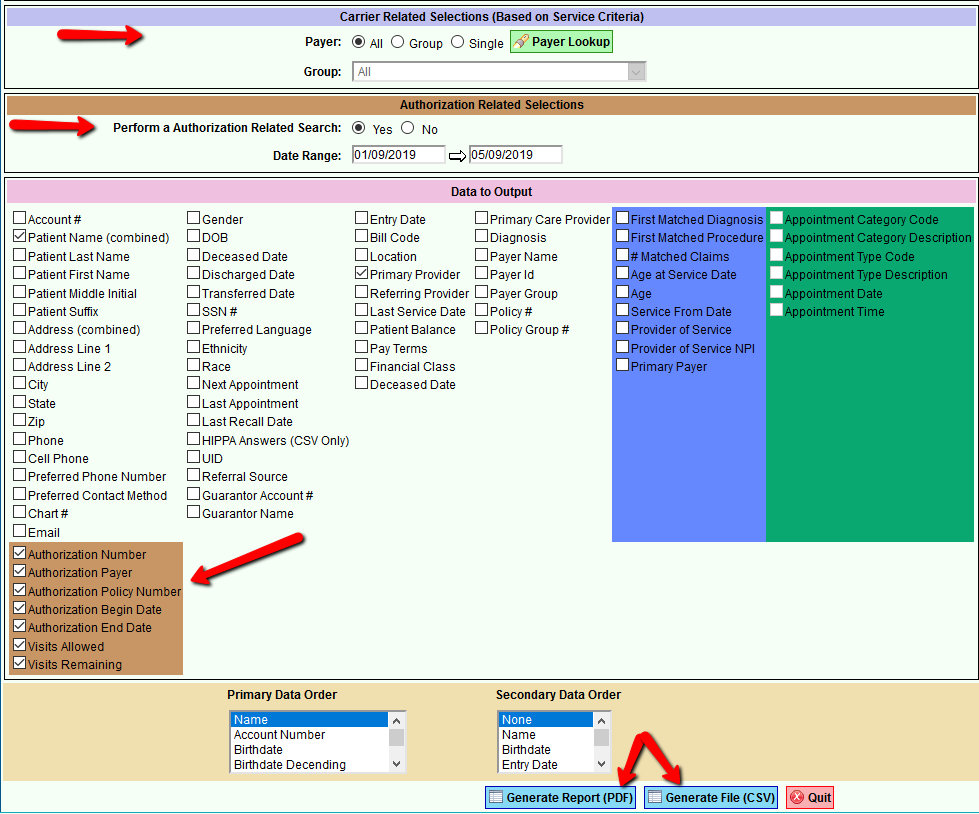
Reports>Patient>Patient Demographics: This report has been updated to perform an Authorization Related Search.
Search by:
- Single Payer/Payer Group.
- Date Range
Output Selections:
- Authorization Number
- Authorization Payer
- Authorization Policy Number
- Authorization Begin Date
- Authorization End Date
- Visits Allowed
- Visits Remaining
Example Criteria Selections for Patient>Patient Demographics Report:
This report will export in PDF or CSV (open in Excel) Formats.
PDF output example:
Excel output example:
Claims
Charge Entry:
For our clients that file Institutional – CMS 1450 – UB04 Form & 837I Electronic UB: Value Codes – Value Codes are located under the UB04 fields of Charge Entry , Section 4. • Value code fields will now support currency amounts to be reported under a value code with two decimal places on the form and per 5010 837I specifications.
Appointments
Appointments>Printing>Letters/Forms by Appointment.
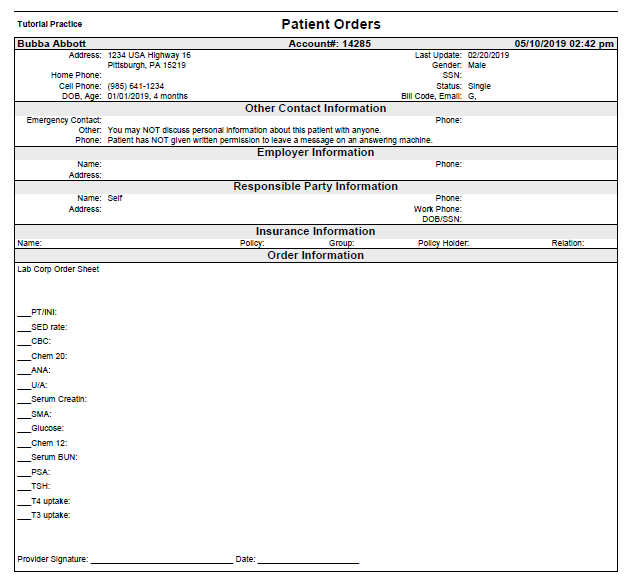
The ability to print letters and forms by appointment is now available under the Appointments tab under “Printing”. The Letters/Forms will generate the same as Superbills as in they will generate by appointment with each patient’s information header at the top of your created form.
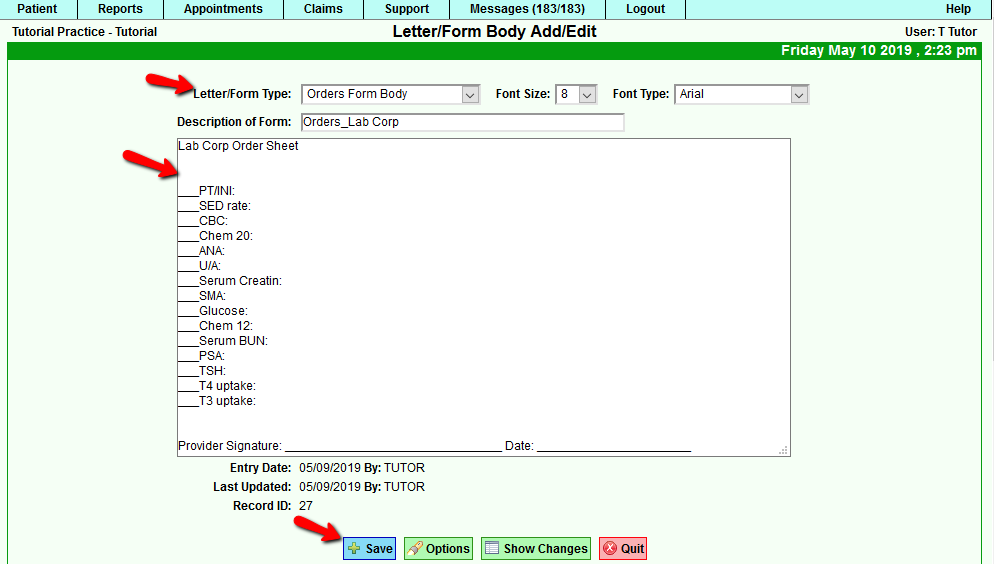
To create a form, go to Support tab>General>Letter/Form Body Setup>Select, "Add + New".
Letter/Form Type: {Select Orders Form Body} Description of Form: {Free form name of your form} Body of the form: Keep in mind that when you are creating your form, you will need to allow space on the printed paper for the Orders Header of which is pre-built for you.
Example Order Body:
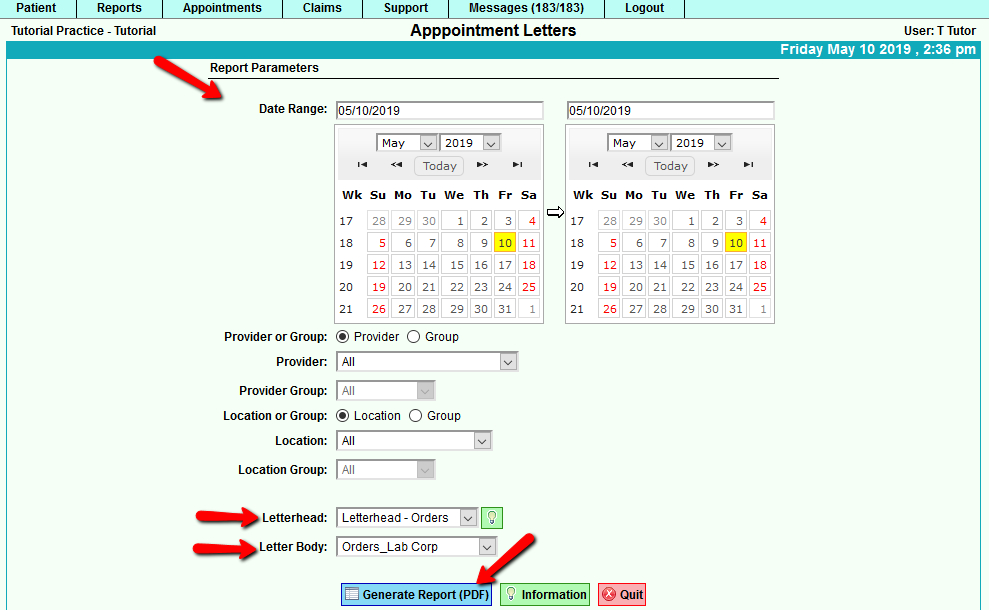
How to generate your forms by appointment:
Go to Appointments tab>Printing>Letters/Forms by Appointment.
Select your criteria as illustrated below: Make sure that “Letterhead – Orders” is selected as Letterhead. Select the form that you would like to print by appointment.
Output:
Patient Dashboard:
We have the ability to add an “Orders” button on your Patient Dashboard as well. Please call Customer Support and we will be glad to add the button for you.
Patient
Patient Add/Edit: Gender: Only Level 4 and Level 5 users will have the ability to select “Organization” to add this type of account.
If you have any questions, please do not hesitate to contact your PM Customer Support Team. We are glad to assist you.


