Statements
Contents
- 1 Collection Manager User Guide
- 1.1 Section One - Statement Default Setup
- 1.2 Section Two - Basic Statement Gathering and Creation
- 1.3 Section Three - Advanced Statements
- 1.4 Section Four- Balance Forward and Statement Re-run
- 1.5 Section Five - Statement Error
- 1.6 Section Six - Multiple Business Entity Setup for Single Print Statements
Collection Manager User Guide
Introduction
The Collection Manager provides the ability to gather Statements, to create Statements and to re-run Statements.
One important new feature in the Collection Manager is that all Statements are gathered into batches,
created into a a PDF printable format or electronic file, and if the user chooses, the option is available to add a
newly gathered batch to an existing batch.
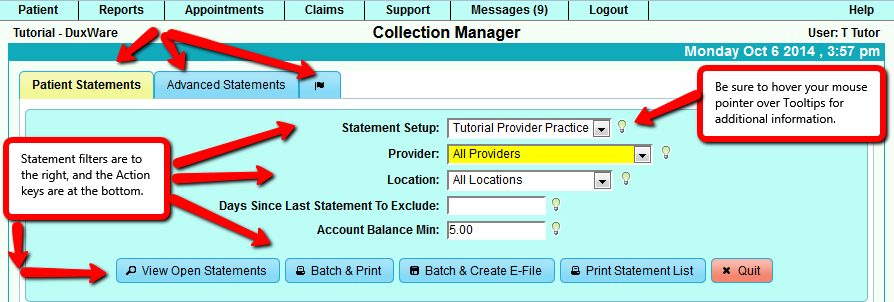
Upon entry into the Collection Manager, There are three tabs at the top left of the screen:
- Patient Statements for basic statement gathering
- Advanced Statements for more versatile manipulation of statement gathering
- Flag Tab to open previous batches
Terminology
- Statement - A collection of one or more claims
- Statement Run - the process of creating one or more statements based on a Statement Batch
- Statement Batch - A group of statements created through the use of the Statement Filters
- Statement Filters - The method by which claims are gathered together so they can be placed into Statement Batches
Section One - Statement Default Setup
Statement Setup provides a set of default options for all patient statements. These options control what information
is shown on printable statements and how to format it. Refer to the Statement Setup for details.
Section Two - Basic Statement Gathering and Creation
1. Accessing the Collection Manager and initial viewing.
Reports>Collections>Collection Manager
2. Gathering Statements
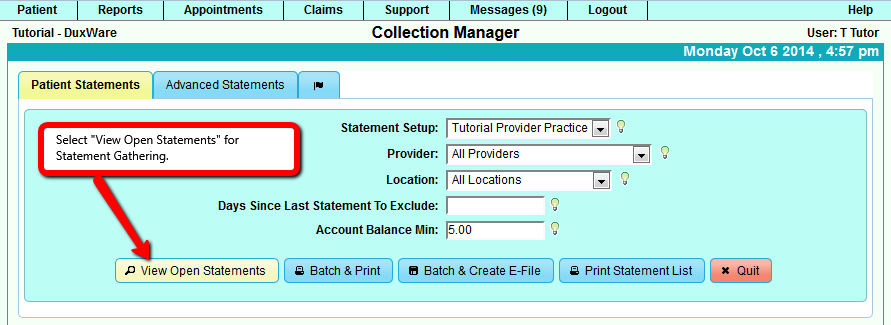
Statements can be gathered by selecting "View Open Statements" button. The result will be filtered by the filtered options that
are listed in the Action buttons.
NOTE: All of the other filter options associated with a Statement Setup, but not displayed here, also affect the Statement
gathering result. For example, if the Statement Setup has the Payer type set to "Medicare", the gathering will only be looking for
claims that are currently on file to Medicare.
3. Creating A Statement Batch
3.1 Select Statements that need to be included in a Batch
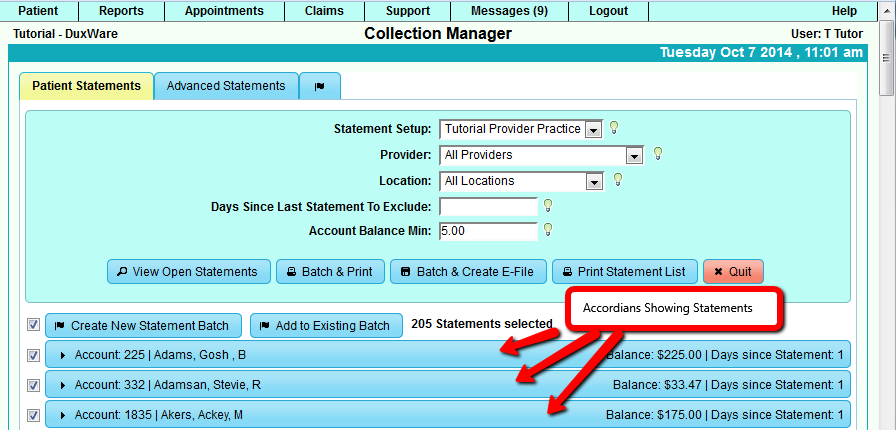
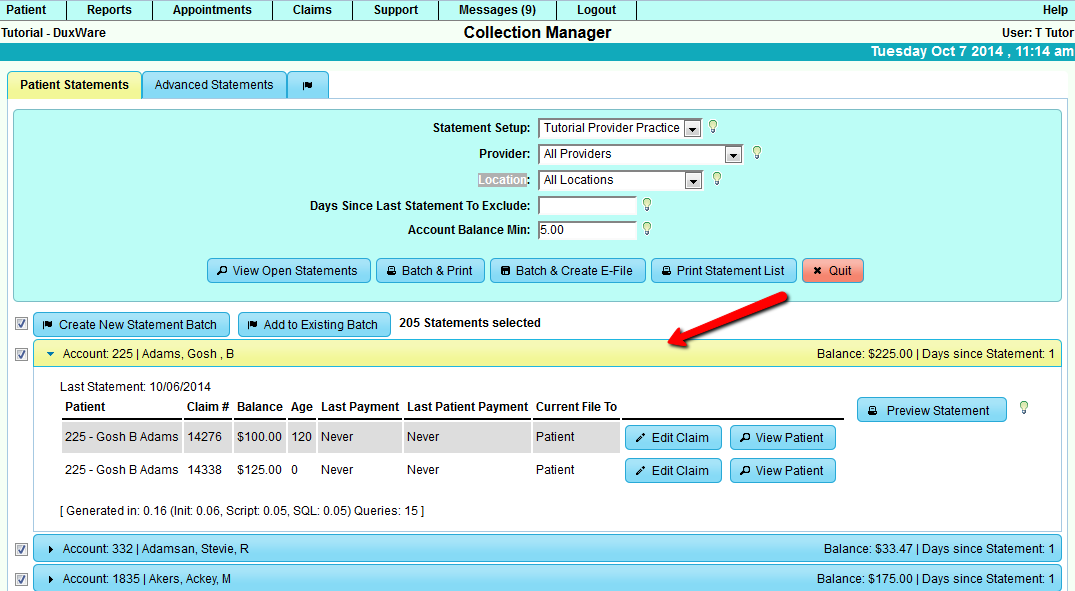
If the gathering process finds any Statements, they will be displayed in the "accordions" which can be in expanded view or
collapsed view showing the summary of Statements.
Select an Accordion to view Statement Summary, Edit a claim, View Patient, or Preview a Statement. You can Preview a Statement
without adding the preview and print to Statement History.
3.2 Add selected statements to a Batch
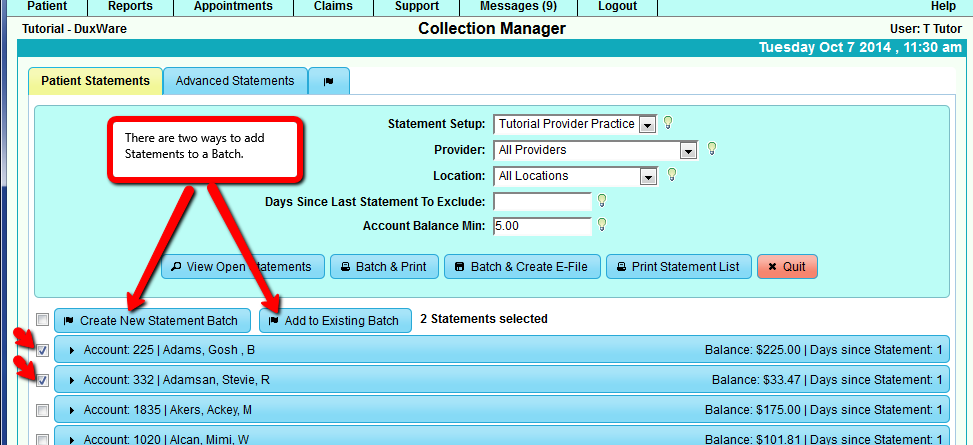
There are two ways to add Statement to Batches:
- Create a New Statement Batch
- Add to Existing Batch
3.3 Choose Statement Batch actions at the time of creating the Batch.
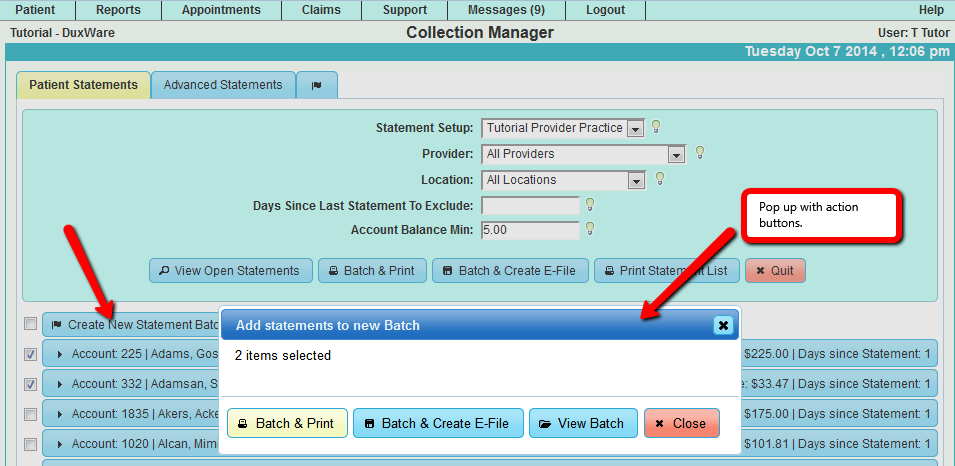
At the time of creating a Statement Batch or adding Statements to an existing Batch, a dialog pops up to ask what is the desired
action after the Batch is created.
View Batch - opens a new tab and shows all Statements in that Batch.
Print Statement Batch - opens a new tab and shows all Statements in that Batch and creates PDF Statements, also creates
Statement History and Filing History.
Create Electronic File Batch - opens a new tab and shows all Statements in that Batch and creates an Electronic Statement File
with a prompt for the user to Download the file. This action also creates statement and filing history in the respective accounts.
3.4 Creating Statements in View Batch
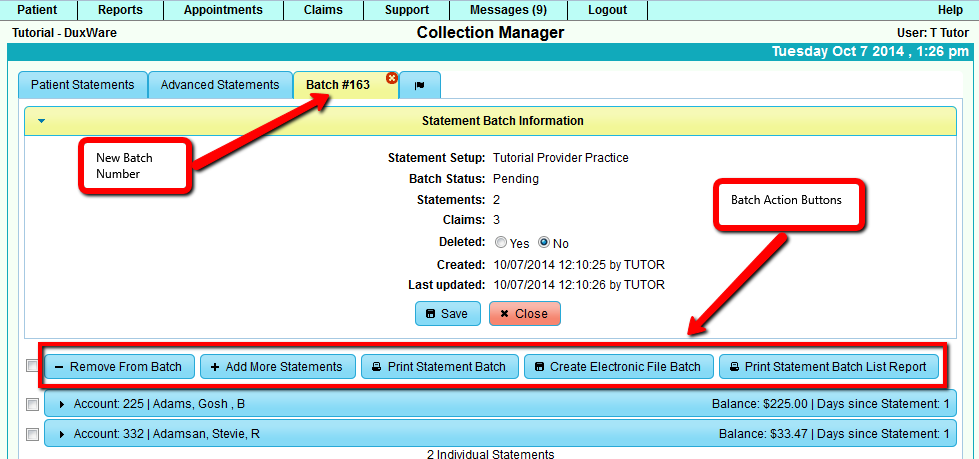
In addition to the same action buttons described in 3.3, more action buttons are available in the Batch tab view.
Remove From Batch - remove selected Statements from the current Batch. Note: when a Statement Batch has been run,
this button will no longer be available.
Add More Statements - a prompt to open the Advanced Statements tab to gather more statements and add to the current Batch.
Note: when a Statement Batch has been run , this button will no longer be available.
Print Statement Batch - creates PDF to print statements in the batch.
Create electronic file Batch- creates electronic statement file.
Print Statement List Report - Creates a PDF report listing a summary of each account with aging.
3.5 Delete a Statement Batch
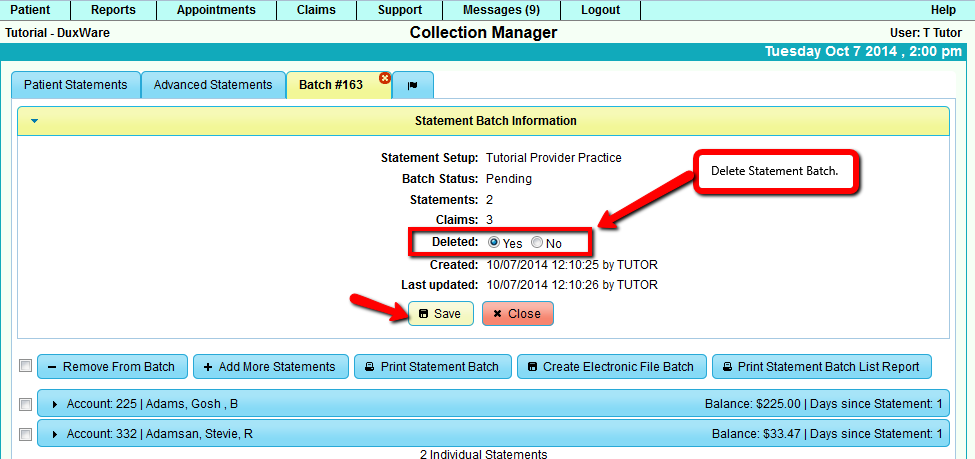
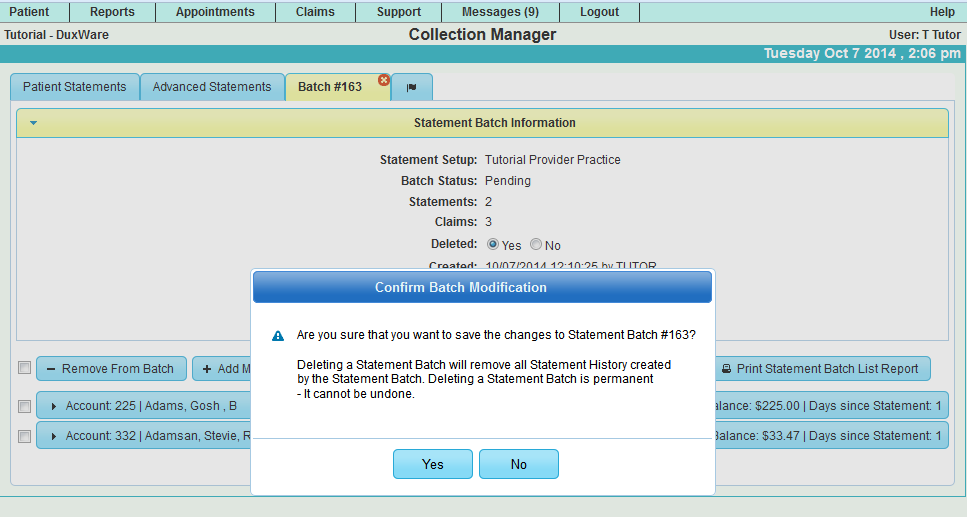
A Statement Batch can be set as "deleted" by setting the "deleted" option to "Yes" and selecting [Save].
Note: Deleting a Statement Batch will also delete all Statement History and Filing History created by the
Batch that has been deleted. The user will also NOT be able to undo the Delete.
The User will see a Pop-up that will ask to Confirm Batch Modification. Select "Yes" to proceed with deleting the batch
or "No" to cancel the delete.
3.6 Open a Statement Batch
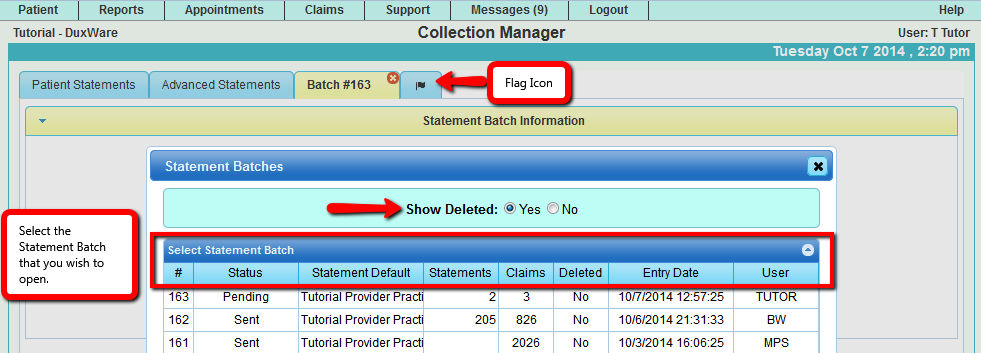
By selecting the "flag icon", the Statement Batch Dialog will pop up and show all Statement Batches that have been created.
Deleted Statement Batches can be found by enabling "Show Deleted" in the Batch list dialog.
Section Three - Advanced Statements
"Advanced Statements" Tab is is basically just a "Patient Statements" tab with additional filtering options.
By specifying these filter values, Statements can be targeted more specifically to Patients, Payers, Locations,
or by type of services.
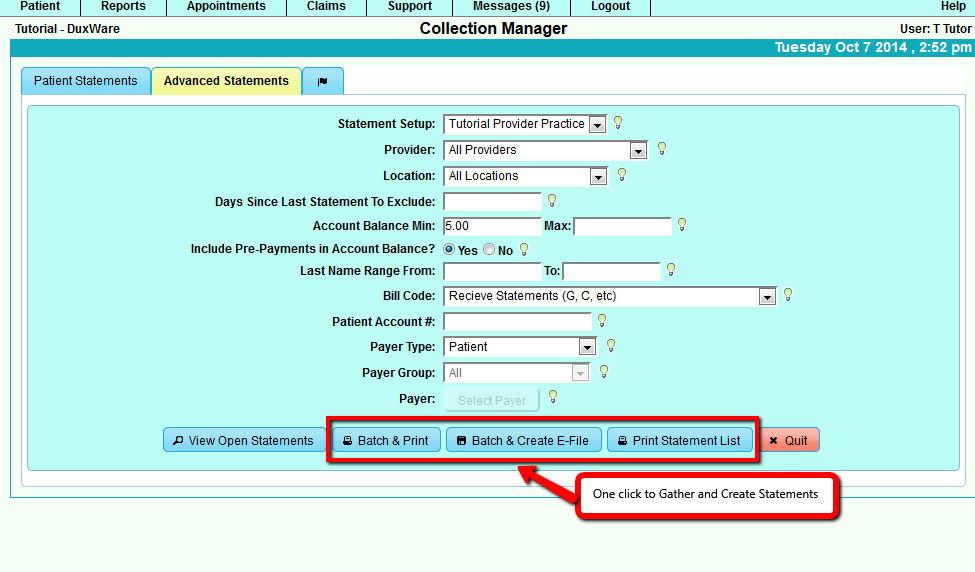
1. One Button Click to Gather and Print Statement Batch
There are times when a practice just wants to generate all Statements that are available without going through the
gathering [View Open Statements] result to select which statements to create.
There are three action buttons to perform [Batch & Print], [Batch & Create E-File], and [Print Statement Listing].
Batch & Print - gather Statements based on search criteria, add all Statements, if there are any, to new
Batch and create PDF Statements.
Batch & Create E-File - gather Statements based on search criteria, add all Statements if there are any
to add to a new Batch and create and electronic file to download.
Print Statement List Report - creates a PDF report listing a summary of each account with aging.
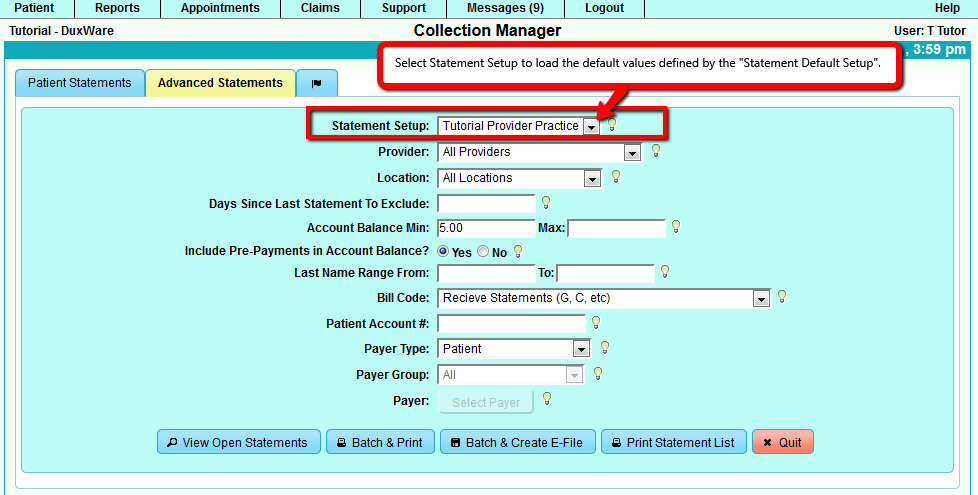
2. Filter Options
Filter options are labeled with self explanatory names and tool tips for additional information.
2.1 Statement Default Setup Predefined Values
All filter options can be predefined in a Statement Default Setup. Refer to the Statement Setup Guide for details.
Filter Options Explained
Options that are configured in the Statement Setup:
Statement Mode
Per Guarantor - The Collection Manager generates Statement Sets grouped by Guarantor. Each Guarantor will receive one
Statement showing all outstanding patient claims that each Guarantor is responsible for.
Per Patient - The Collection Manager generates Statement Sets grouped by Patient. Each Patient will receive one Statement
showing all of their out standing claims.
Per Claim - The Collection Manager generates Statement Sets grouped by Claims. Each patient/guarantor will receive one Statement
per Claim.
Balance Forward - If the Balance Forward Option is enabled, Claim line items such as services and payments which occurred on
previous statements are combined together as a single line item.
Advanced Statement Tab Override Options
Include Prepayments in Account Balance - Only debit Claims (balance greater than zero) are considered when the Collection Manager
gathers Statements unless the option is enable in the Statement Setup or it is overridden from the Advanced Statements tab.
This option controls whether or not to include Unapplied Pre-payments when calculating Account Balances.
Only Claims with a positive Account Balance are considered.
Account Balances must also fall within the Min/Max range.
Pre-payments, regardless of the setting, are not subtracted from Balance Due Now. Balance Due Now is calculated as the sum of all claims that
appear on the Statement.
Choose (Yes) to count Pre-payments when calculating Account Balances. This option will consider Unapplied Pre-payments when calculating
balances to produce a statement.
Example 1: a patient has $100.00 in Unapplied Prepayments on their account, and $99.00 balance due on their account. A statement will
not generate.
Example 2: a patient has $10.00 in Unapplied Pre-payments, and $99.00 balance due on their account. A statement will generate.
Choose (No) to NOT count Unapplied Prepayments when calculating Account Balances.
Example: a patient has $500 in Unapplied Pre-payments and $500.00 balance due on their account. The $500.00
Unapplied Pre-payment is ignored, and a statement will generate for the account.
Note: The best practice for handling unapplied money is for the practice to make sure that all unapplied payments, that should be,
applied to services, are done before a statement run.
Last Name Range From & To: filters statement gathering by patient's last name. The user can enter "a to bzzz: to capture all last
names beginning with "a" through last names "b".
Bill Code: Patient can have different Bill Codes to attribute to whether or not or how they will receive Statements.
Patient Account #: - if a patient's account number is input in this field, a statement will generate for this patient only.
Payer Type: -Filter by Payer Type to include all payer types and patient balances select "All". Normally Payer Type is defaulted to
Patient to only send statements for claims that are on file with the patient.
Payer Group: - Filter statement gathering by Payer Group.
Payer: - Filter statement gathering by a specific Payer. For example, selecting Medicare will only show statements with claims
filed to Medicare.
Section Four- Balance Forward and Statement Re-run
1. Balance Forward
The purpose of the Balance Forward option is to suppress Statement Details that have already been included in the previous Patient
Statement. Previous statement details will appear as a summary. All account details after the last statement date, will appear on
the new statement. See examples below:
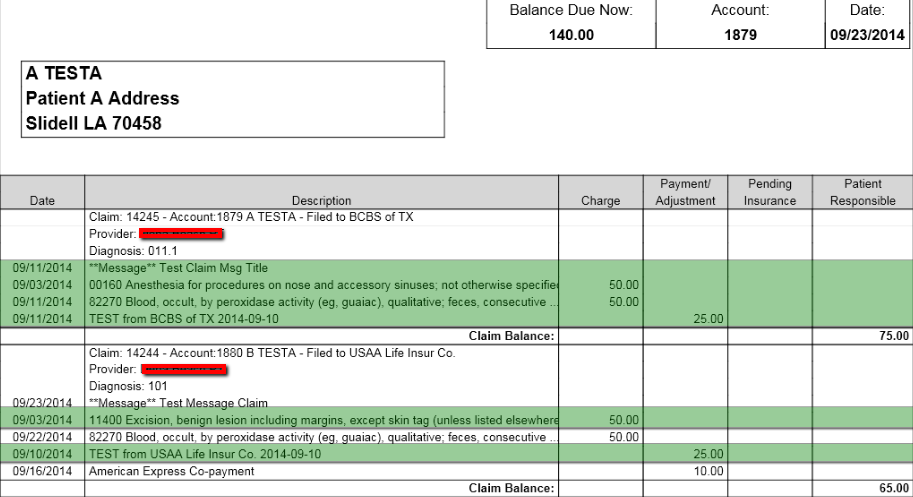
1.1 Example of Statement Created when Balance Forward is OFF
Example of a Statement run on 9/23/2014 with the Balance Forward option OFF, and the last Statement Date was "09/11/2014".
The highlighted items above are activities prior to the last Statement Run.
- In this Statement, there are two claims: 14245 and 14244. Notice Claim 14245 has no activities since "9/11/2014".
- In Claim 14244, there are activities before "9/11/2014".
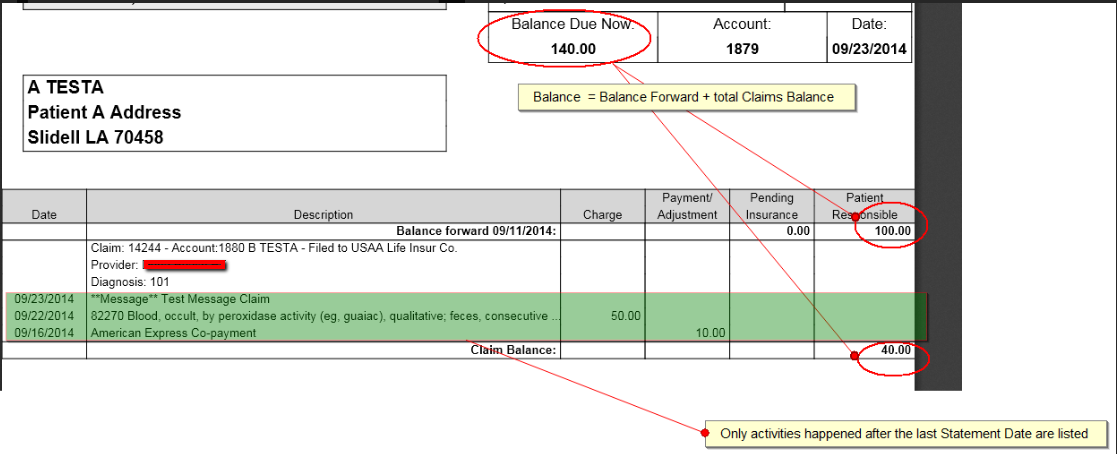
1.2 Example of the same Statement Run with the Balance Forward option ON.
Note:
- All highlighted line items in the previous example are no longer listed.
- The Balance Forward amount and the Claim Balances add up to the Balance Due amount.
- Claim 14245 has been omitted entirely since it doesn't have new activities.
2. Statement Re-run
There are times when a practice would like to review what was on an old Statement sent in the past. Statement re-run is
designed for that purpose. However, it is important to understand that there is a potential that the recreated Statement
could be different from what was actually sent.
NOTE: Statement re-run will NOT create new Statement History or Filing History.
2.1 What can cause Statement re-run to be different?
Changes made to anything related to that Statement during last time statement run and the re-run time can result in a Statement
re-run to be different. For example, a service line listed on last Statement was deleted. Another example could be the Statement
Setup for Statement Mode has changed from Guarantor Mode to Claim Mode.
2.2 What will not cause Statement re-run to be different?
Anything new added that is related to the old Statement will not affect the Statement re-run. For example, a new payment has been
posted after the old Statement date. Another example, the Claim on that old Statement is now on file with a different payer.
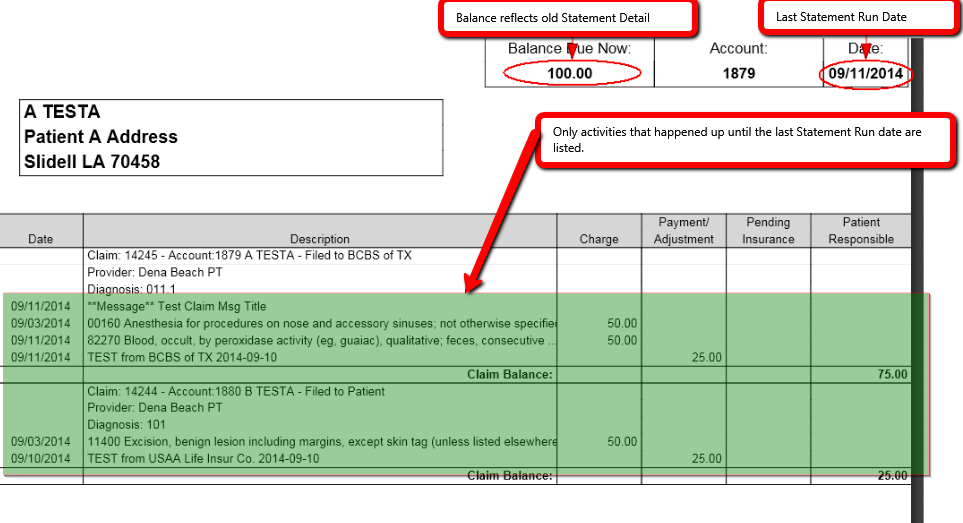
2.3 Example of a Statement Re-run
Note:
- Compare to example in 1.1. Activities after "09/11/2014" are not listed in this Statement re-run example.
- Compare to Example in 1.2. The Statement re-run Statement Due amount matches to the Balance Forward amount
Section Five - Statement Error
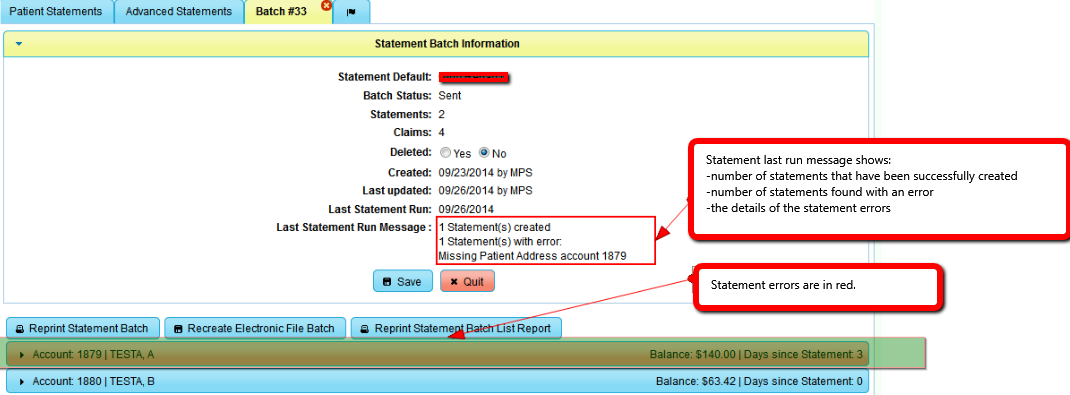
There are errors that could stop the Statement from being created such as missing Patient Address and a non-billable procedure with charges.
1. Last Statement run message
In the example below, the "Last Statement Message" section of the "Statement Batch Information" show the result of the last Statement run
and any details about the Statement Error. Statements errors are Red.
2. Statement Error Dialog
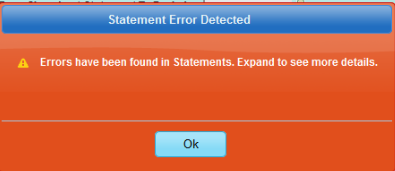
A dialog box will pop up to alert that a Statement error has occurred after the gathering process.
3. Statement Error Details
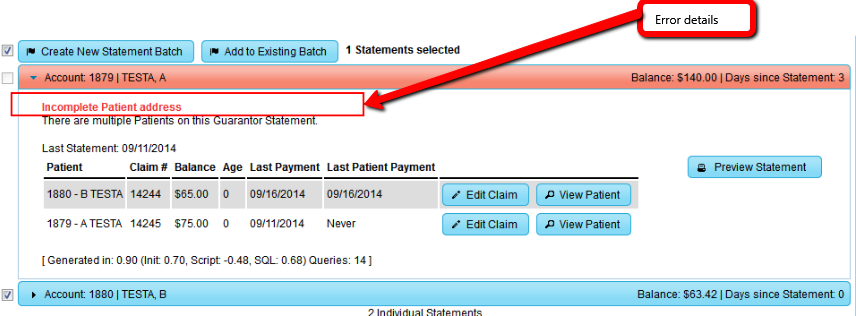
The Statement accordion section will auto-expand to display error details.
Section Six - Multiple Business Entity Setup for Single Print Statements
Practices that have more than one Billing Provider/Business Entity in a single database:
A new system configuration item is now available for multiple Billing Provider practices to be used in conjunction with Provider Groups and Location Groups.
Previously, practices that billed claims with more than one Tax ID could not enable the Statement Setup Option to use the Single/instant print option for printing statements from the patient’s account. Now, you do have the option.
Example: Practice has providers who bill claims under separate Group NPIs and Tax IDs. These type practices will typically have a separate statement setup for each business entity.
To take advantage of this new feature, you will need to sort your providers in to their respective entity by creating and adding them into their respective provider group.
For Example, you have two business entities:
- Tutorial Eye Physicians Group
- Tutorial Eye Surgery Center
You already bill to payers under each entity, you can now setup up a Provider Group to sort and print Statements as well.
To add a Provider Group, go the top tab menu:
Support>Provider>Provider Group Setup
Select the “+ Add” button
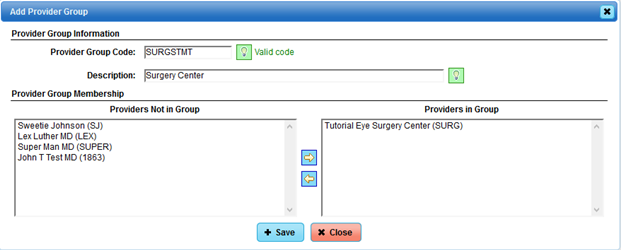
For this example, we are adding a Provider Group called “Surgery Center”, and we are adding the provider: “Tutorial Eye Surgery Center” as the Provider in this group. Once you select and move the provider(s) to be included in the group, be sure to select the “Save” button at the bottom of your screen.
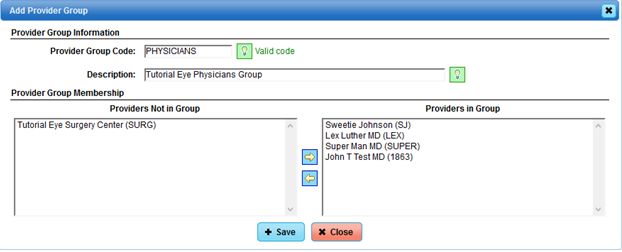
For this example, we will also need a Provider Group added for the Physician Group:
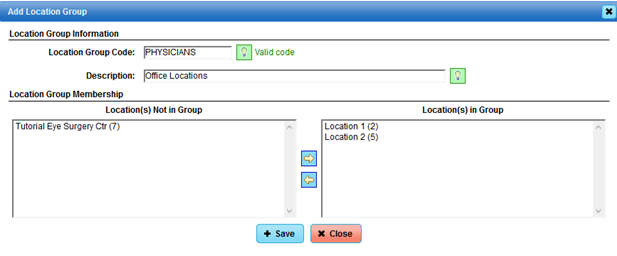
If separate locations are involved, then we will need to add Location Groups so that we can link them in the Statement Setup.
To add a Location Group, go to the top tab menu: Support>Location>Location Group Setup
Select the “+ Add” button.
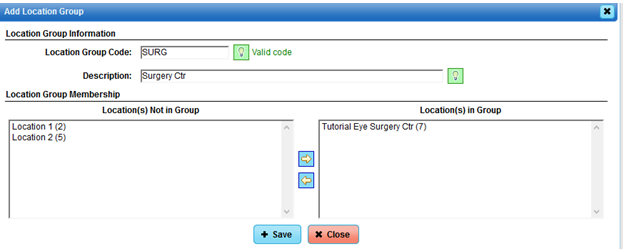
Add Location Group for the Physicians’ locations:
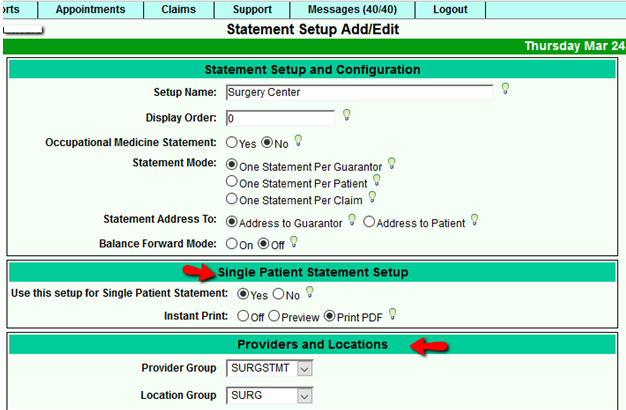
To access your statement setup, please go to the top tab menu: Support>Management>Statement Setup. Select “Search” to see your list of statement setups that are currently in your database.
Statement setup after System option has been turned on:
The Single Patient Statement option is set to “Yes” with Instant Print set to “PDF”.
Under the Providers and Locations section, select the Provider and Location Group that you wish to link with this statement setup.
Patient Statement Example to Print Surgery Center Statement:
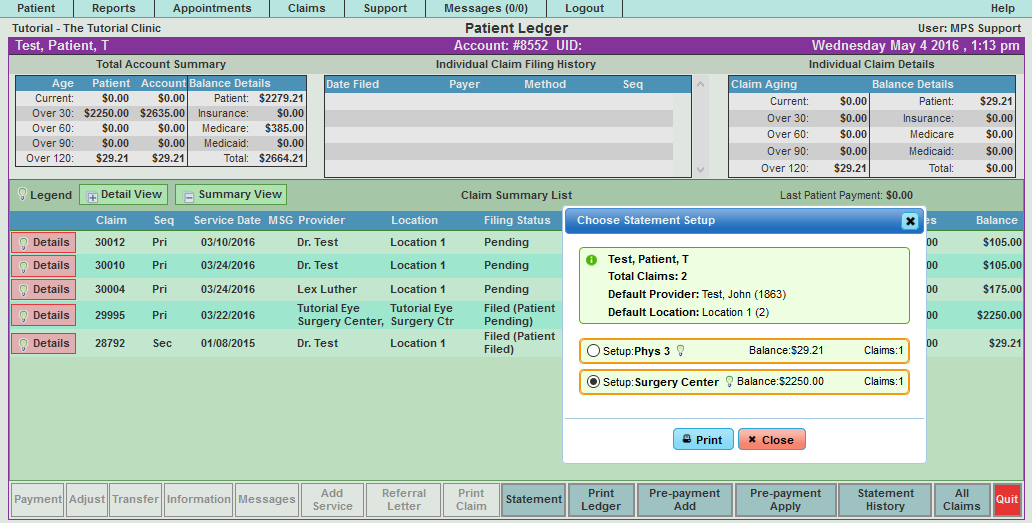
With properly setup provider and location groups, the statement setup above will pull in the claims linked to the setup selected and produce a statement. In the above example, we only want to include claims linked to the Surgery Center Statement Setup. The option is there to pull all claims on file to the patient regardless of the statement setup. We suggest printing only the claims associated to the Statement Setup.
