DuxWare Release Note - 09/10/2023
Contents
Patient Ledger
New Look and New Features for the Patient Ledger
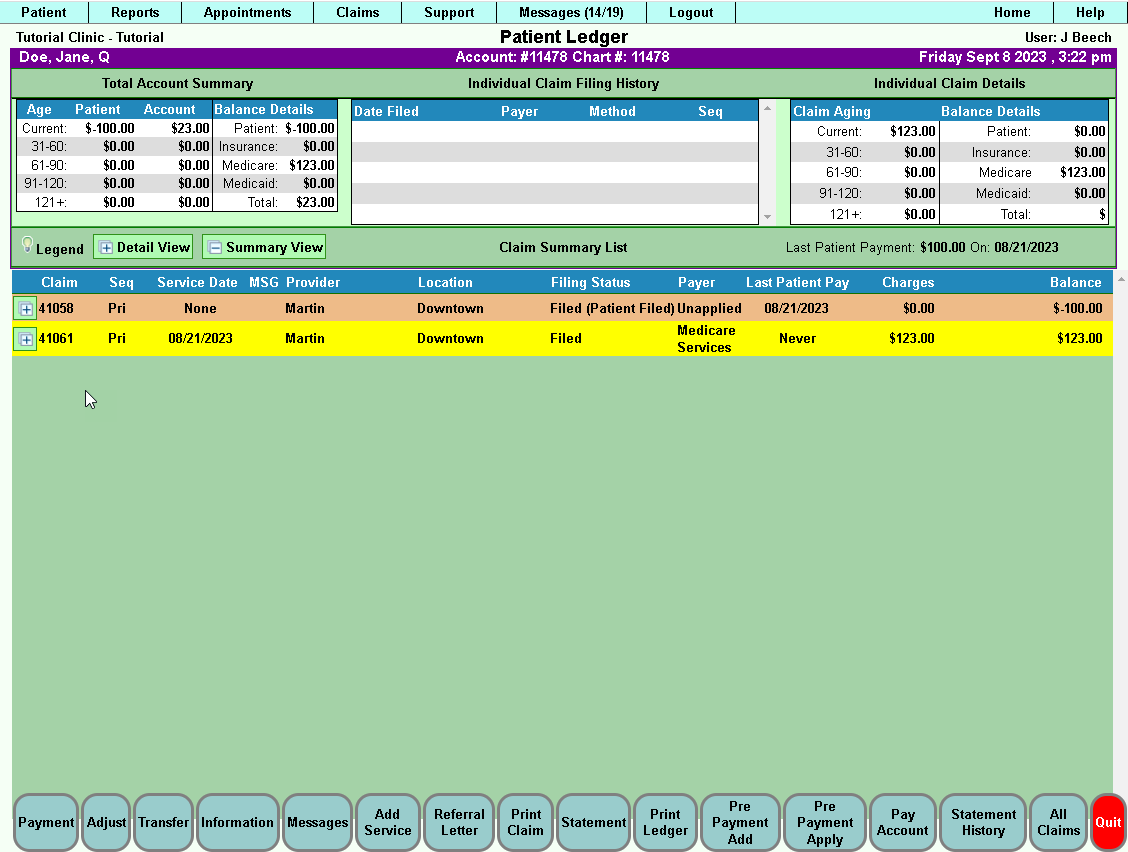
First, let’s look at what is being replaced.
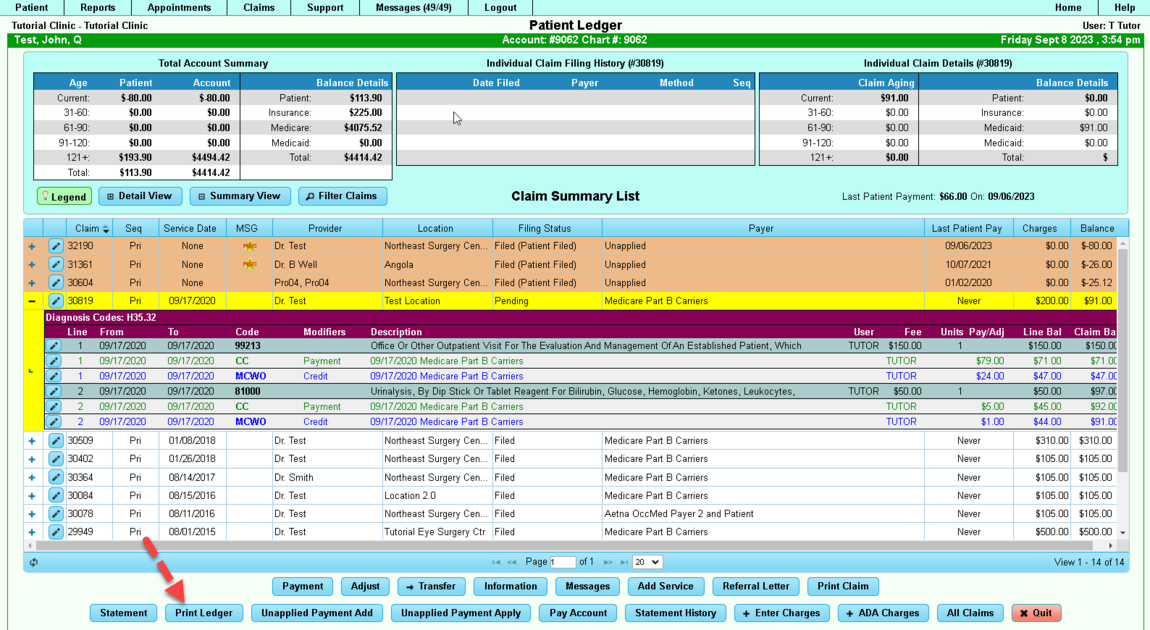
The old patient ledger displays the Total Account Summary, Individual Claim Filing History, and Individual Claim Details.
There is also Detail View and a Summary View with the various action buttons at the bottom of the screen.
We hope that you enjoy your new Patient Ledger with the added functionality. Our goal is not to change the workflow of the ledger, but to enhance it.
So, let us look at your new patient ledger.
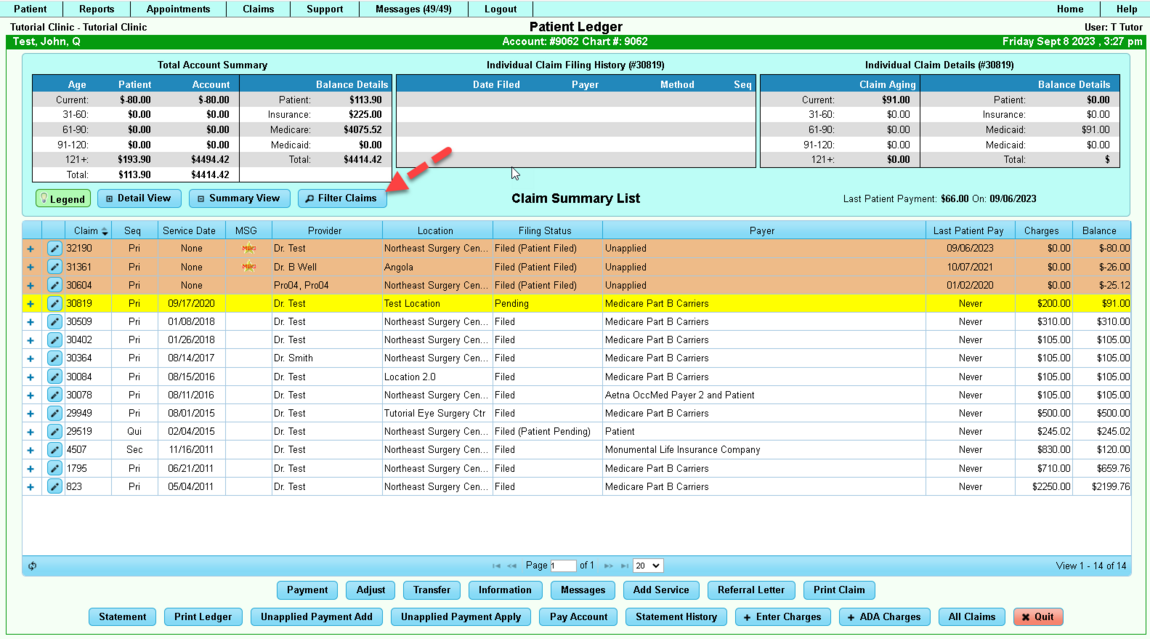
When entering the Billing System, navigate to Patient Ledger. You will see:
- The top section contains the Total Account Summary, Individual Claim Filing History, and Individual Claim Details components.
- The middle grid section listing claims.
- The bottom section contains the action buttons.
There are 4 buttons listed underneath the three components at the top of the page:
- Legend
- Detail view
- Summary View
- Filter claims
There are two rows of buttons at the bottom of the page.
- First Row (only available when a claim is selected)
- Payment
- Adjust
- Transfer
- Information
- Messages
- Add Service
- Referral Letter
- Print Claim
- Second Row (Always enabled)
- Statement
- Print Ledger
- Pre-Payment Apply
- Pay Account
- Statement History
- Enter Charges
Please note the new Filter Claims Button:
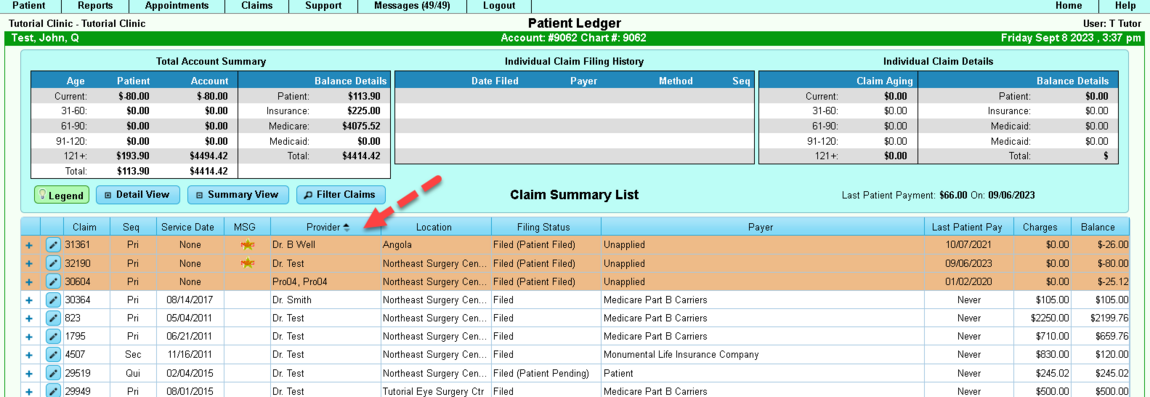
Column headings will sort oldest/newest or alphabetically depending on the type of data within the column. Place your mouse pointer to the right of the column heading to perform the sort.
Edit Claim - Get to the Claim Information screen to review/edit by selecting the edit icon to the left of the claim #. If the claim is highlighted, you can still select the Information action button at the bottom of the screen.
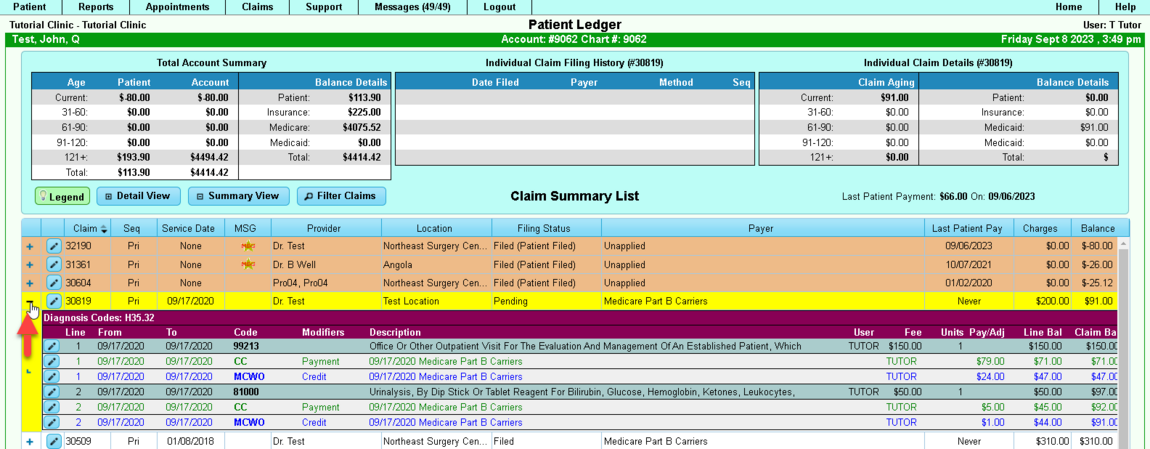
Expand Claim – Expand the claim to view/edit service lines and transaction details.
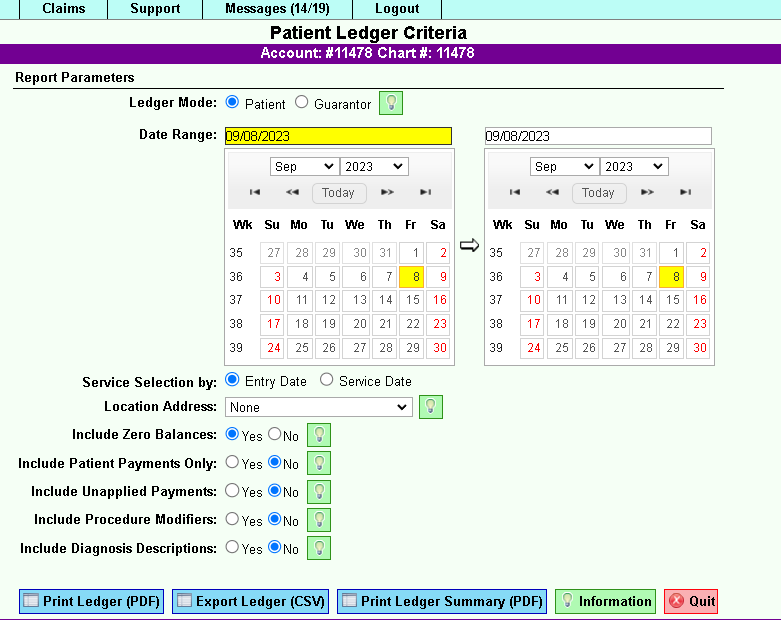
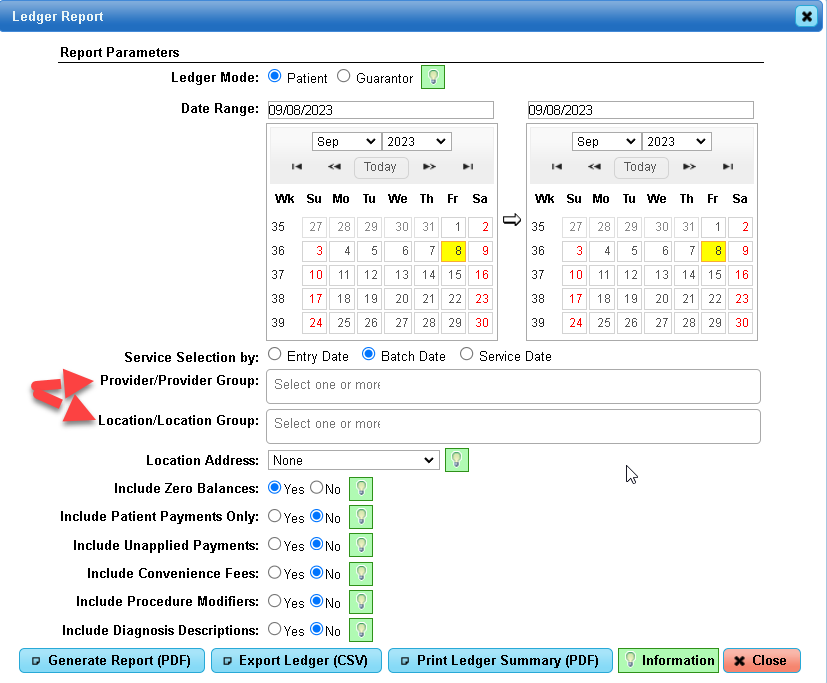
Print Ledger – New filtering options for Provider and Location have been added.
Prior to the update:
After the update:
Payments/Adjustments:
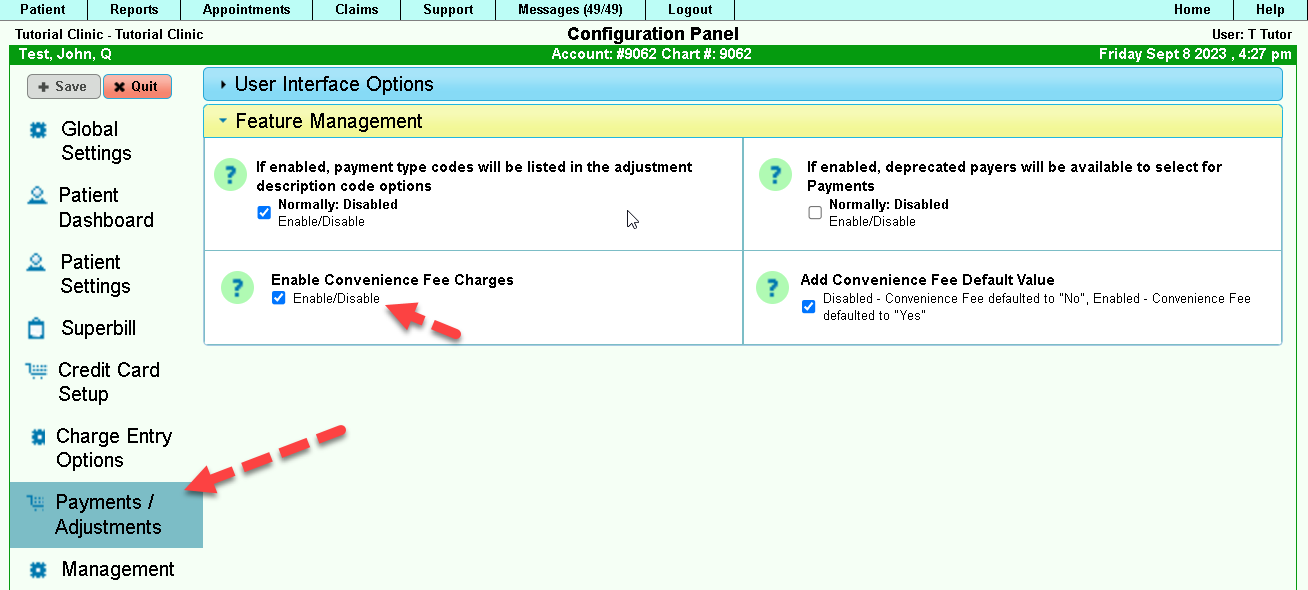
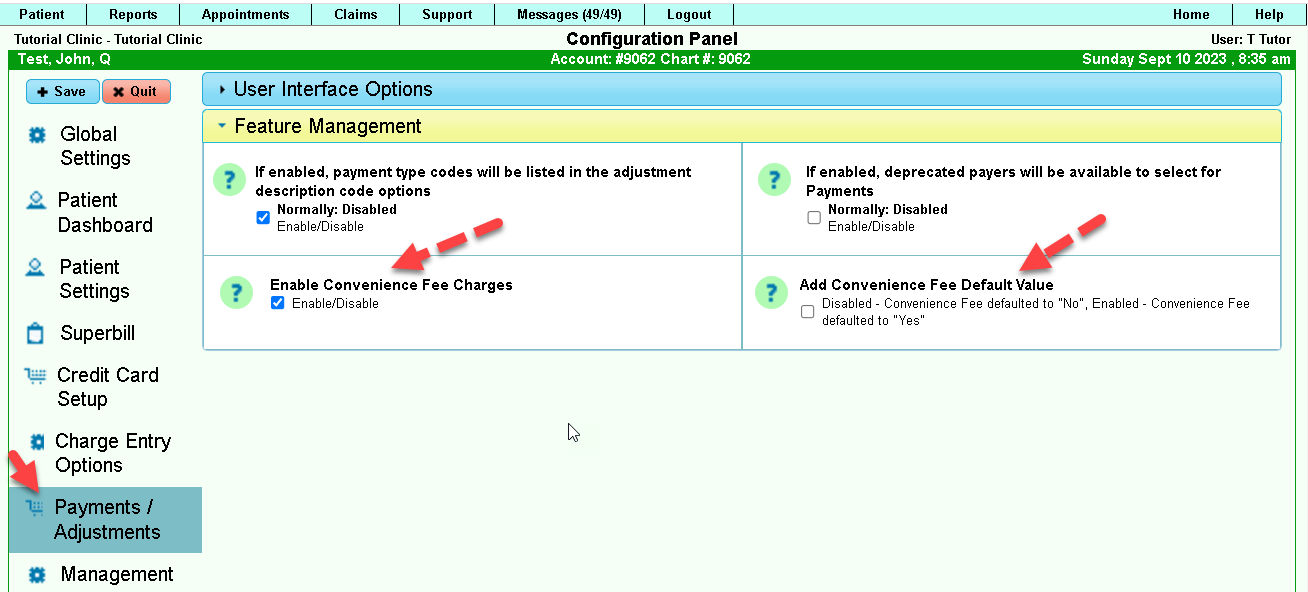
Navigate to the Configuration Panel (Support>Management>Configuration Panel).
Confirm there is a new option on the left-hand side for “Payments/Adjustments”.
Click on the “Payments/Adjustments” link on the left-hand side then, “Feature Management”.
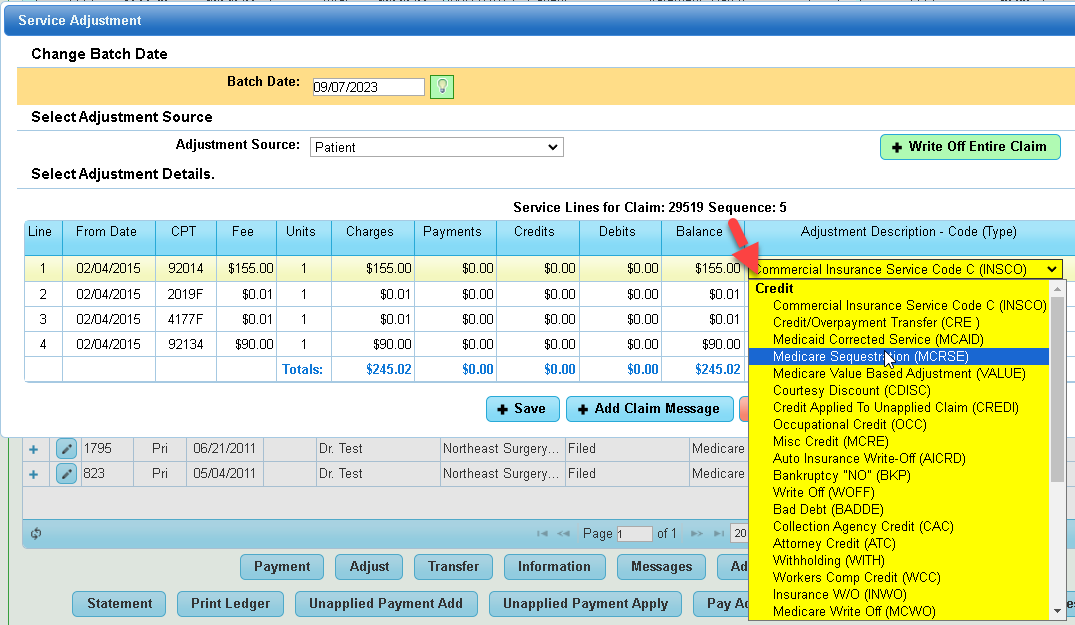
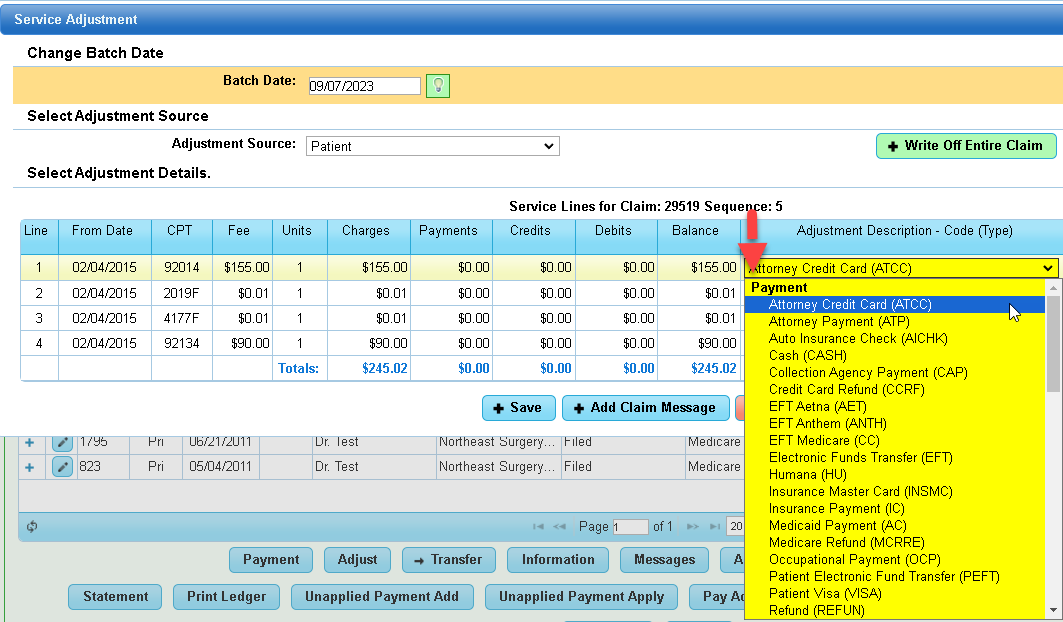
Select the enabled option to see payment type codes listed in adjustment description options when performing an adjustment for a patient transaction. This option is normally disabled.
When this option is disabled, the Payments Category does not appear in the list – only Credits and Debits.
When the option is enabled, the Payments category will also appear in the list.
Patient
Patient Dashboard>Authorization
Authorization – (Patient Dashboard>Authorization Section>View All) A warning flag has been added to let the user know that there are claims linked to an authorization before a delete occurs.
Patient Dashboard> FaceSheet
FaceSheet – Next Appointment Date/Time will now appear to the bottom left of section one of the patient’s FaceSheet.
Reports
Payment Variance Report:
Reports>Revenue Analysis>Payment Variance Report – This report now has an Excel output option.
Productivity by Provider Report
Reports>Revenue Analysis>Provider Productivity – This report now has a new criteria option for Procedure Groups.
Support
Support>General>Payer Manager
Payer Manager – New criteria option has been added to search by Payer ID.
Merchant Provider Updates
Currently, we accommodate 4 Credit Card Merchant Service Providers that are integrated into our Billing System:
- Complete Merchant Solutions (CMS)
- Zeamster
- TranSafe
- Pace Insight
All new credit card integrations are driven toward Pace Insight, and you will see why when you see the feature list below. If you have one of the credit card integrations listed above, we will continue to support the integration. However, if you want to switch over to Pace Insight, the transition is easy.
Convenience Fees:
Support tab>Management>Configuration Panel>Payment/Adjustment
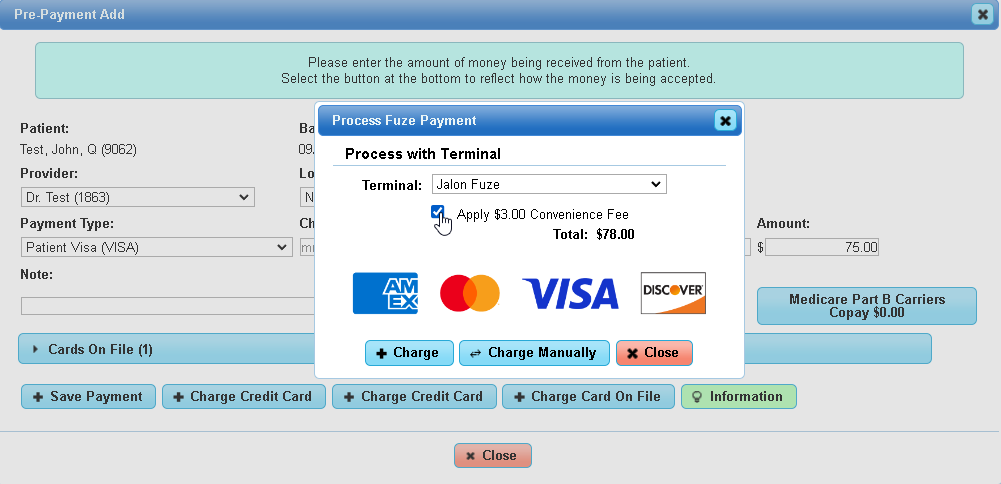
All credit card integrations have the new convenience fee feature. The set up is easy. Select enable to input a check mark, then click Save. If you do not wish to pass on convenience fees to your patients, then you simply do nothing.
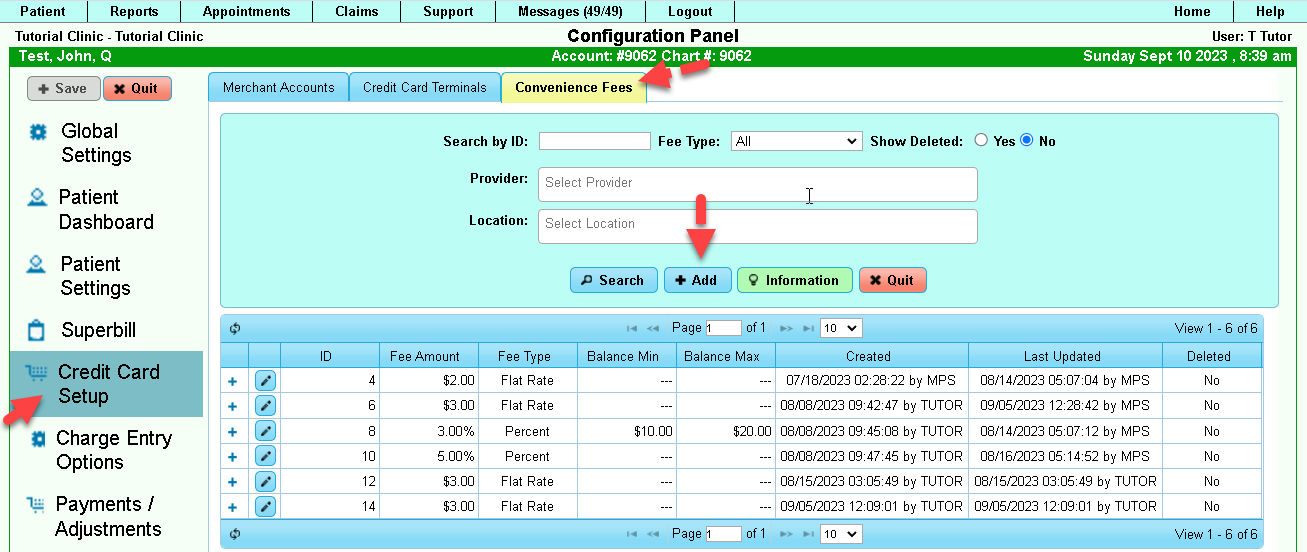
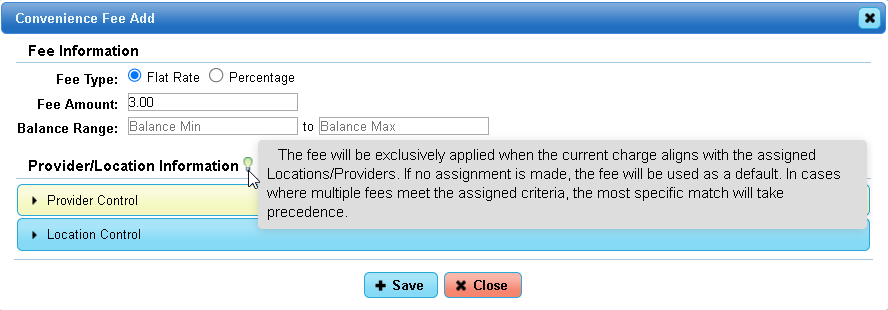
Once “Enable Convenience Fee Charges” has been selected, and your option has been saved, select Credit Card Setup from the main settings on the left. You will see a Convenience Fees tab, select it, and then click on “Add”.
In the above illustration, you will see multiple convenience fee setups; however, a clinic will normally settle on a percentage of the total payment or a flat fee. It is possible to configure different fee types with this setup that can include provider and location controls. In the setup, you have the option to set Fee Type: Flat Rate or Percentage, Fee Amount, Balance min/max range.
In this example, we will set a $3.00 flat rate convenience fee of the total credit card payment.
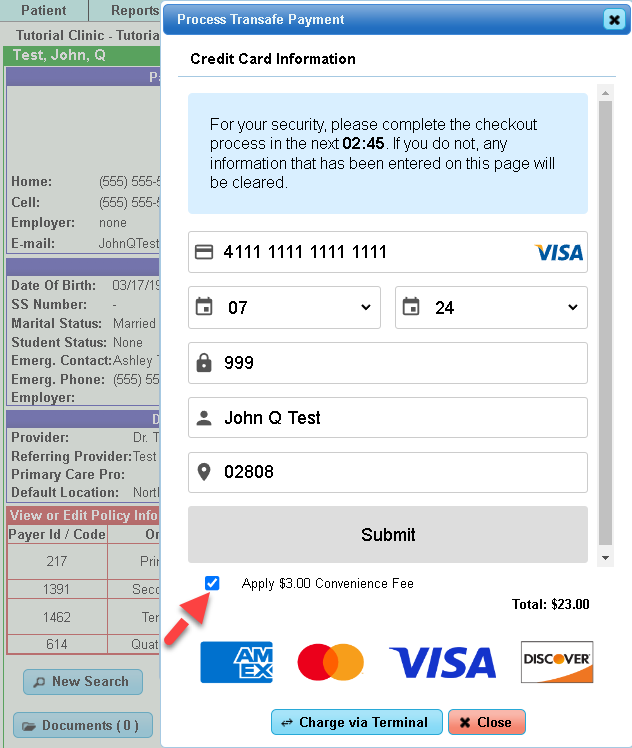
At this point, the convenience fee can be de-selected. If a convenience fee is selected for a particular provider and/or location, the convenience fee defaults to enabled.
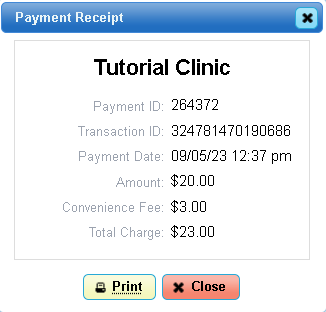
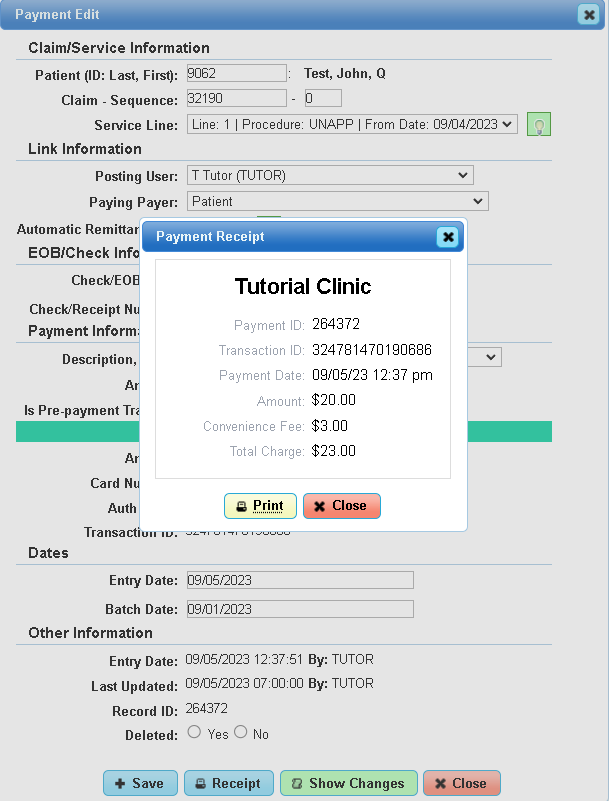
Once the card information is submitted, a receipt will be presented for printing.
Convenience fee as represented in the Patient Ledger:
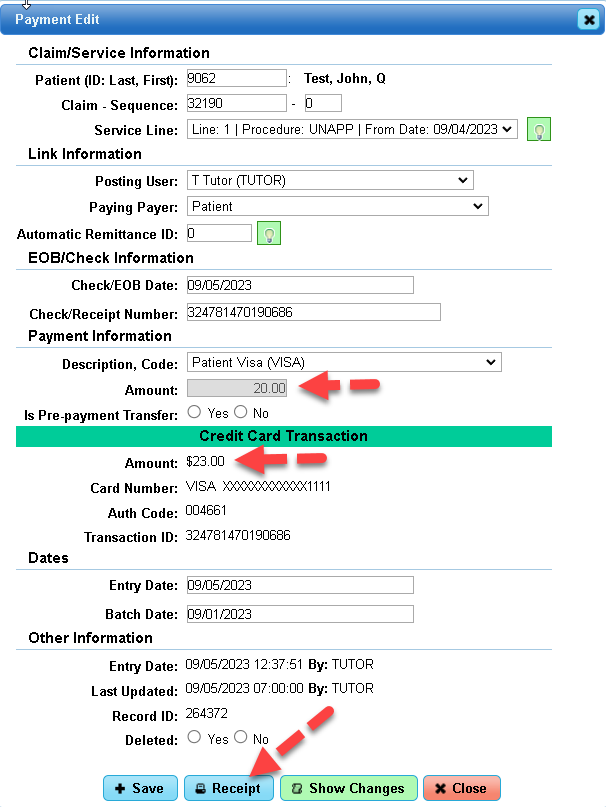
Go to Patient Ledger, select the [+] to expand, then edit to retrieve the Payment Edit screen. You will see the Payment amount of $20.00, then under the Credit Card Transaction, you will see the Amount $23.00, excerpt of card number, auth code and transaction ID. The option to print a receipt has also been added to this area.
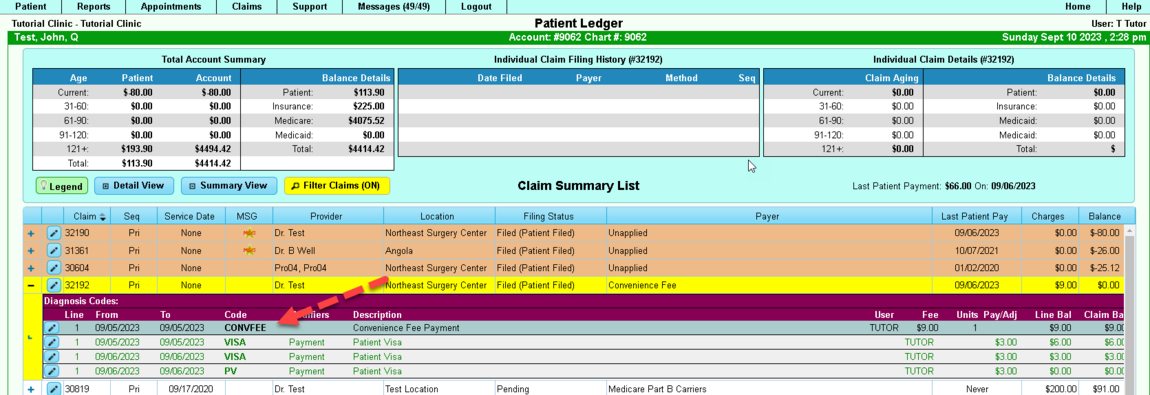
Convenience fees never calculate into the balance due; therefore, these fees are designed to be tracked and accounted for and will not deduct from an account balance. To view Convenience Fees separately in a patient ledger, select [All Claims] at the bottom right of your screen. The service line will be highlighted in green.
Select [+] to expand, and the edit icon to view Payment/Edit screen. The Payment code is “CONVFEE”.
Reports that have the option to include convenience fees:
- Reports>Daily>Day Sheet Report
- Reports>Daily> Reconciliation Day Sheet Report
- Reports>Listing>Claim Summary Report
- Reports>Listing>Payment Summary Report
- Reports>Listing>Claim Data Report
- Reports>Practice>Billing Service Payments Posted Report
- Reports>Practice> Billing Service Claim Filing Fee Report
- Patient Dashboard>Ledger>Print Patient Ledger Report
Pace Insight Features:
Credit Card on File
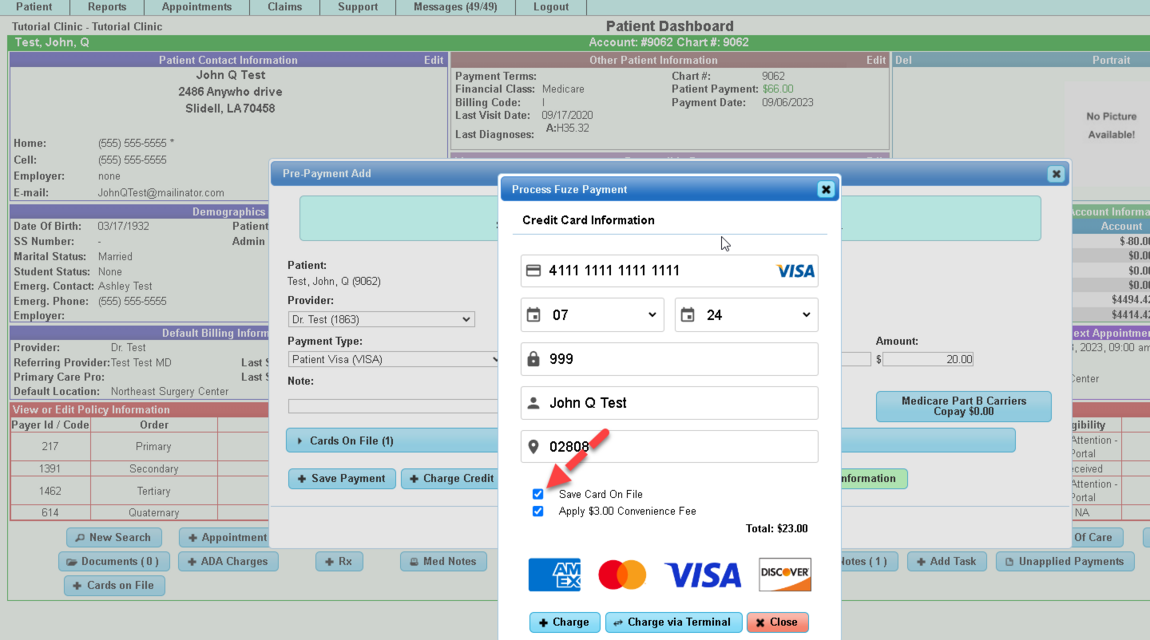
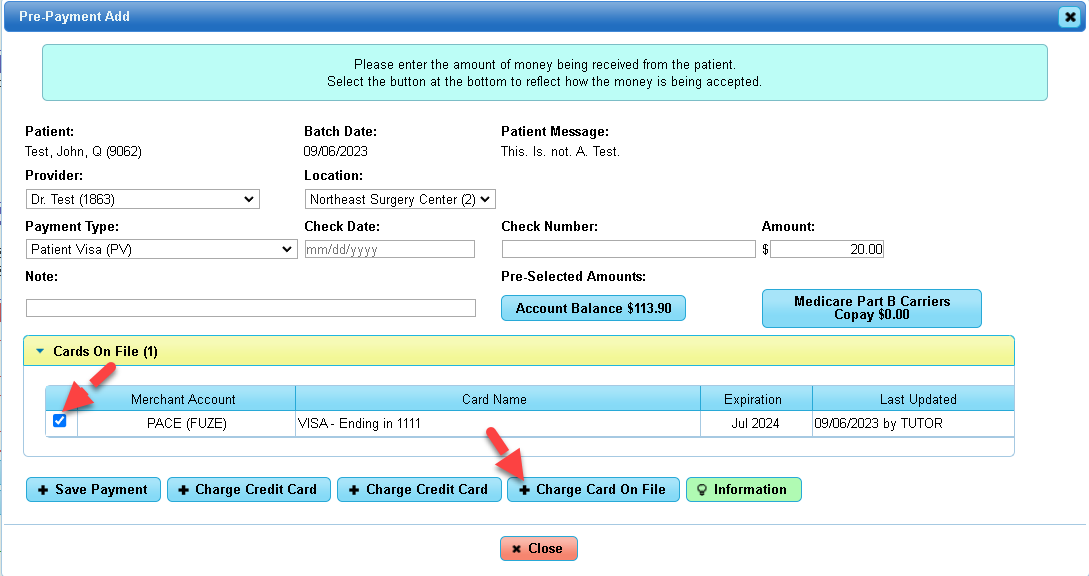
Credit Card on File is an exciting feature to add that will allow the clinic to give their patients the option to keep a credit card on file. How do I do this? It is very easy. All that you need to do is process a patient’s credit card via Pre-Payment Add/Unapplied Payment in either the Patient Dashboard or the Patient Ledger to place the current credit card on file for future use. Just click the box to enable/disable “Save Card on File” as illustrated below.
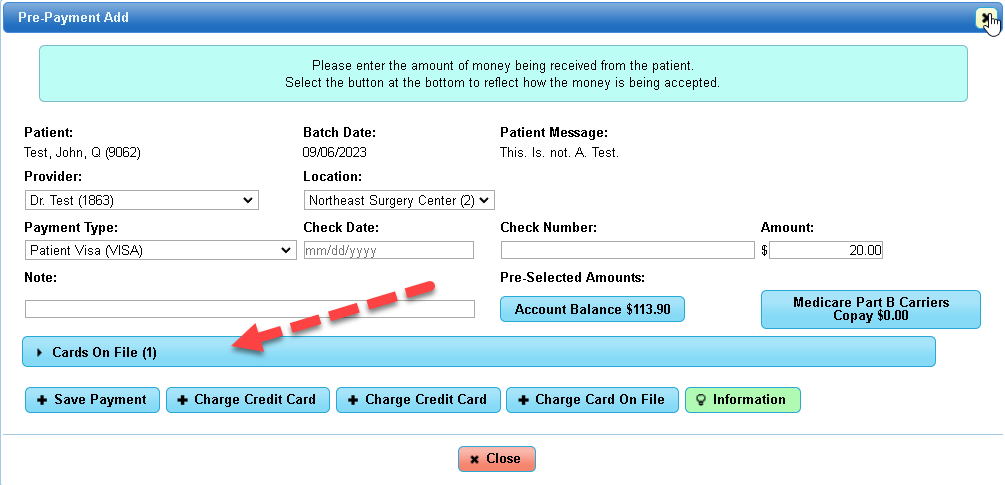
Now that a card is on file for the patient, you simply select the blue accordion as illustrated below to place the charge to a card on file.
Select the card on file and then [Charge Card on File]. Please note that patients can have multiple cards on file.
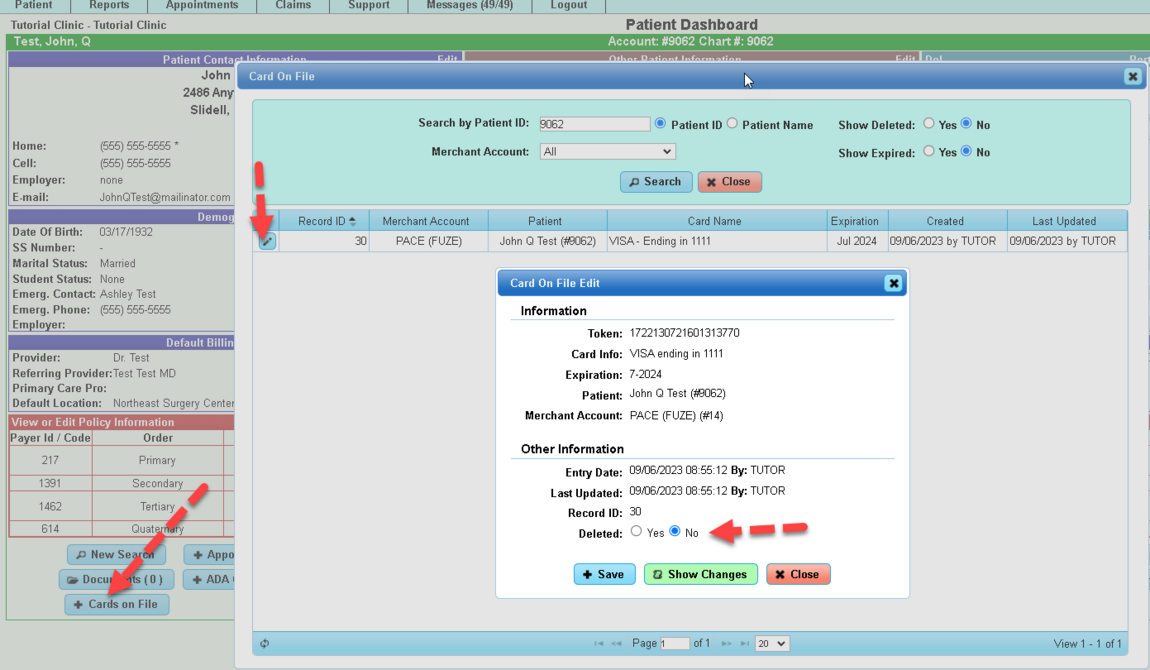
In the Patient Dashboard, you will see [+Charge Card on File] action button at the bottom of the screen. You can select this button to view all cards on file. You can view and/or remove a card on file in this area. If there is no card on file for this patient, the action button will not appear.
Virtual Terminal
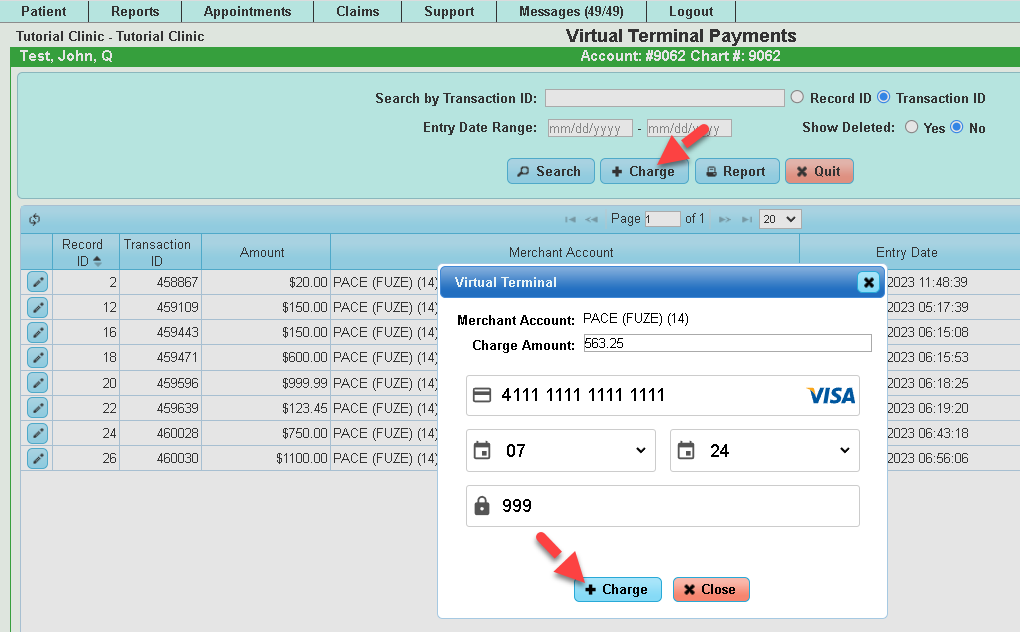
With the Pace integration, our users can process a credit card that is imaged on an Explanation of Benefits which will eliminate the need to go outside of your billing system to process this type of credit card transaction.
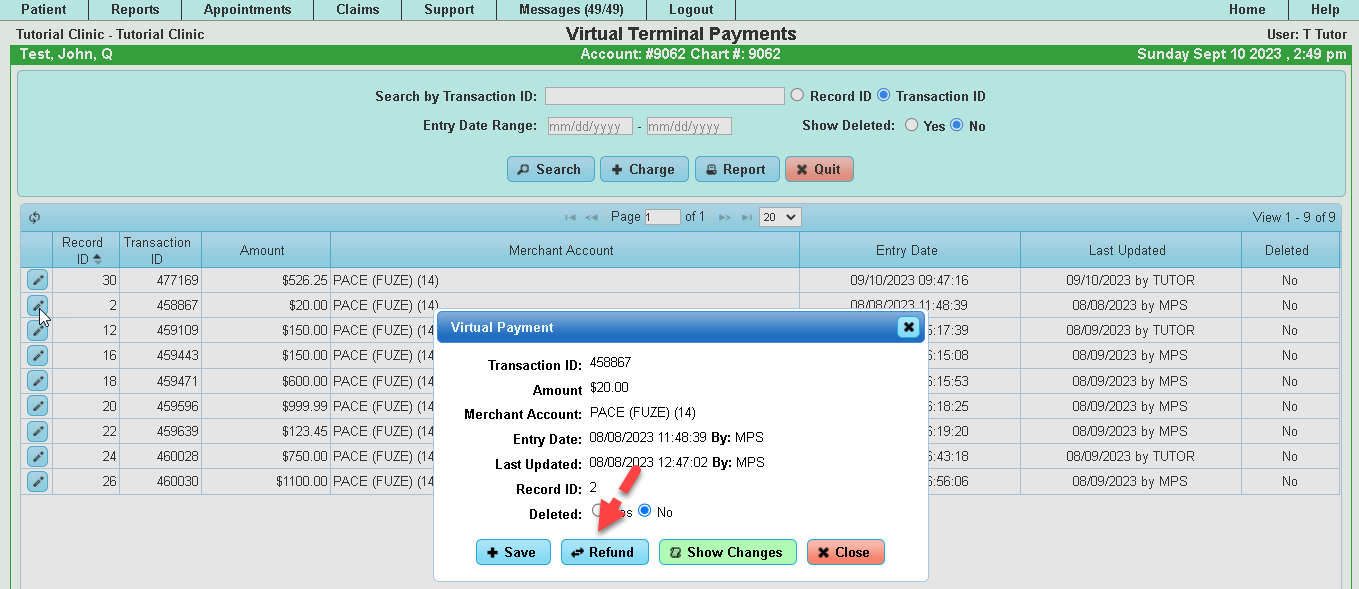
To access the Virtual terminal, go to Claims tab>Virtual Terminal. Search transactions, charge credit card. Edit the payment to Void/Refund Payment or delete the record.
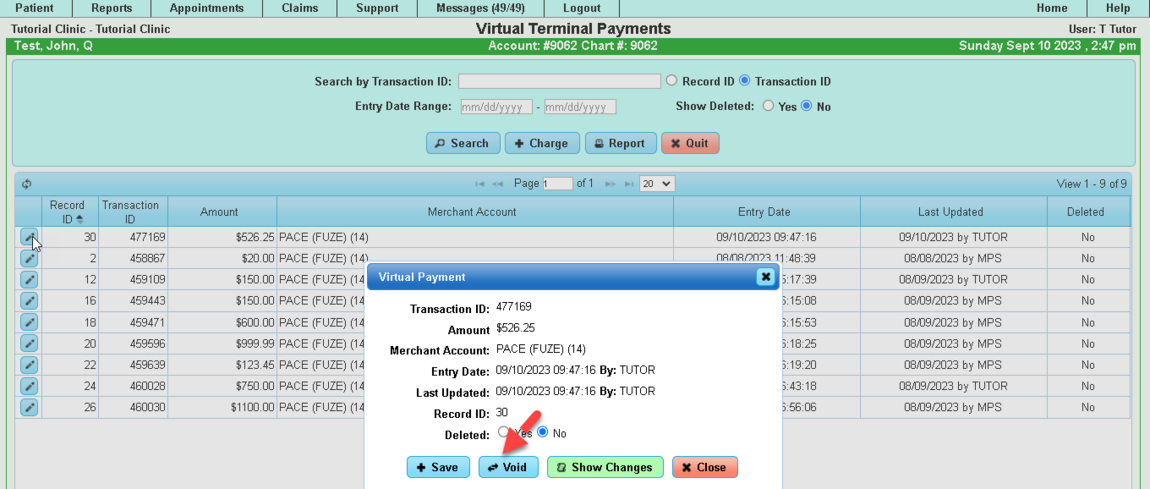
If the transaction occurs the current day, the user can void the transaction by editing the record as with the following example:
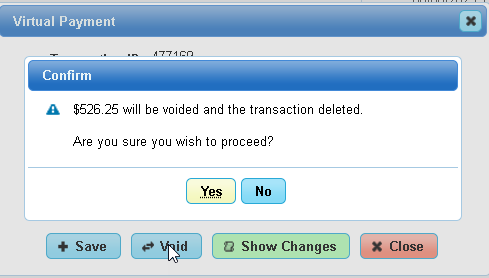
Once [VOID] is selected, a prompt will appear “Are you sure you wish to proceed?”. Yes or No.
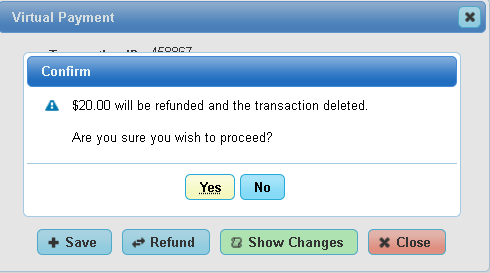
Example of a Refund:
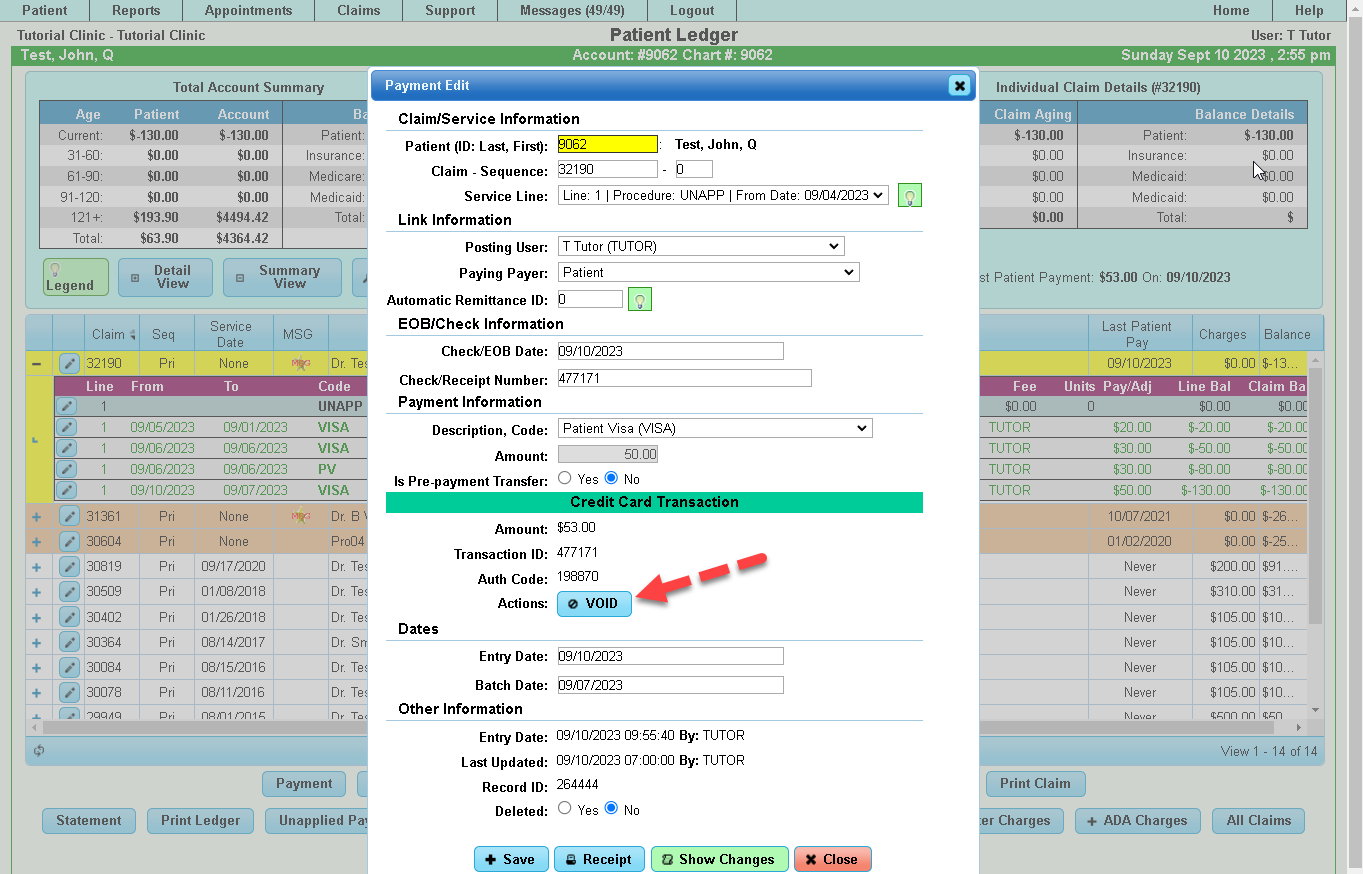
Refunds and Voids can also be performed in the Payment Edit screen of the Patient Ledger.
Convenience Fees (PACE)
Convenience Fees for our current merchant solutions work in a similar fashion. In this example, Card on File was used to process the credit card so that you can note the Convenience Fee.
With the PACE merchant, you can void/refund from the payment edit screen. If a void or refund is performed on a PACE payment that is linked to a convenience fee, the convenience fee will also be included in the void/refund.
If you have any questions regarding the release, please do not hesitate to contact your Support Team for assistance.
