Eligibility, 270, and 271 Management
Contents
DuxWare Eligibility User Guide
Introduction
DuxWare Eligibility is designed to enable the practice to generate an electronic record for the policy of a particular patient that tracks an eligibility
request (270) and an eligibility response (271) from a clearinghouse or payer. This allows the system to determine if the patient's insurance is currently
active and providing benefits on claims filed to them.
Before you begin:
- Setup for the DuxWare Eligibility Manager requires a Level 5 Management User to add or edit in this area.
- Make sure that you have purchased Eligibility through your clearinghouse, and know if your practice is
- invoiced or charged per record check, or if your package is unlimited. You do not want your practice to incur
- unexpected charges.
- Obtain User Name and Password from your clearinghouse to check eligibility. The user name and password pair
- from your clearinghouse will work for both of their SOAP (instant check) or SFTP (batch) Portals. The username and password given
- to you by the clearinghouse should work for all of the Portal(Bridge) interfaces that we support to that clearinghouse.
- For example, the username/password pair from the clearinghouse will work for both their SOAP (instant) and SFTP (batch) Portals.
- A customer should at the minimum add both Portals for the system to work at peak efficiency.
- If your clearinghouse does not offer instant eligibility or direct file transfers from and to your Practice Management System,
- you will still have the ability to manually upload and download your files to and from the clearinghouse just as you did prior
- to this update.
- Your clearinghouse may require a separate Payer ID to check Eligibility. Please check with your clearinghouse and obtain the
- eligibility payer IDs that you will need to add to your payer setups. If the the Claims and Eligibility Payer IDs are the same,
- you do not do anything to your Payer Setup, but turn the option on under Electronic Eligibility Options as illustrated below.
- Electronic Eligibility Options are located on page 2/Billing of your Payer Setup.
- DuxWare Support Staff will assist you with set up once the update is deployed to your system, so it is important that you
- have consulted your clearinghouse to review your options, obtained user names and passwords, etc. to make the process more efficient.
Eligibility Configuration and Set-up
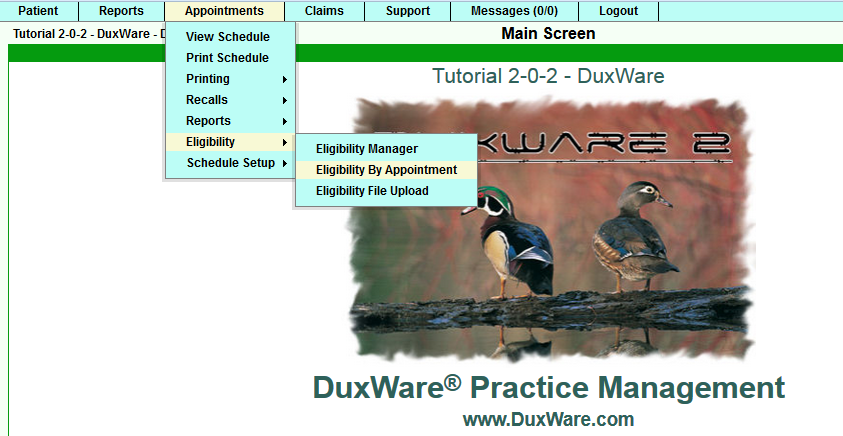
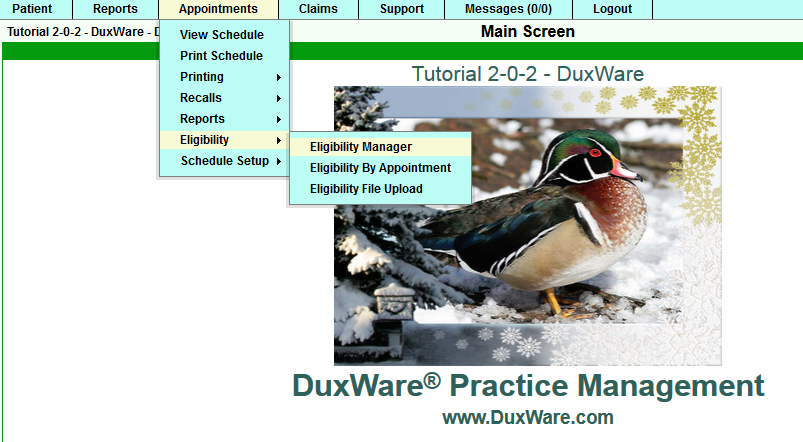
Eligibility Manager Configuration and Setup can be accessed under the Appointments Tab as illustrated below:
Once you select the Eligibility Manager, the first thing to do is to setup a portal(bridge) to use for getting eligibility data.
You will need a username/password from your clearinghouse. The username and password given to you by the clearinghouse should work
for all of the Portal(Bridge) interfaces that we support to that clearinghouse. For example, the username/password pair from
gatewayEDI will work for both their SOAP (instant/real-time) and SFTP (batch)Portals. A customer should at the minimum add both Portals
for the system to work at peak efficiency.
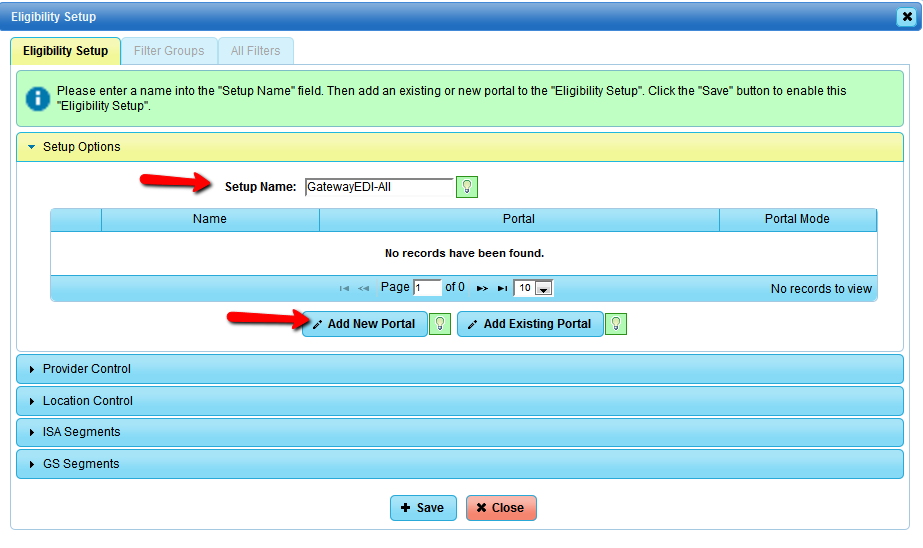
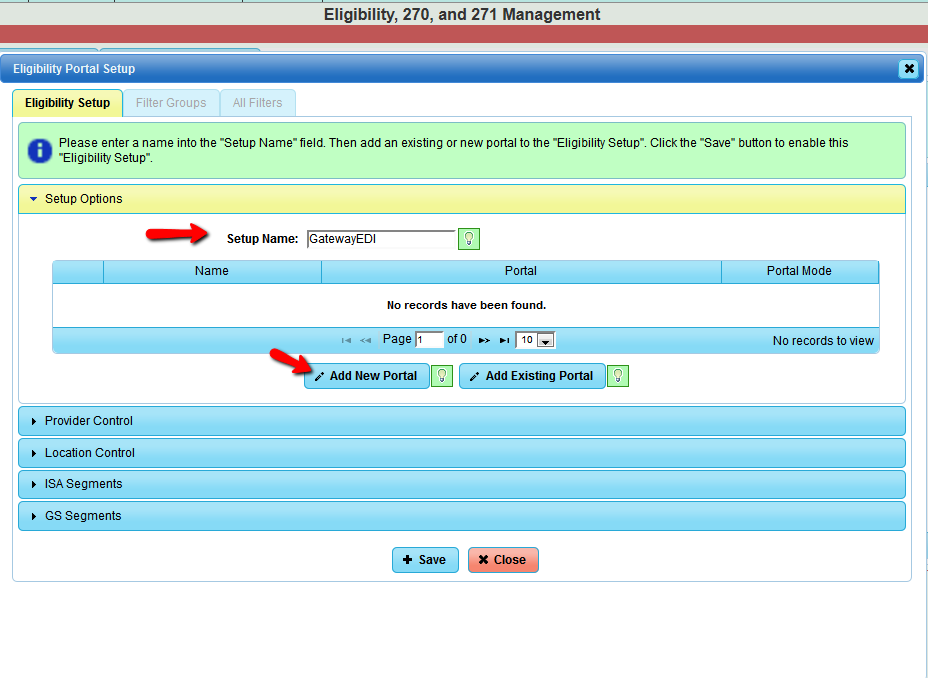
Select the "Add" button at the top to call up the "Eligibility Setup" creation dialog:
At this point, you should select "Add New portal" button located at the bottom of the portal table as illustrated above.
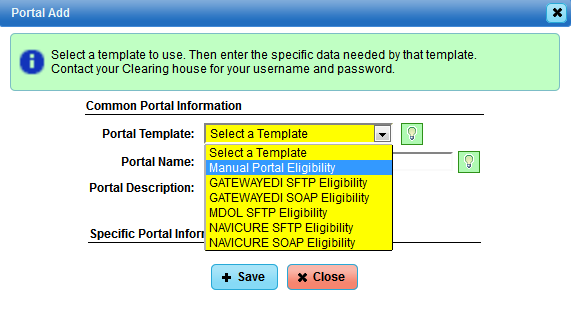
DuxWare supports the following Portal types at the current time:
Manual Portal - Manual - This Portal/bridge does not send the eligibility request (270) to any clearinghouse. It is only
used for customers that will manually upload/send the eligibility request (270) to the clearinghouse. It also allows for filters
to be created against it so the full functionality of eligibility is present for manual systems.
GATEWAYEDI SFTP - Automatic - This is the SFTP portal. This is mainly used for bulk processing. The turn around on a request
is about 5 minutes.
GATEWAYEDI SOAP - Real Time - This is the SOAP portal. This is mainly used for single request needing an immediate answer.
The turn around on a request is about 1 minute.
MDOL SFTP - Automatic - This is the SFTP portal. This is mainly used for bulk processing. The turn around on a request is
about 2 to 12 hours.
NAVICURE SFTP - Automatic - This is the SFTP portal. This is mainly used for bulk processing. The turn around on a request is
about 2 minutes.
NAVICURE SOAP - Real Time - This is the SOAP portal. This is mainly used for single request needing an immediate answer, The turn
around on a request is about 1 minute.
These Portals have a "Portal Mode" associated with them:
Manual - This portal will only create the 270 locally or process the 271 from a local source. If there are no Automatic or Real
Time portals, then all eligibility request will fail over to this portal.
Automatic - This portal mode is used primary for bulk processing (Checking more than 1 eligibility at a time). If there is no
Real Time portal then Real Time request (Eligibility Quick Check) will fail over to this Portal.
Real Time - This portal mode is used primary for single processing (Checking 1 eligibility at a time). If there is no Automatic
portal then a Bulk request will fail over to this Portal.
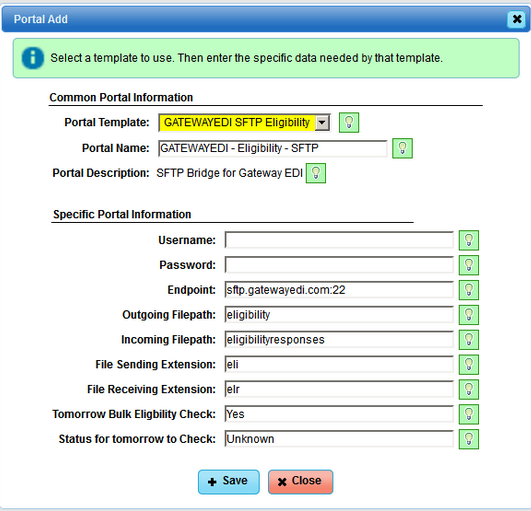
For this example, you select the "GATEWAY SFTP Eligibility" Portal to add to the system. The "Portal Add" dialog will now appear as this:
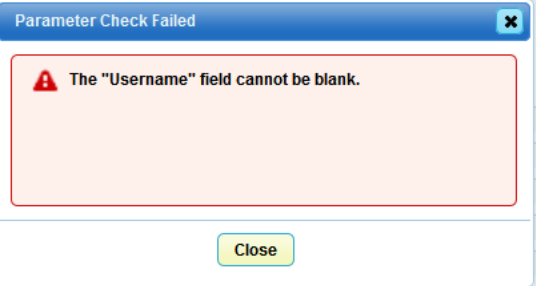
The only fields the end user needs to fill in are "Username" and "Password". If you try to add this portal without filling in those two
fields, an error message will appear as illustrated below:
You can close the dialog box and enter the Username and Password and click the "Add" button.
The screen will go to the "Eligibility Setup" tab of the "Eligibility Portal Setup" dialog. It will fill in the Portal field with the Portal
that you just created. It also fills in any unique values for the portal into the ISA and GS segments located in the accordion tabs. At this
current time, there are no setups or changes needed in these two areas.
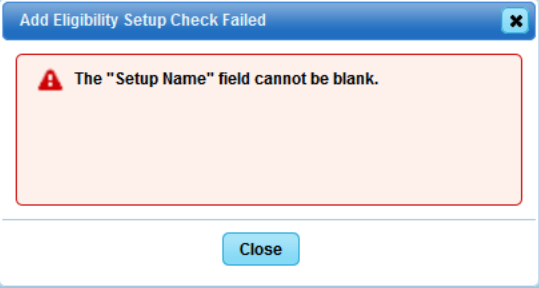
If you select "Add" at this point in the process, you will receive the following error.
Name your setup, and select the save button and the "Eligibility Setup" will be saved. This will cause a the following actions to occur:
- The Provider Link and Eligibility Response Filter tab will become active.
- There will be a generic Provider Link record created.
- The generic Provider Link record will get a default set of filters.
- A bridge representing the portal will be added.
NOTE: You will optimally add three portals to your Eligibility Setup: Manual, Automatic (SFTP)and Real-time (SOAP).
Currently, MD On-line (MDOL) only supports Manual and Automatic.
For example, you will add GatewayEDI Eligibility Setup named, "GatewayEDI", you would then need to
"Add New Portal": Manual, then again for Automatice (SFTP), and then again for Real-time (SOAP).
The illustration below shows an example of a GatewayEDI setup with three portals:
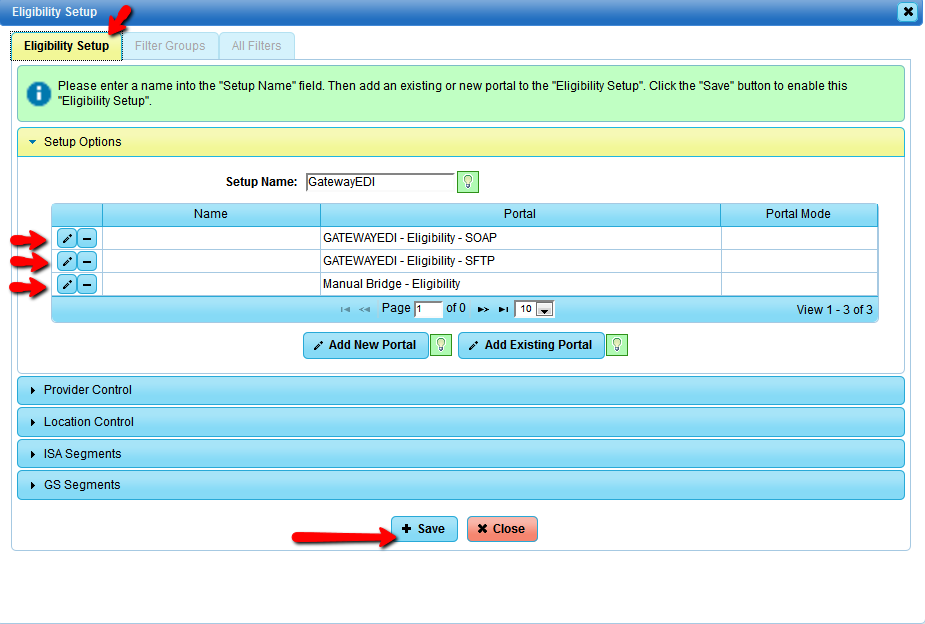
Select the "Provider Control" and "Location Control" accordions to see the automatically defined "Provider Link"
and Location Links" for further filter options.
ISA and GS segments should not be edited by the practice.
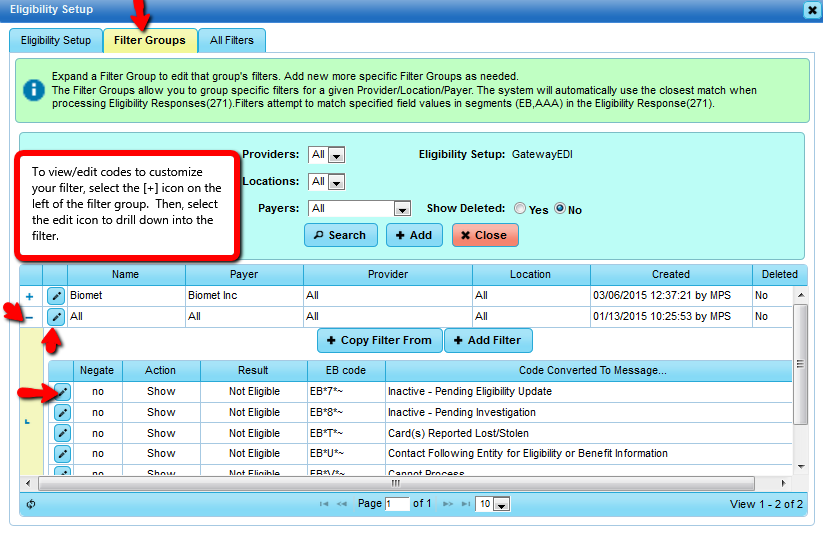

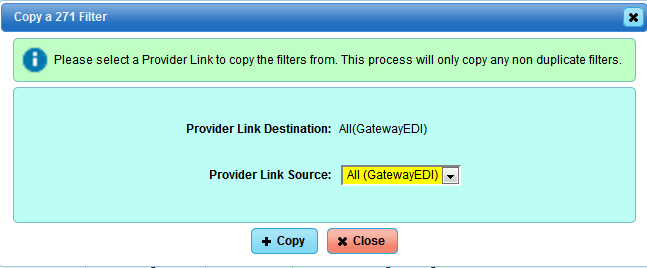
If you click the "Copy Filter From" button the following dialog will appear. This allows you to copy all the filters
from another "Provider Link".
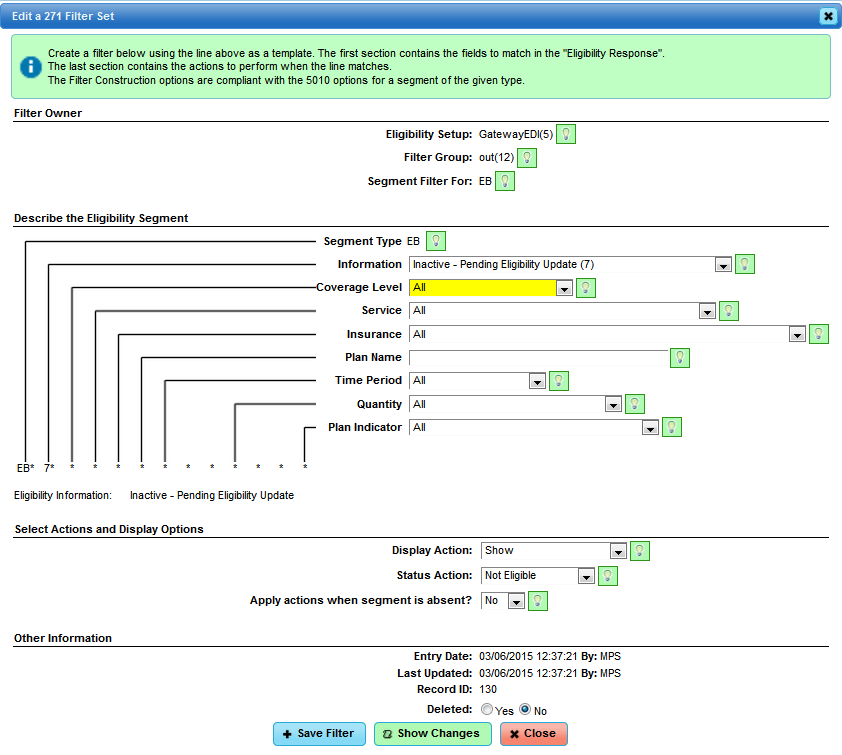
Select the edit icon to the left of the filter to review/edit the filter. You will land at the Filter Editing Screen as
illustrated below:
Selecting the third tab "All Filters" will show a list of all of the filters across all of the "Provider Links" associated
with "Eligibility Setup".
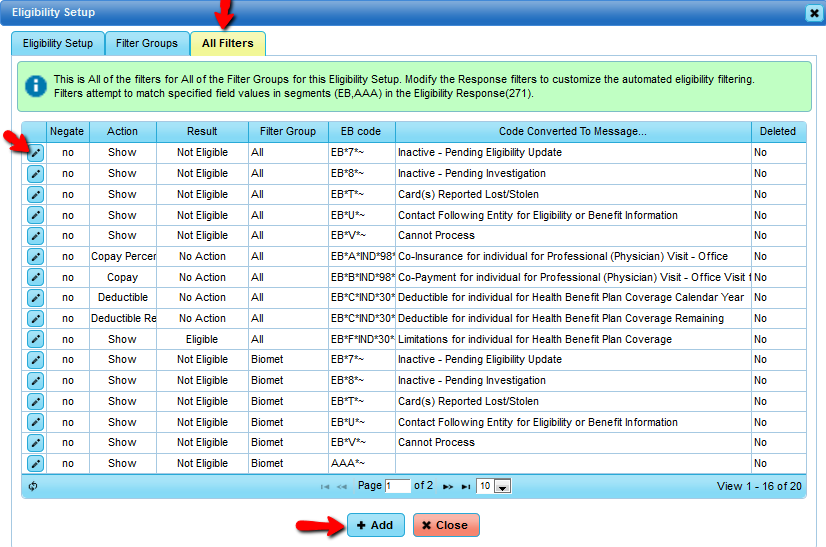
Understanding Filter Rules for when you get the response back from the Clearinghouse
The general idea is that a filter will match an eligibility field (EB) in the Eligibility Response (271). Upon this match, an action
will occur and cause a result to be applied to the Eligibility record.
The screen shot below shows a filter opened for editing.
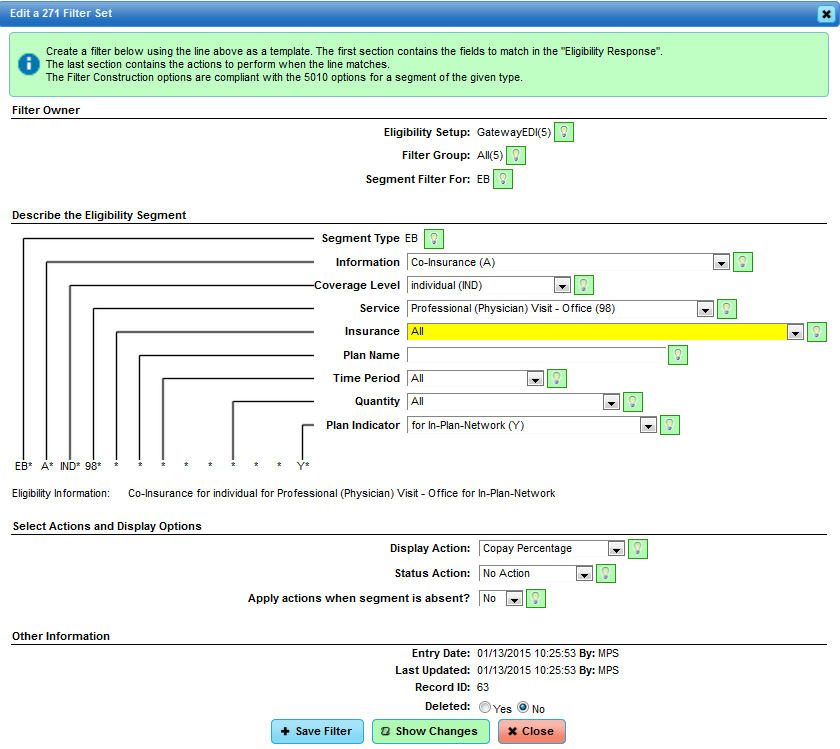
The filter construction block controls which parts of the eligibility message (EB) the filter will match.
So in the example above, the filter will match any eligibility message field (EB) that has the T information
in the field 1. The lines at the bottom show the raw EB code and the parsed version.
The filter Actions block controls what the filter will do when it matches. Listed below are the possible selections.
Display Action:
- Action Show - This is a default action that will show the match record.
- Action Hide - This action will hide the record in the Eligibility edit view.
- Action Copay Standard - Attempt to extract a dollar amount for the matched record and load it into eligibility record and policy record.
- Action Copay Surgery - Attempt to extract a dollar amount for the matched record and load it into eligibility record and policy record.
- Action Copay Lab - Attempt to extract a dollar amount for the matched record and load it into eligibility record and policy record.
- Action Copay Percentage - Attempt to extract a dollar amount for the matched record and load it into eligibility record and policy record.
- Action Copay All - This is a special action that will cause Standard, Surgery, Lab, and Percentage filter records to be created.
- Action Deductible Standard - Attempt to extract a dollar amount for the matched record and load it into eligibility record and policy record.
- Action Deductible Surgery - Attempt to extract a dollar amount for the matched record and load it into eligibility record and policy record.
- Action Deductible Lab - Attempt to extract a dollar amount for the matched record and load it into eligibility record and policy record.
- Action Deductible Percentage - Attempt to extract a dollar amount for the matched record and load it into eligibility record and policy record.
- Action Deductible All - This is a special action that will cause Standard, Surgery, Lab, and Percentage filter records to be created.
Status Action:
- Not Eligible - This filter will cause the eligibility record to be marked as a Automated No - "Not Eligible" status.
- Requires Action - This filter will cause the eligibility record to be marked as a Automated Maybe - "Requires Action" status.
- Eligible - This filter will cause the eligibility record to be marked as a Automated Yes - "Eligible" status.
- No Action - This filter rule will not effect the eligibility records status.
Apply actions when segment is absent?:
- Absence No - This filter has to match a line in the 271 response for result to be used.
- Absence Yes - This filter must NOT match a line in the 271 response for result to be used.
At this point, your Eligibility Setup is complete, and you are ready to begin sending Eligibility Requests and processing the
Eligibility Responses.
Eligibility Quick Check via Patient's Account
In order to use Eligibility Quick Check, your clearinghouse must provide a Real-time access (SOAP) interface.
Your Eligibility Manager Configuration and Set-up must be complete. Eligibility ID should be input in the
Payer Setup if different from the Claims Payer ID.
There are three areas in DuxWare to access the Eligibility Quick Check interface:
- Insurance Policy Add/Edit (located on the first screen of the patient information screen).
- Appointment Schedule
- Eligibility by Appointment (located under the "Appointments" tab)
Insurance Policy Add/Edit:
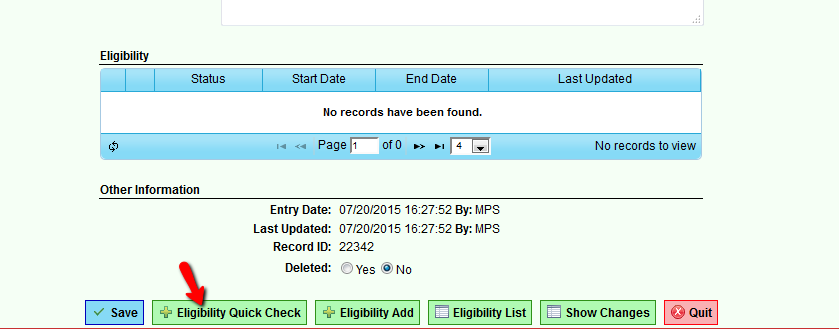
Retrieve the patient's account and select the insurance payer that you wish to Quick Check. Scroll down to the
bottom of the page and select [Eligibility Quick Check].
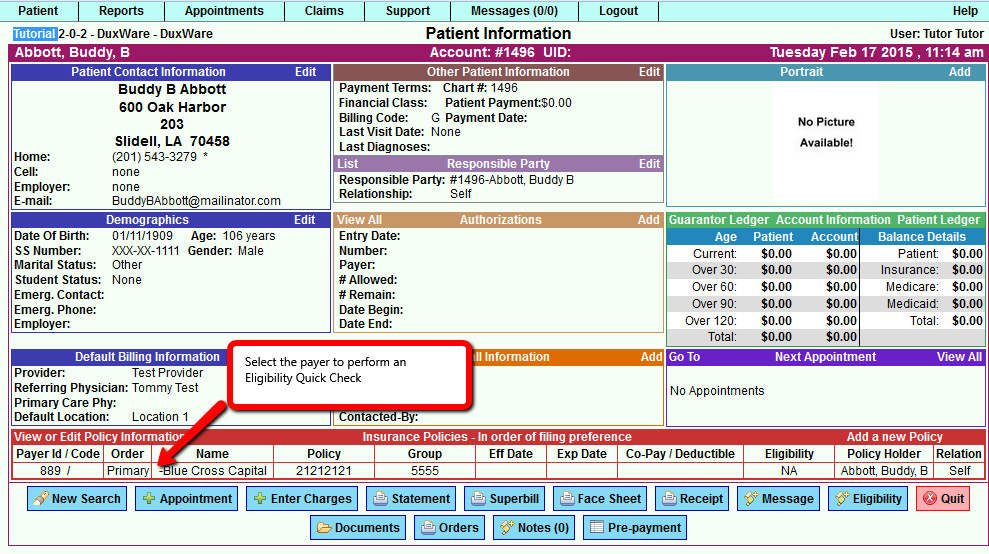
Below is an example and Insurance Policy Add/Edit in the Patient's account. In this example, the user
is viewing a policy and selected the "Eligibility Quick Check" button. The Quick Check dialog has auto-selected
the patient's default provider, default location, and the policy that is being viewed. In this case, it still allows
the user to select a different Provider or Location because they are on the policy view and could be checking to see if
a different Provider or Location will work better with the current Policy.
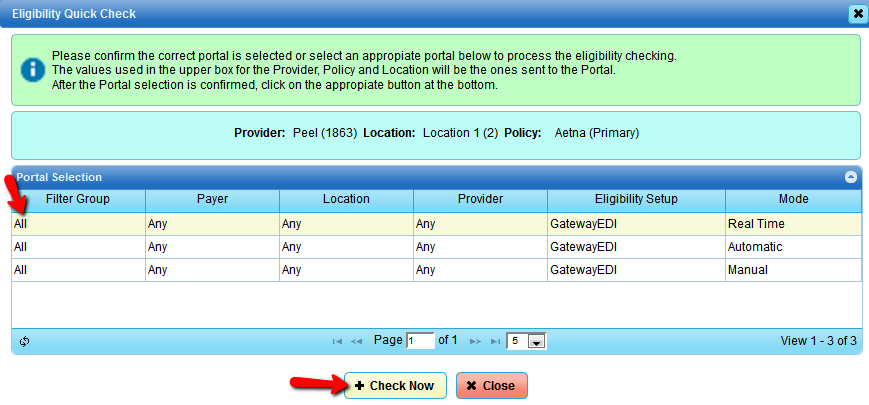
Below is the response that was received from the clearinghouse indicating that the patient was not eligible.
At this point, the user will need to verify that patient information was input correctly before contacting the
the patient for updated insurance information. Be sure to review the messages provided to guide you as to why the
response was returned as ineligible. You can view messages by clicking the small icon next to the message to expand
for viewing. You can also view the raw response message by selecting the tab labeled "Eligibility 271 Message.
If you determine that the response should have been valid, modified the rule, etc. you can select [Save], or you can
[Save as Invalid] if you determine that the payer was correct with sending back that the patient was not eligible.
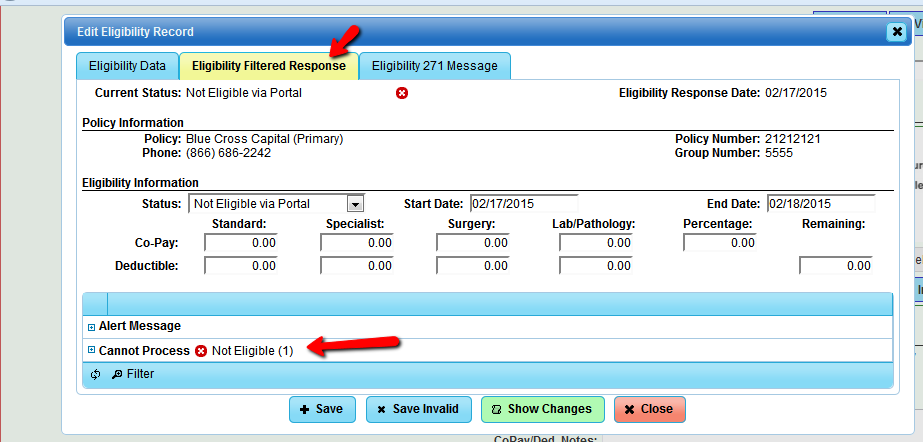
We have decided that the payer was correct with their invalid response, and select [Save]. Below is how it will display on
the insurance payer on the Patient Information Screen.

NOTE: Unfortunately, we can not show live responses for our users to see what the Eligibility system is really capable of,
but we are confident that you will catch on quickly. As always, we encourage you to call our support line if you need
assistance or have questions at 1(800)248-4298.
Appointment Schedule Quick Check
In order to use Eligibility Quick Check, your clearinghouse must provide a Real-time access (SOAP) interface.
Your Eligibility Manager Configuration and Set-up must be complete. Eligibility ID should be input in the
Payer Setup if different from the Claims Payer ID.
The Front Desk now has the ability to perform an Eligibility Quick Check from the Appointment Scheduler.
The patient's information should be complete with the policy information fully added to the patient's account.
As illustrated below on the "Appointment Scheduler" screen, the user will mouse right-click on the appointment.
and select "Eligibility Quick Check" from the right click popup menu.
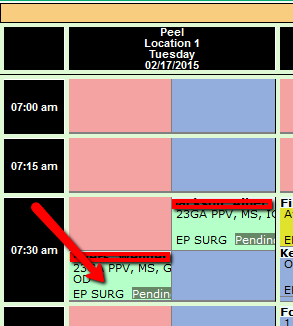
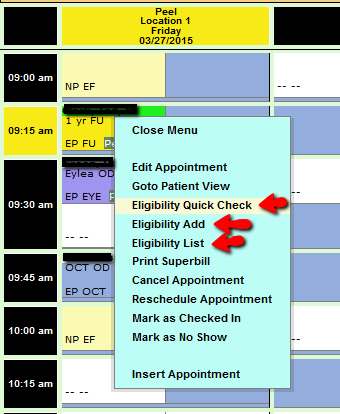
Which will cause the Eligibility Quick Check dialog to appear. The Quick Check dialog has already selected the Provider
and Location based off the appointment information. The Policy field is still allowed to be changed from the Primary in the
case the staff understands this appointment will be covered by a secondary Policy.

Eligibility by Appointment Report Quick Check
To perform a Quick Check from the Eligibility by Appointment Report, select the second icon on the row
to perform an Eligibility Quick Check as illustrated below.
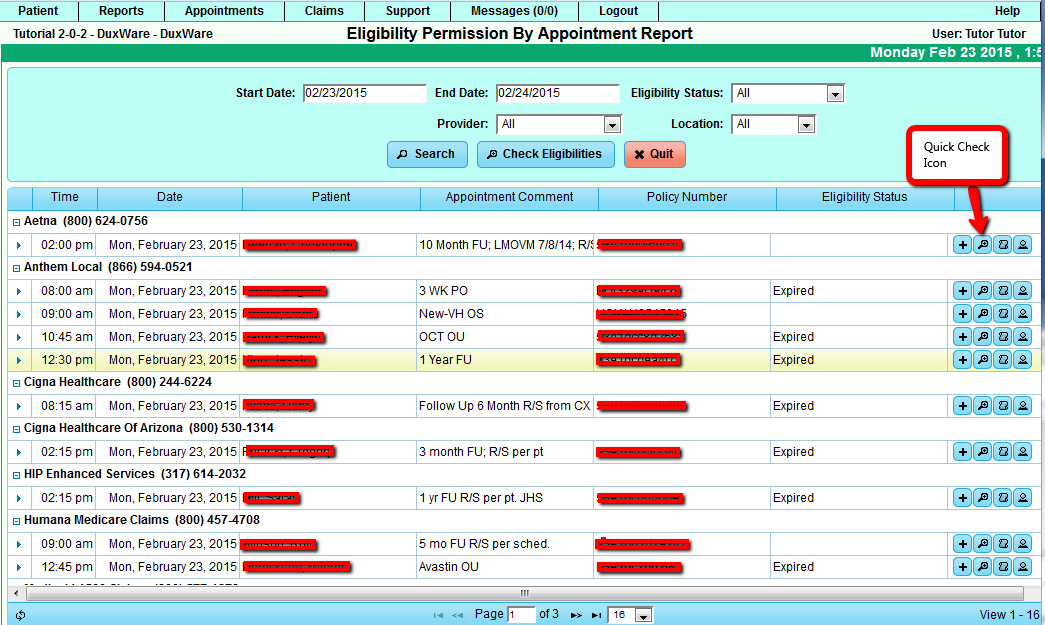
Once the Quick Check Icon has been selected, the Quick Check Dialog will appear. The Provider, Locations and
Policy are automatically locked. In this report, the appointments are sorted by their primary policies as
opposed to the Appointment Scheduler view.

Eligibility via Bulk Checking
There are two locations in DuxWare available to perform Eligibility Bulk Checking:
- Eligibility by Appointment Report
- Automatically check eligibility via the Eligibility Portal Setting.
Bulk Checking via the Eligibility by Appointment Report
To access the Eligibility by Appointment Report, see the illustration below:

On the top of the Eligibility by Appointment Report, there is a "Check Eligibility"
button that will cause the bulk checking dialog to appear as illustrated below.

After selecting the "Check Eligibilities" button, the following dialog box will appear.
It will display the number of eligibility records that will be sent and how they will be sent
through to the clearinghouse. By default, the Automatic Portal is selected which will allow the
system to choose a portal automatically based off of the chosen criteria. The criteria is an
Automatic Portal, then a Real-time Portal, then a manual portal. The appointments it will choose
to select is based on the following criteria:
- The appointment appears in the table of "Eligibility by Appointment Report".
- The appointment is within 30 days of now (future or past).
- The patient has a policy.
- The last valid Eligibility for the appointment is not Yes, Maybe or No.
The "Start Check" will cause the system to send the relevant data to the clearinghouse for processing.
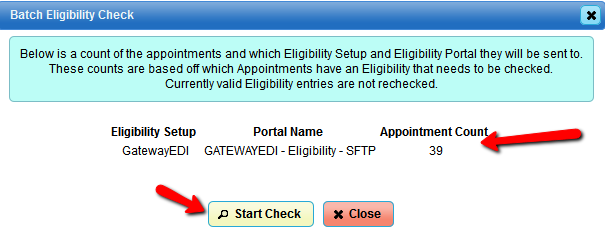
This dialog shows you how many eligibility request you are going to send and how they will be sent. By default
the Automatic Portal is selected which will allow the system to choose a portal automatically based off of chosen
criteria. The criteria is a Automatic Portal, then a real time portal, then a manual portal. The appointments it will
chose to select is based off the following criteria:
- The appointment appears in the table of "Eligibility by Appointment Report".
- The appointment is within 30 days of now (future or past).
- The patient has a policy.
- The last valid Eligibility for the appointment is not Yes, Maybe or No.
The "Start Check" will cause the system to send the relevant data to the clearinghouse for processing. As times for
large data transactions will vary the "Eligibility by Appointment Report" will not automatically update. In general the
fastest turn around time is 3 minutes the slowest is 18 hours.
The Eligibility Portal Setting is controlled in the portal settings as illustrated below.
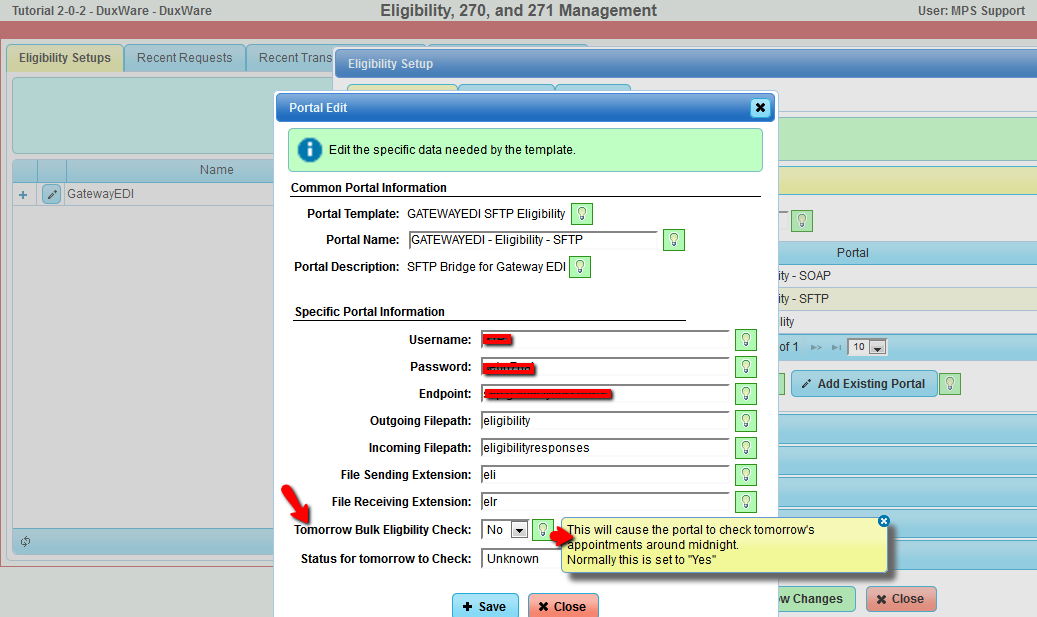
The allowed values for "Activate Tomorrow Bulk Eligibility Checking" are No, Yes, and a number. The number represents how
far away tomorrow is in days. This report runs at early in the morning so it will check that days appointments which is
represented by the number 0. If you want the system to check the day after appointments use the number 1. The day after
setting is required for the MDOL sftp interface due to the large latency in getting results.
The allowed values for the "Status for tomorrow to Check" may be one of the words in the list below (case matters). It is
highly recommended the "Unknown" word be used.
- Unknown - The last valid Eligibility for the appointment is not Yes, Maybe or No.
- Error - The last valid Eligibility for the appointment is None, Error, Expired.
- Not Yes - The last valid Eligibility for the appointment is not Yes.
- No - The last valid Eligibility for the appointment is No.
- Yes - The last valid Eligibility for the appointment is Yes.
- Maybe - The last valid Eligibility for the appointment is Maybe.
- All - The last valid Eligibility for the appointment is not checked at all.
Eligibility Request (270) via Manual Download
If you are reviewing this area of the user guide, it is likely that your clearinghouse does not support eligibility real-time or SFTP batch
processing. The manual process is identical to our previous Eligibility Module with the exception that it is now in the 5010 format.
To download an eligibility request file (270), you will need to create a Manual Portal in the Eligibility Manager.
From the Appointments tab, select Eligibility Manager, then Eligibility.

Once you have added the Manual Portal, go to Eligibility by Appointment, make your selections, then check Eligibility.

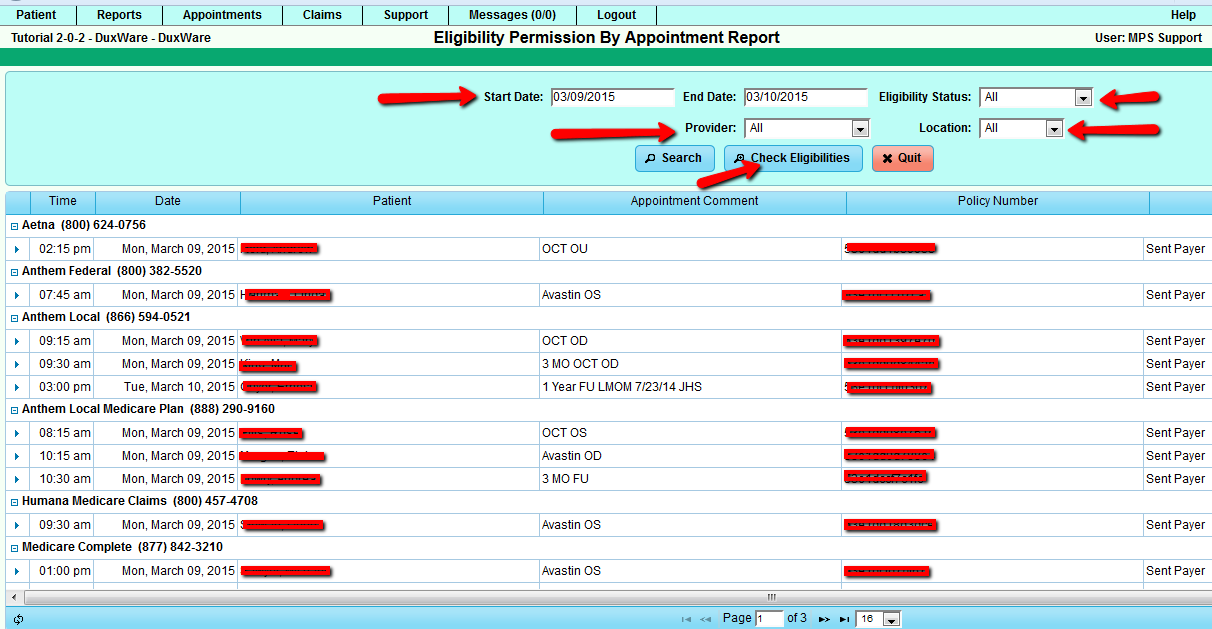
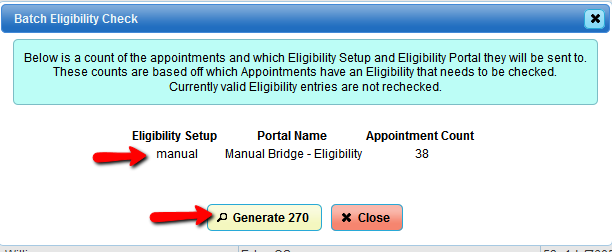
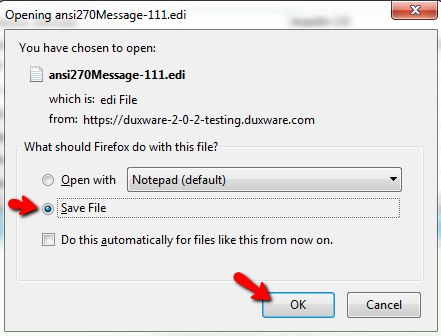
Once "Generate 270" has been selected, you will see a dialog box as illustrated below. Make sure to select
Save File. You will need to upload this file to your clearinghouse. Depending on your Browser download
settings, the file will either be saved to your Desktop and/or your Downloads.
Eligibility Response (271) Manual Upload and Processing
In the event that your clearinghouse does not support real-time or batch portals, manual upload for eligibility
responses (271) is still available. The process works the same as DuxWare's system prior to this update with the exception that this
update is in the 5010 format and has added features.
Before you begin the Manual Upload process,you must first download the Eligibility Response file (271) from your clearinghouse.
The file should look similar to the illustration below:

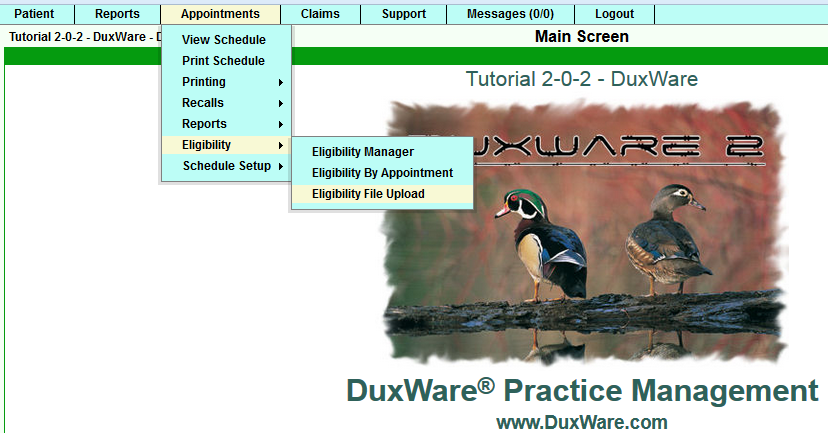
To access the Eligibility Upload, Appointments tab>Eligibility>Eligibility File Upload:
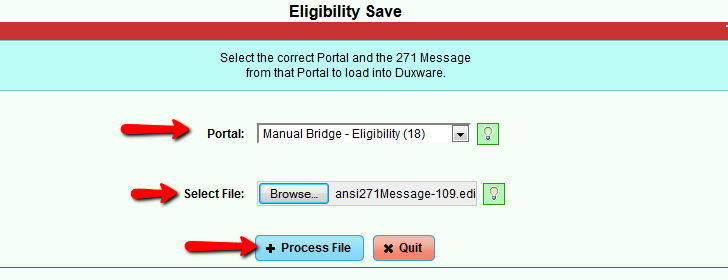
You will need to select the "Manual Bridge" from the drop down menu for the Portal, browse,pick your file and select
"Process File" as illustrated below:
To view the processed Eligibility Response, go to the Appointments tab>Eligibility>Eligibility Manager.
Select the fourth tab "Recent Responses(271). Then select the "+" sign to the left of the eligibility response
that you just uploaded. "+" will expand; edit will allow the user to manipulate responses for your practice.
See section for Understanding the Rules in the Eligibility Configuration and Set-up section of the User Guide.

Eligibility Response Examples from the Patient's Account
When the clearinghouse has returned the data, Duxware will automatically update the Eligibility records. See Illustrations
below:
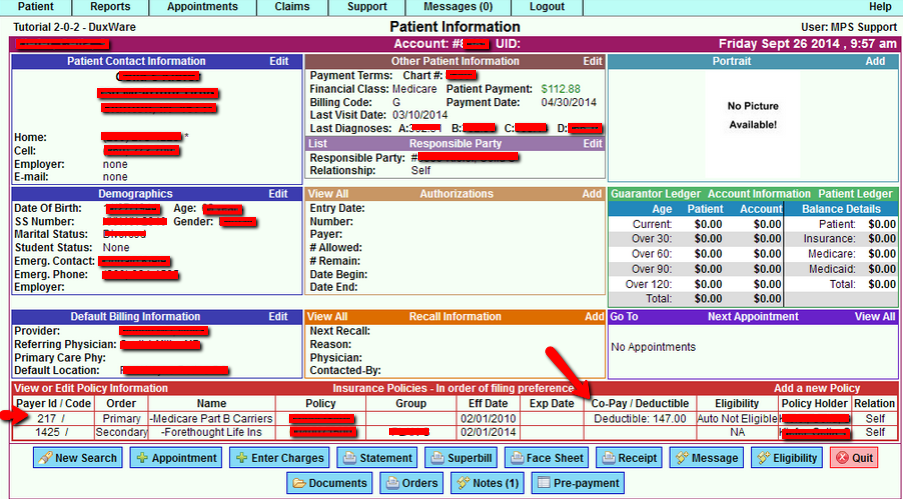
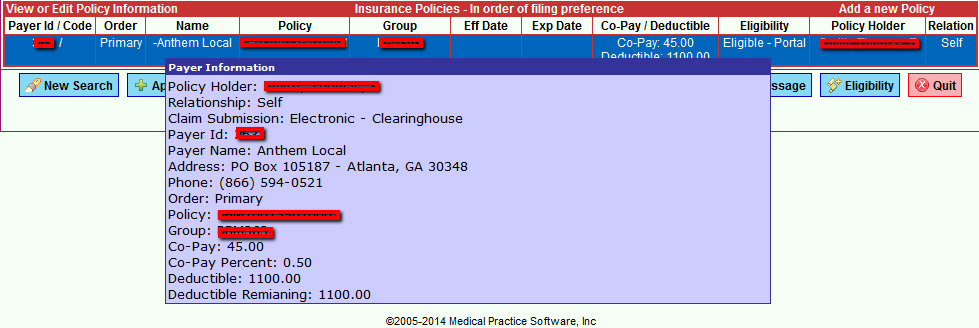
If you mouse-hover over each policy at the bottom to the Patient Information screen, more detail is provided as illustrated below.
To view the actual eligibility responses, select the payer from the Patient Information screen, then scroll down to view the
eligibility responses.
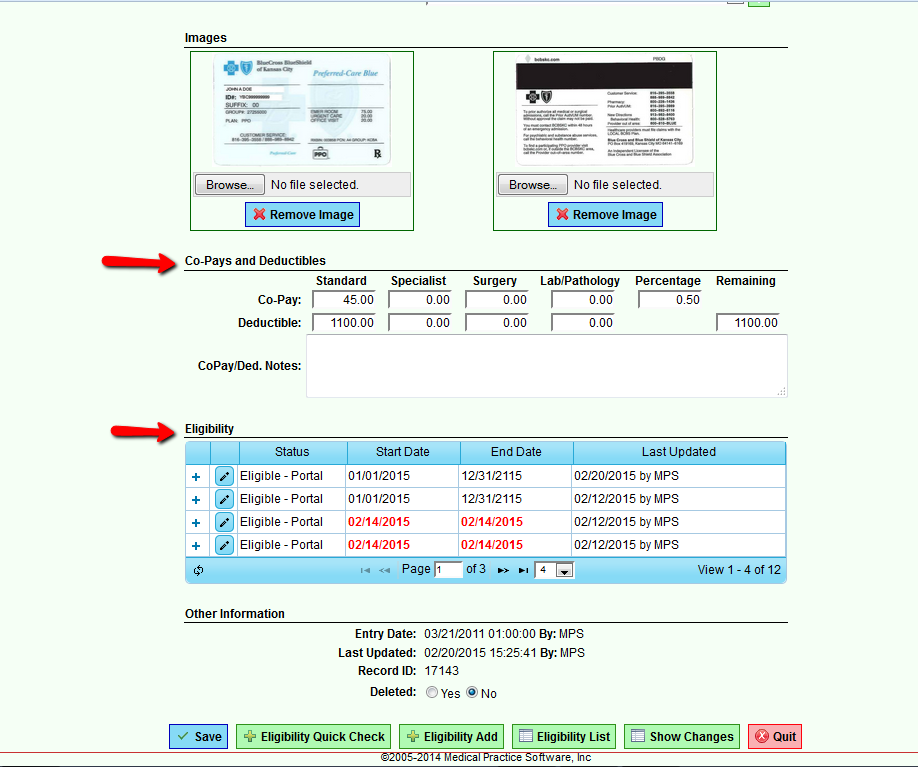
To edit view response messages or edit filters, select the "+" icon to view and the edit icon to edit the response rule.
To view and drill down to details of the eligibility response, select the plus icon to expand as illustrated below:

You will see four tabs:
- Results
- Notes
- Eligibility 270 (request) message
- Eligibility 271 (response message
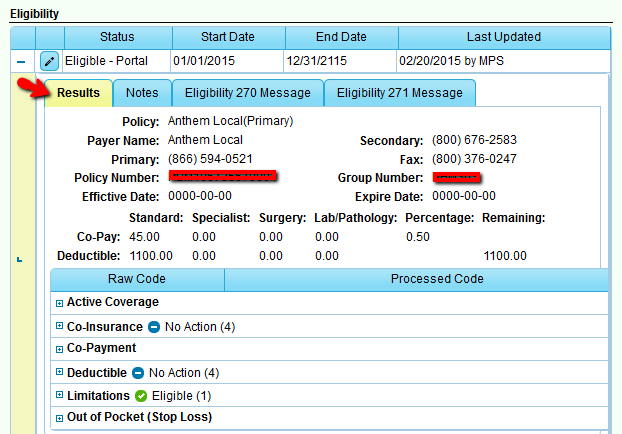
To view and edit the eligibility response, select the edit icon. You will be able to edit the response rules from this area.
![]()
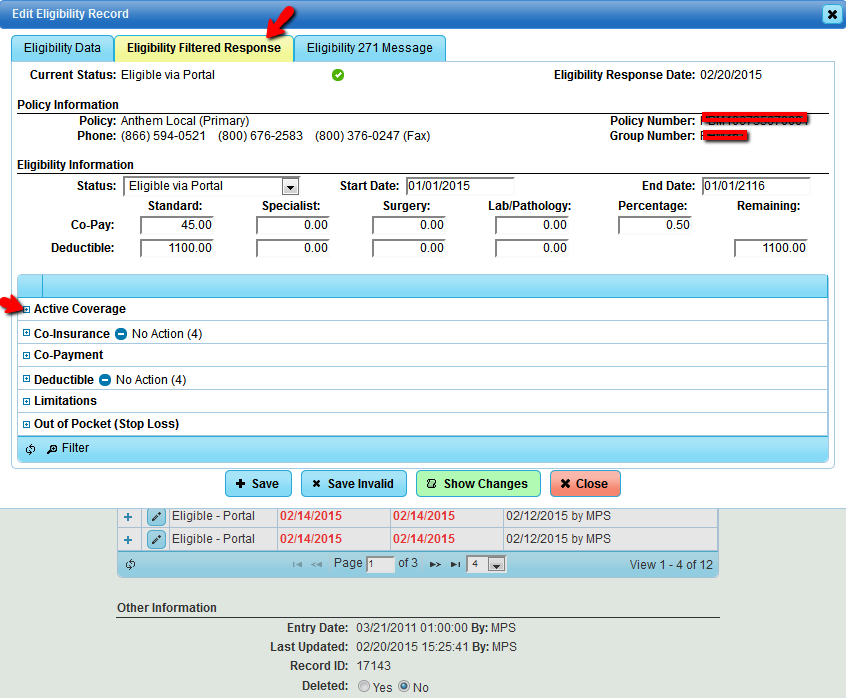
If you decide to edit the filter, be sure to save your change at the bottom.


