Difference between revisions of "DuxWare Release Note - 05/05/2024"
| (31 intermediate revisions by the same user not shown) | |||
| Line 1: | Line 1: | ||
| − | |||
==Charge Entry== | ==Charge Entry== | ||
| Line 9: | Line 8: | ||
Within this setting, you can input the provider or referring provider code for the associated field. Consequently, any new claims (without a patient-level referring or ordering provider) will adopt these default values. It's worth noting that if an invalid value is entered, the charge entry page will not apply the associated field settings. | Within this setting, you can input the provider or referring provider code for the associated field. Consequently, any new claims (without a patient-level referring or ordering provider) will adopt these default values. It's worth noting that if an invalid value is entered, the charge entry page will not apply the associated field settings. | ||
| + | Support tab > Management > Configuration Panel: | ||
| + | [[File:Cee1.png]] | ||
| − | + | Charge Entry > Claim Defaults: | |
| − | [[File: | + | [[File:Cee2.png]] |
| − | [[File: | + | Claim Defaults > Default Referring Physician: |
| + | |||
| + | [[File:Cee3.png]] | ||
| Line 21: | Line 24: | ||
| − | [[File: | + | [[File:Cee4.png]] |
| + | |||
* Use of Enter Key to Move Forward | * Use of Enter Key to Move Forward | ||
| Line 28: | Line 32: | ||
| − | [[File: | + | [[File:Cee5.png]] |
==Claims== | ==Claims== | ||
| Line 71: | Line 75: | ||
| − | [[File: | + | [[File:Chh2.png]] |
| Line 77: | Line 81: | ||
| − | [[File: | + | [[File:Chh3.png]] |
==Collections== | ==Collections== | ||
| Line 127: | Line 131: | ||
* Removed the existing feature that allows the user to click inside the chart to display the number of visits by provider (feature is moved to menu) | * Removed the existing feature that allows the user to click inside the chart to display the number of visits by provider (feature is moved to menu) | ||
| − | * Added Action Menu to the widget title bar next to the Widget Settings button. The menu has the following items: | + | * '''Added Action Menu''' to the widget title bar next to the Widget Settings button. The menu has the following items: |
| − | + | * '''Show All Providers''' – select this item to show the number of visits by Provider. | |
| − | + | ** Opens Yesterday’s Visits by Provider dialog. | |
| − | + | ** Shows the number of visits by each provider, and whether their break-even goals were met. | |
| − | + | ** Able to sort the results by provider name, or by the number of appointments. | |
| − | + | ** Able to switch from provider view to location view. | |
| − | + | * Show All Locations – select this item to show the number of visits by Location. | |
| − | + | ** Opens Yesterday’s Visits by Location dialog. | |
| − | + | ** Shows the number of visits by each location, and whether or not its break-even goals were met | |
| − | + | ** Able to sort the results by location name, or by the number of appointments. | |
| − | + | ** Able to switch from location view to provider view. | |
| − | + | * Updated the Widget Settings: | |
| − | + | ** Added the ability to display visits for all locations (the default), or for only the selected locations – available through the Location/Location Group multi selector: | |
| − | + | *** Leave empty to select all locations. | |
| − | + | *** Select one or more locations/location groups. | |
| − | + | ** Added the ability to display visits for all providers (the default), or for only the selected providers – available through the Provider/Provider Group multi selector: | |
| − | + | *** Leave empty to select all providers. | |
| − | + | *** Select one or more provider/provider groups. | |
| − | + | ** Added the ability to set break even goals for each provider in the practice – available through the Set Break Even Goals by Provider button: | |
| − | + | *** Opens the Edit Provider Goals dialog. | |
| − | + | *** If Provider Goals are set, Yesterday’s Visits by Provider dialog will show whether each provider has met their goals. | |
| − | + | *** If no provider goals are set, the default practice level Break Even Goal will be used. | |
| − | + | * Added the ability to set break even goals for each location in the practice – available through the Set Break Even Goals by Location button: | |
| − | + | *** Opens the Edit Location Goals dialog. | |
| − | + | *** If Location Goals are set, Yesterday’s Visits by Location dialog will show whether each location has met its goals. | |
| − | + | *** If no location goals are set, the default practice level Break Even Goal will be used. | |
| + | |||
| + | [[File:Yv1.png]] | ||
| + | [[File:Yv2.png]] | ||
| − | [[File: | + | [[File:Yv3.png]] |
| + | |||
| + | |||
| + | [[File:Yv4.png]] | ||
==Patient== | ==Patient== | ||
| + | |||
| + | * Patient Demographics | ||
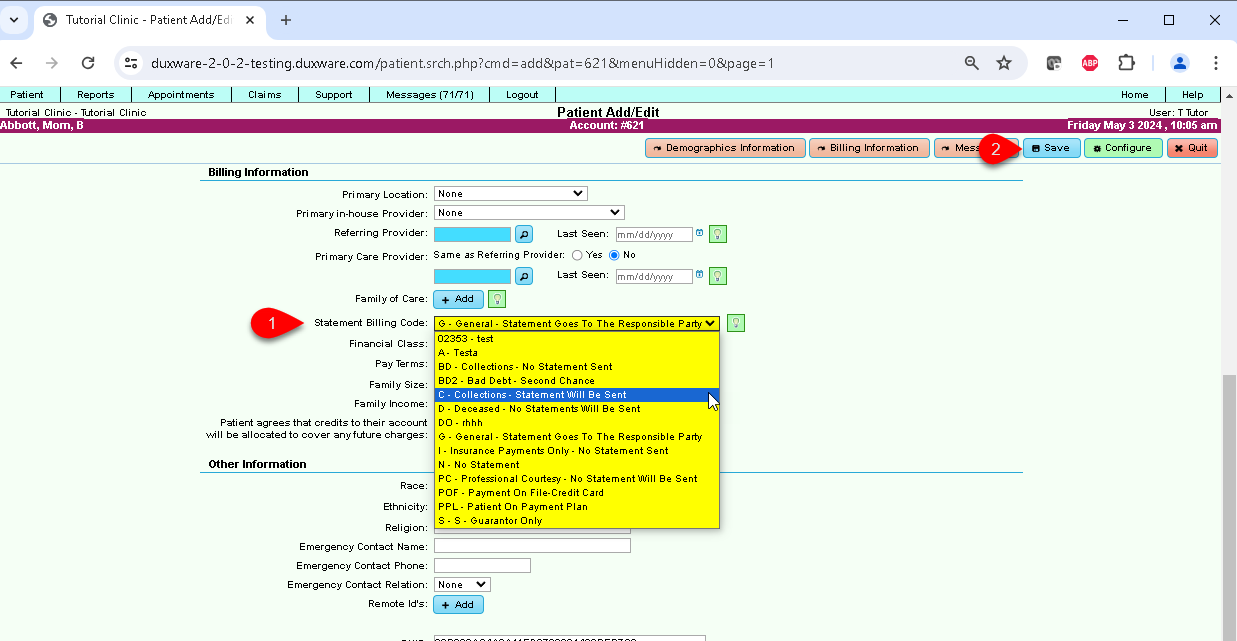
| + | ** When updating a guarantor’s bill code, an option was added to also update the bill codes of all the patients linked to the guarantor. | ||
| + | ** When updating a patient’s bill code, and the patient is linked to a guarantor other than self, the option was added to also update the bill codes of the guarantor and any other patients linked to that guarantor. | ||
| + | |||
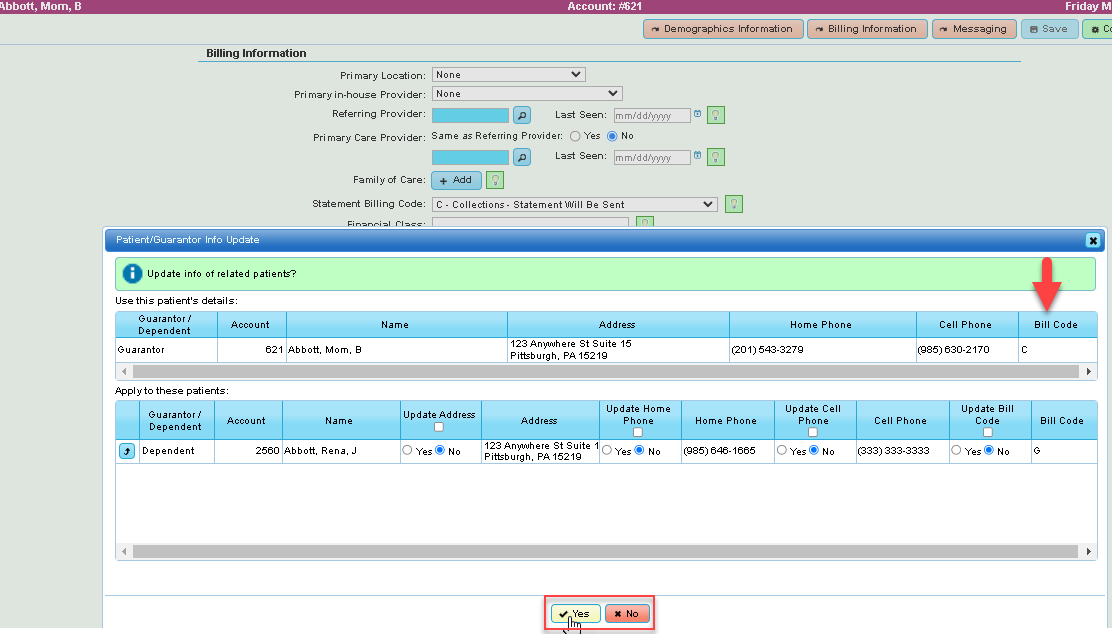
| + | '''Note:''' When saving a patient/guarantor, the Patient/Guarantor Address Update Dialog has been used to update the addresses and phone numbers of guarantors and their patients. To satisfy the issue of updating the Patient/Guarantor Bill Codes, we will allow the Bill Codes to also be updated through the Patient/Guarantor Address Update Dialog. Since now more than just addresses and phone numbers can be updated through the dialog, the dialog will be renamed to the Patient/Guarantor Info Update Dialog. | ||
| + | |||
| + | |||
| + | [[File:Pp1.png]] | ||
| + | |||
| + | |||
| + | Once ‘Save’ has been selected, the following dialog will appear with the guarantor and dependent(s) with an option to update the Bill Code. | ||
| + | |||
| + | |||
| + | [[File:Pp2.png]] | ||
==Payments== | ==Payments== | ||
| + | '''Batch Payment Apply'''<br> | ||
| + | |||
| + | The Batch Payment Apply interface empowers users to efficiently handle payments across multiple claims through a unified input platform. Within this interface, users can select a specific batch ID and payer, facilitating seamless payment application to numerous claims. | ||
| + | Key Features: | ||
| + | * Batch Selection: Users can pick a batch ID from a predefined list, allowing them to focus on a specific batch for payment processing. | ||
| + | * Payer Selection: Users have the flexibility to designate a payer for the chosen batch, streamlining payment attribution and accounting processes. | ||
| + | * Payment Input: Users can input payment details, such as amount and payment method, once for the entire batch, simplifying data entry and reducing errors. | ||
| + | * Claim Application: The interface facilitates the application of payments to multiple claims associated with the selected batch, enabling efficient allocation of payments across claims for accurate and timely processing. | ||
| + | * Invoice Lookup: Users can now add an "Invoice ID" via the statement setup screen, which will be visible and printed on statements. By utilizing the "Invoice Lookup" button on the batch payment screen, claims that were part of that batch will automatically load in the grid. | ||
| + | |||
| + | By consolidating payment processing tasks into a single interface, the Batch Payment Apply screen enhances user productivity and promotes streamlined payment management workflows. | ||
| + | |||
| + | To access, go to: Claims>Post Payments by Statement: | ||
| + | |||
| + | |||
| + | [[File:Pay1.png]] | ||
| + | |||
| + | |||
| + | You will be redirected to Bulk Check Distribution. | ||
| + | |||
| + | |||
| + | [[File:Pay2.png]] | ||
| + | |||
| + | |||
| + | ** Service Adjustment | ||
| + | |||
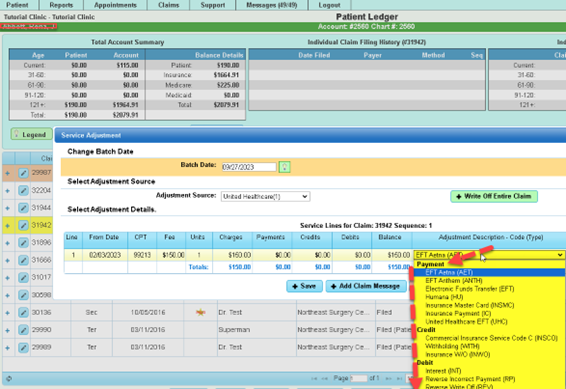
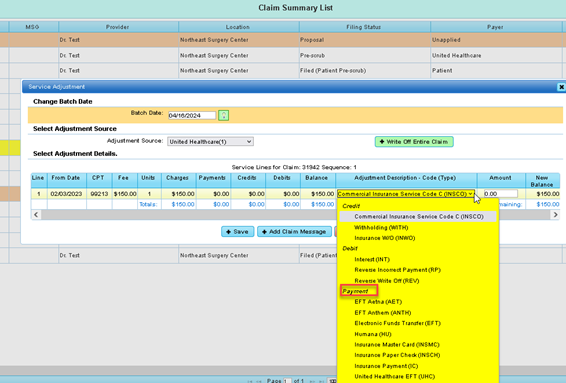
| + | Altered the “Service Adjustment” UI dialog so that pay codes flagged as type “Payment” will appear last in the “Adjustment Code” select box. | ||
| + | Before: | ||
| + | |||
| + | |||
| + | [[File:Pay3.png]] | ||
| + | |||
| + | |||
| + | After update: | ||
| + | |||
| + | |||
| + | [[File:Pay4.png]] | ||
| + | |||
| + | |||
| + | '''Claims Fund Transfer Module (NEW FEATURE):'''<br> | ||
| + | |||
| + | The Claim Fund Transfer module facilitates the effortless movement of funds between claims and unapplied buckets or between claims themselves, providing users with intuitive functionality for managing financial transactions.<br> | ||
| + | |||
| + | '''Key Features:'''<br> | ||
| + | |||
| + | 1. Transfer Between Claims and Unapplied Buckets: | ||
| + | * Users can transfer funds from a claim to an unapplied bucket or vice versa, allowing for flexible allocation of financial resources. | ||
| + | * This feature streamlines the process of managing unapplied funds and ensures efficient utilization of available funds across claims. | ||
| + | 2. Transfer Between Claims: | ||
| + | * Users have the option to transfer funds directly between different claims, simplifying financial adjustments and transactions. | ||
| + | * This capability enables users to reconcile balances and redistribute funds as needed to maintain accurate accounting records. | ||
| + | 3. User-Friendly Interface: | ||
| + | * The module features an intuitive interface designed to enhance user experience and facilitate smooth navigation. | ||
| + | * Users can easily initiate fund transfers and complete transactions with minimal effort, reducing the time and complexity associated with financial management tasks. | ||
| + | |||
| + | '''Usage:'''<br> | ||
| + | 1. Choose the claim from which funds will be transferred within the patient's ledger: | ||
| + | 2. Ensure that the selected claim contains available funds for the transfer. | ||
| + | 3. Click on the "Credit Transfer" button to open a dialog displaying all accessible buckets and claims. | ||
| + | 4. Provide Transfer Information: | ||
| + | * Enter the desired amount of funds to transfer and include any relevant transaction details. | ||
| + | 5. Begin Transfer: | ||
| + | * Finalize the transfer procedure to execute the transaction and accurately update financial records.nefits: | ||
| + | |||
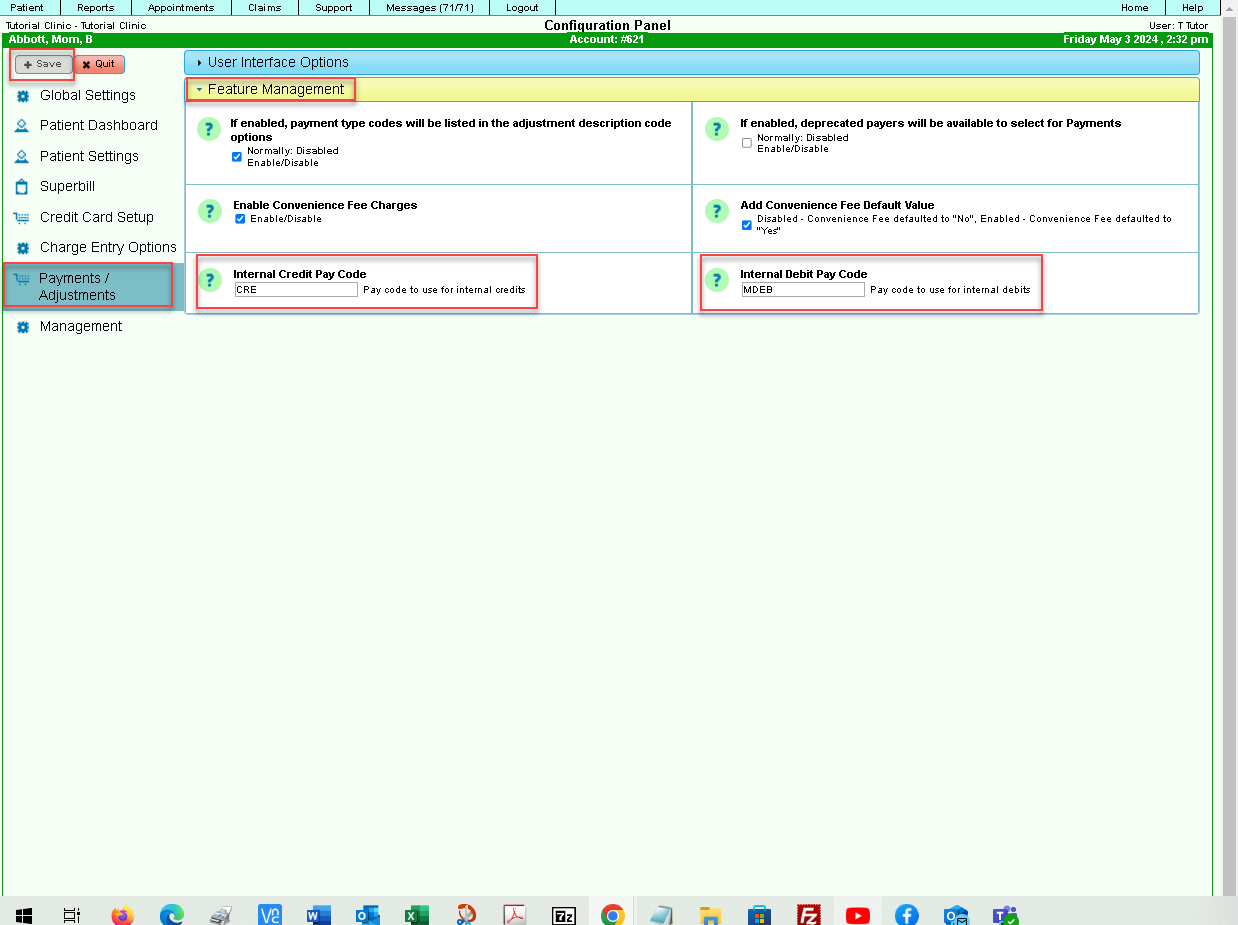
| + | Level 5 user can navigate to the “Payments/Adjustments” section of the system configuration module (Support → Management → Configuration Panel → Payments/Adjustments) | ||
| + | Expand the Accordion titled “Feature Management” | ||
| + | There are two new input fields: | ||
| + | |||
| + | * Internal Credit Pay Code (text field) - defaulted blank. | ||
| + | * Internal Debit Pay Code (text field) - defaulted blank. | ||
| + | |||
| + | Note: The Level 5 (management user) will need to select the Internal Pay Code for Debit and or Credit transaction from their Payment/Adjustment Code Search. If one does not exist, then it can be added. The Paying Entity should be set to ‘Patient’. You will need a designated pay code type: Credit and designated pay code type: Debit. | ||
| + | |||
| + | Let’s take a look: | ||
| + | |||
| + | |||
| + | [[File:Ppay5.png]] | ||
| + | |||
| + | |||
| + | '''NOTE: Pay Code Setup/Validations'''<br> | ||
| + | '''Scope:'''<br> | ||
| + | * Feature unavailable if patientDebitPayCode or patientCreditPayCode is empty/invalid. | ||
| + | * denied if transfer from the credit available < 0. | ||
| + | * denied if the claim is unapplied/conv fee. | ||
| + | * denied if trying to transfer to/from a locked batch. | ||
| + | * denied if transfer debit causes negative balance (sets line balance negative) | ||
| + | * denied if transfer credit causes negative balance (sets line balance negative, exception: unapplied claims | ||
| + | |||
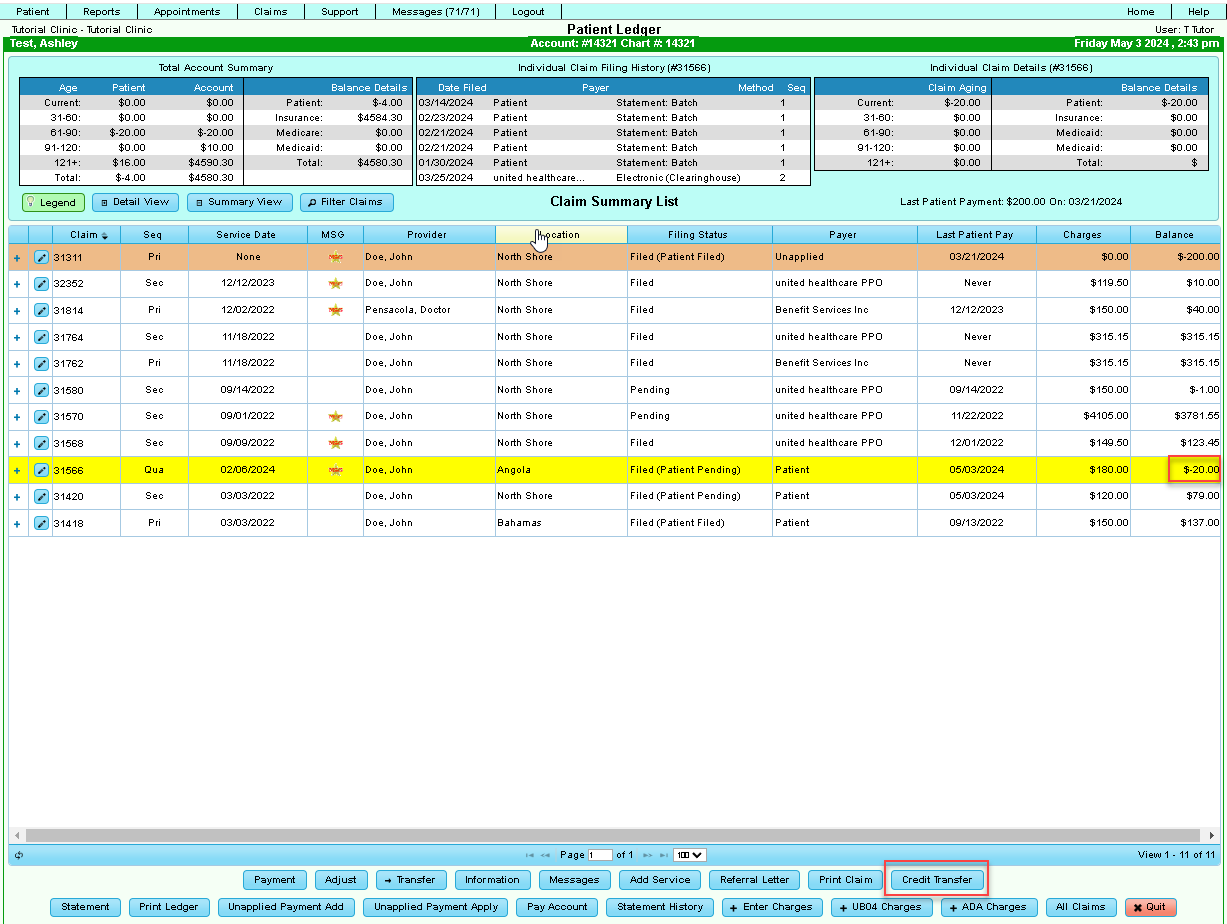
| + | Navigate to the Patient Ledger for any patient. | ||
| + | There is a new “Credit Transfer” button to the right of the “Print Claim” button. | ||
| + | |||
| + | |||
| + | [[File:Ppay6.png]] | ||
| + | |||
| + | |||
| + | If a pay code has not been input into the System Configuration Panel as illustrated above, then the following error will appear: | ||
| + | |||
| + | |||
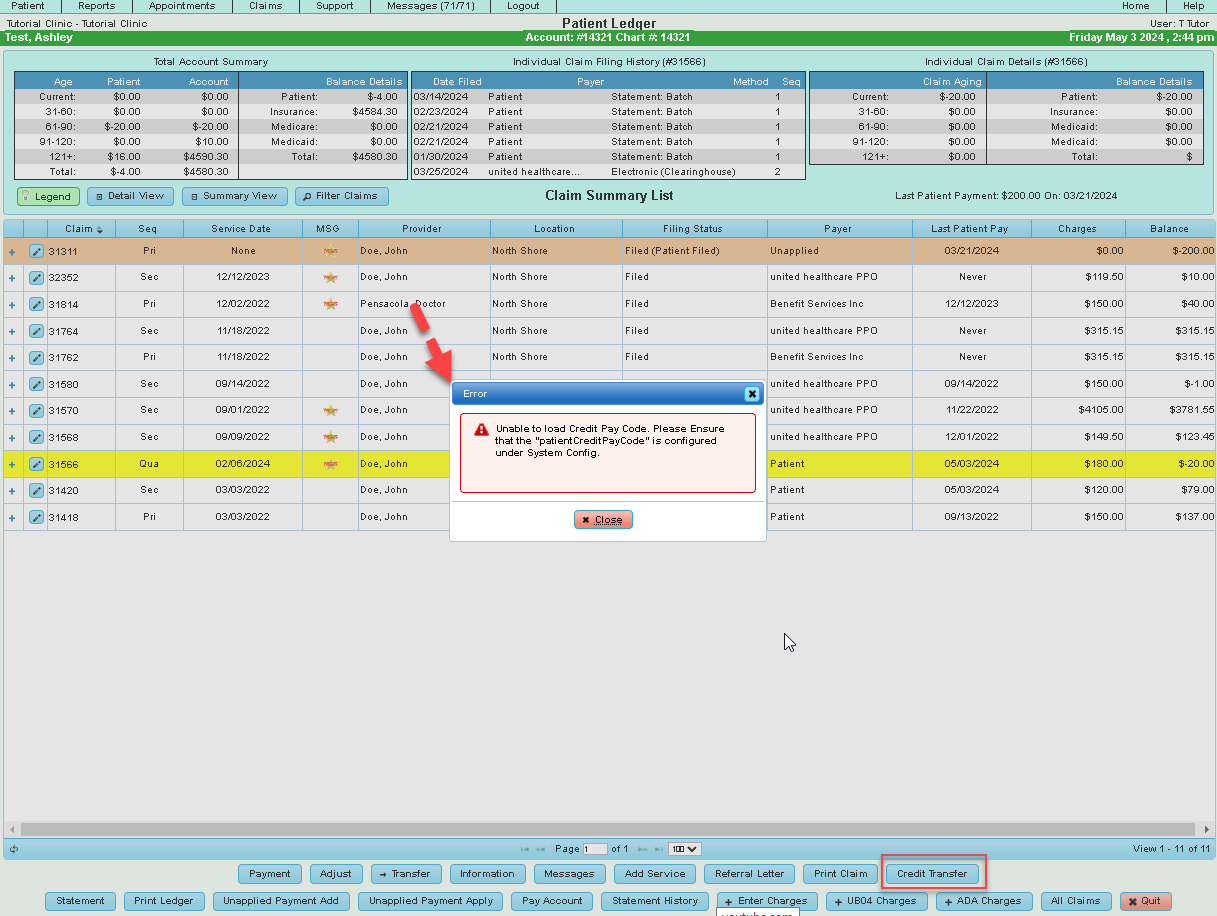
| + | [[File:Ppay7.png]] | ||
| + | |||
| + | |||
| + | Case Example: We will move $20.00 credit on file to patient to unapplied account.<br> | ||
| + | |||
| + | Highlight the claim with the credit, then select, “Credit Transfer”.<br> | ||
| + | |||
| + | |||
| + | [[File:Ppay8.png]] | ||
| + | |||
| + | |||
| + | $10.00 is being applied to Dr. Doe’s unapplied claim and $10.00 to claim # 32352 with balance of $10.00. | ||
| + | |||
| + | |||
| + | [[File:Ppay9.png]] | ||
| + | |||
| + | |||
| + | A confirmation dialog appears. If all is good, then select ‘Yes’. If ‘No’, then select ‘No’, and the transaction will cancel. | ||
| + | |||
| + | |||
| + | [[File:Ppay10.png]] | ||
| + | |||
| + | |||
| + | Ledger view after selecting yes for the move to unapplied and to the selected claim: | ||
| + | |||
| + | |||
| + | [[File:Ppay11.png]] | ||
| + | |||
| + | |||
| + | Below is how it is represented on the Reconciliation DaySheet: | ||
| + | |||
| + | |||
| + | [[File:Ppay12.png]] | ||
==Reports== | ==Reports== | ||
| + | |||
| + | Updates have been made to the following reports:<br> | ||
| + | |||
| + | '''Claim Data Report''' – To access, go to: Support tab>Reports>Listing> Claim Data Report. | ||
| + | |||
| + | * Added Primary and Secondary Filed to Payer Policy Number to Output | ||
| + | * Added the ability to find claims that have services with a combination of procedure codes on the same claim. | ||
| + | ** Apply search to any service that has one or more of the selected procedures. This is the default mode and is how the Procedure Search always functioned. When this option is selected, the Procedure Search applies to any service that has one or more of the selected procedures, regardless of whether the services associated with the procedures belong to the same claim. | ||
| + | ** Apply search to all selected procedures on the same claim. When this option is selected, the Procedure Search will find only the claims that have services with the selected procedure codes on the same claim. | ||
| + | |||
| + | '''Reconciliation Daysheet''' – To access this report, go to: Reports tab>Daily>Reconciliation DaySheet. | ||
| + | |||
| + | * Added the payment check numbers to the list of payments on the Excel report. | ||
| + | |||
| + | '''Patient Demographic Report''' – To access this report, go to: Reports tab>Patient> Patient Demographic Report. | ||
| + | |||
| + | * Added the ability to display patients that have more than one credit card on file. | ||
| + | * Added a new filter section titled Credit Card Related Selections | ||
| + | ** Can choose to perform a credit card related search or not. | ||
| + | ** Can search for patients that have credit cards on file. | ||
| + | ** Can search for patients that do not have credit cards on file. | ||
| + | ** Can search by credit card brand (Visa, Mastercard, Discover, etc.) | ||
| + | ** Can choose to ignore expired cards. | ||
| + | * Added additional output fields related to credit cards. | ||
| + | ** Credit Card Brand | ||
| + | ** Credit Card Expiration Date | ||
| + | ** Can only be selected when selecting “Yes” for the Perform a Credit Card Related Search filter option. | ||
| + | ** The report output will not display a list of all the cards that a patient has on file. Each patient appears on the report once, and only the details for the patient’s card that has its expiration date farthest in the future will be shown. | ||
| + | |||
| + | '''Practice Activity Report''' – To access this report, go to: Reports>Practice>Practice Activity Report | ||
| + | |||
| + | * Added the ability to group activity by User only. | ||
| + | |||
| + | '''Patient by Procedures Report''' – To access this report, go to: Reports tab>Patient> Patient by Procedure. | ||
| + | * Added Payer Search report criteria validation. | ||
| + | * If the Payer Search report criteria is set to Single but no single payer has been selected via the Payer Lookup button, then display an error message when user clicks on the Generate Report buttons warning the user that Payer Search is set to Single, but no Payer has been selected. | ||
==Merchant Services== | ==Merchant Services== | ||
| + | * The most recent DuxPortal release introduced the ability for a patient to make a payment directly onto a claim rather than into the unapplied claim (Available for Pace/Transafe Merchant services). This functionality adds the refund/void functionality to these payments rather than forcing the user to refund/void out an unapplied claim. | ||
| + | |||
| + | * Convenience Fee Updates – Added the ability to detect HSA/FSA cards with Pace and Transafe transactions. This is used in conjunction with the Convenience Fees. | ||
| + | |||
| + | * The convenience fee setup empowers users to configure payment accept acceptance and convenience fees according to their business needs and regulatory requirements. | ||
| + | Within the setup dialog, users can configure: | ||
| + | ** Card Present (for transactions over a terminal) | ||
| + | ** Reoccurring Charges (currently not implemented) | ||
| + | ** Installment Charges (currently not implemented) | ||
| + | ** Applied on debit cards (Fuze/Transafe only) | ||
| + | ** Applied on HAS/FSA (Fuze /Transafe only) | ||
| + | * Accepted Card Brands: Users can disable specific card companies, resulting in a failure when processing transactions with disabled cards. | ||
| + | * Assignment of the fee to specific merchant account configuration or leaving it blank to apply it as a default for the system. | ||
| + | * “User Override” acknowledgment: Allows users to override system rules and configure the fee according to their preferences. | ||
| + | * Each fee can be assigned to a merchant account or left blank to apply it as a default for the system. Each merchant account can have only one assigned convenience fee along with a single default fee. This restriction prevents fees from being categorized as “tiered”. | ||
| + | * The system automatically disables setting that do not comply with the “Convenience Fee Guidelines” unless the user selects the “Acknowlegment” checkbox. | ||
| + | |||
| + | All changes including who enabled the acknowledgement are visible via the “Show Changes” button on the dialog. | ||
| + | |||
| + | To review and update Convenience fees, go to the Support tab>Configuration Panel>Credit Card Setup. | ||
| + | |||
| + | You should see the following when selecting the Convenience Fee tab, select “Add” to set up a new fee or an existing record. | ||
| + | |||
| + | |||
| + | |||
| + | [[File:Meer1.png]] | ||
| + | |||
| + | |||
| + | In this example, the Convenience Fee is set to a flat fee. To apply percentage fee, the user will need to review the acknowledgement and check the box as indicated below. | ||
| + | |||
| + | |||
| + | [[File:Meer2.png]] | ||
| + | |||
| + | |||
| + | * Note: Clinics that are currently set up and using convenience fees with a percentage will not be allowed an update to the percentage fee without selecting the acknowledgement. We do encourage our clients to review the guidelines and make the best decisions for your clinic. | ||
| + | * The info bulbs have valuable information to guide you with your selections. The illustration below provides an example. | ||
| + | |||
| + | |||
| + | [[File:Mer3.png]] | ||
| + | |||
| + | |||
| + | '''Convenience Fee Guidelines:''' | ||
| + | |||
| + | |||
| + | [[File:Mer4.png]] | ||
| + | |||
| + | ==Customer Care== | ||
| + | If you have questions, please contact your Customer Care Team. | ||
| + | ==Previous Release Note== | ||
[[DuxWare Release Note - 12/10/2023|Previous Release Note - 12/10/2023]] | [[DuxWare Release Note - 12/10/2023|Previous Release Note - 12/10/2023]] | ||
Latest revision as of 21:32, 3 May 2024
Contents
Charge Entry
- Adding a default for Referring Provider via the Configuration Panel.
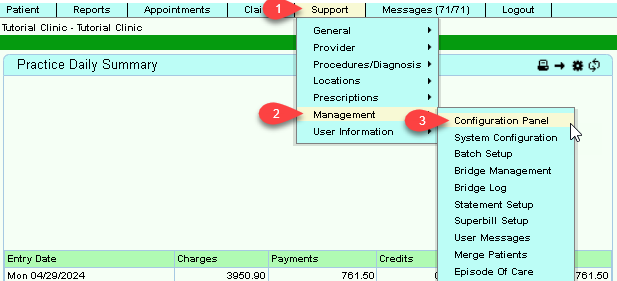
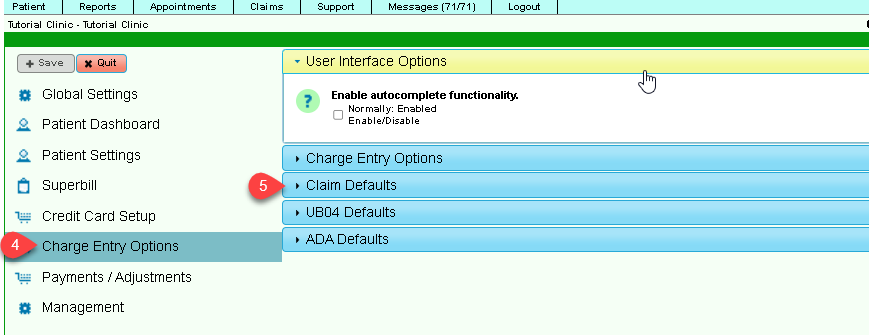
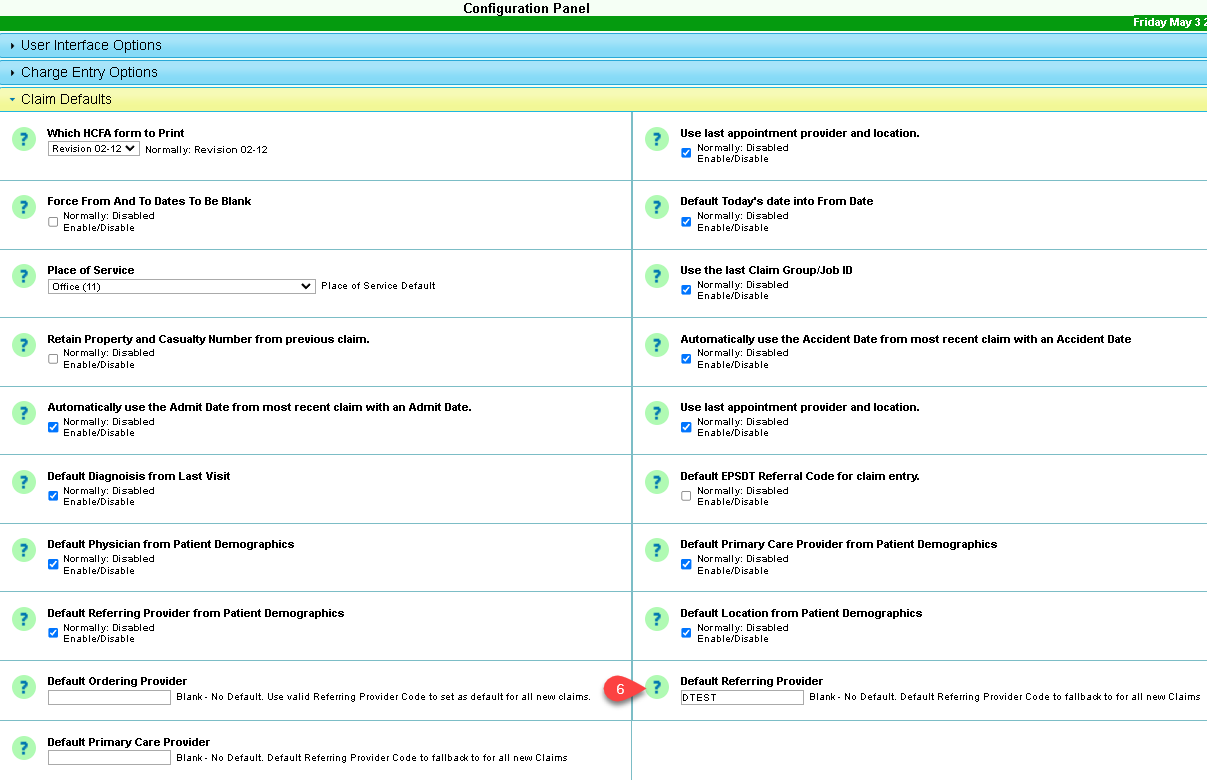
Through the Configuration Panel in Support → Management, users can establish a default system-level order and referring provider. Navigate to Configuration Panel → Charge Entry Options → Claim Defaults to access this feature.
Within this setting, you can input the provider or referring provider code for the associated field. Consequently, any new claims (without a patient-level referring or ordering provider) will adopt these default values. It's worth noting that if an invalid value is entered, the charge entry page will not apply the associated field settings.
Support tab > Management > Configuration Panel:
Charge Entry > Claim Defaults:
Claim Defaults > Default Referring Physician:
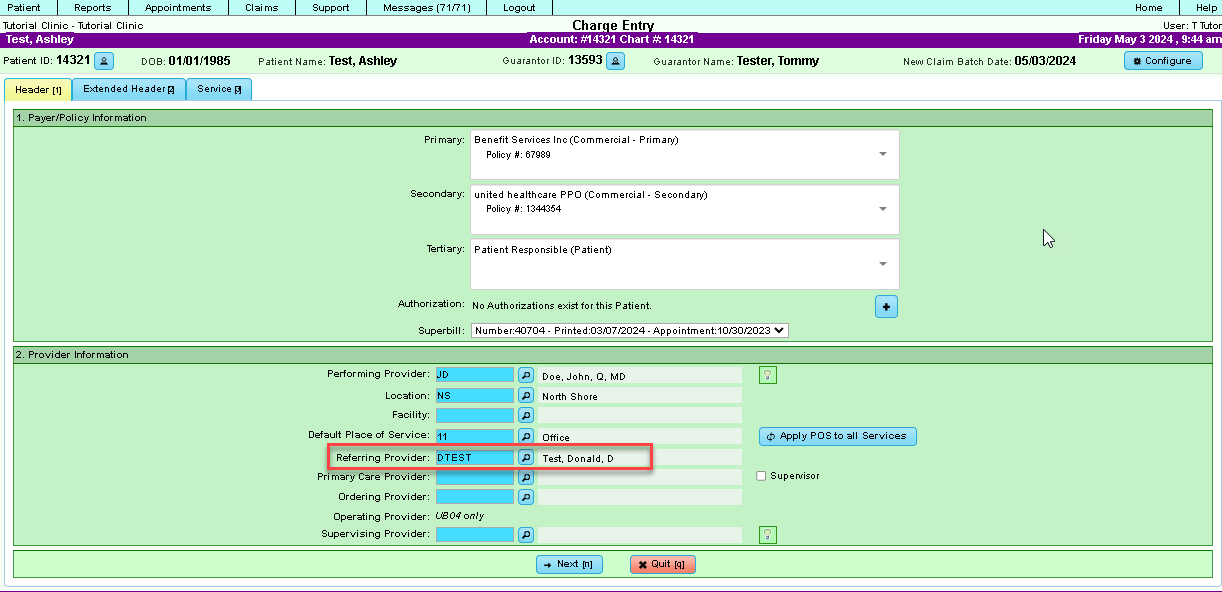
The charge entry screen will respond to the input in the “Default Referring Provider” field.
- Use of Enter Key to Move Forward
Added functionality to allow the user to use the Enter key to navigate through the fields on the Pre-payment Apply screen.
Claims
Fixed issues:
- ICN for 837i claims
- Fixed an error in the code to control the inclusion for the ICN the 837i claim filings based on the submission type.
- Anesthesia:
- Fixed an issue in the anesthesia minutes fields on the service add/edit panel. Now, whenever changes are made to the "From" and "To" input fields, the "Minutes" field will accurately display the time interval in minutes.
- Claim Proposal:
- Fixed an issue displaying the payer information on proposal type claims in the ledger.
- Miscellaneous Claim Updates:
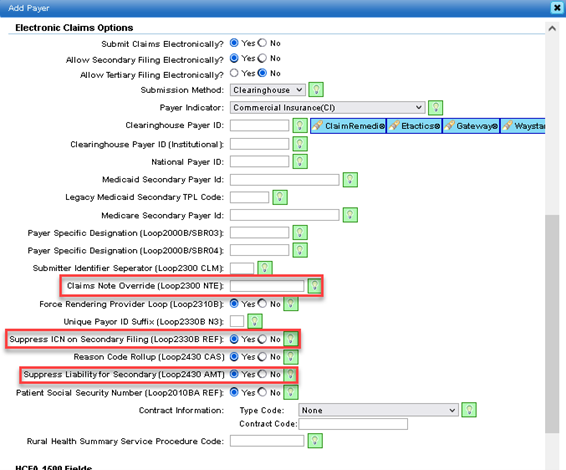
- Payer Manager
- added a payer option “Suppress Liability for Secondary (Loop 2430 AMT).
- added a “Suppress ICN on Secondary Filing (Loop 2330B REF).
- added a payer level override to claim notes for electronics. It is limited to 10 characters.
- Payer Manager
- UB-04/CMS-1450:
- The header text on the Claim's Note entry field was altered to reflect that it will also output on the UB-04. This only occurs when the def “Block 80” is not set.
- There is a new override for Block 61 under UB-04. UB-04 now allows Block 61 to be overwritten by block 51. See Payer Setup under UB-04 section.
- Claim Proposals/Pre-authorization:
- Implemented a loading indicator for the transition between claims and proposal and vice versa. This feature ensures users are informed about the ongoing process. (Primarily dental ADA claims)
Updates to ICN Usage:
Description:
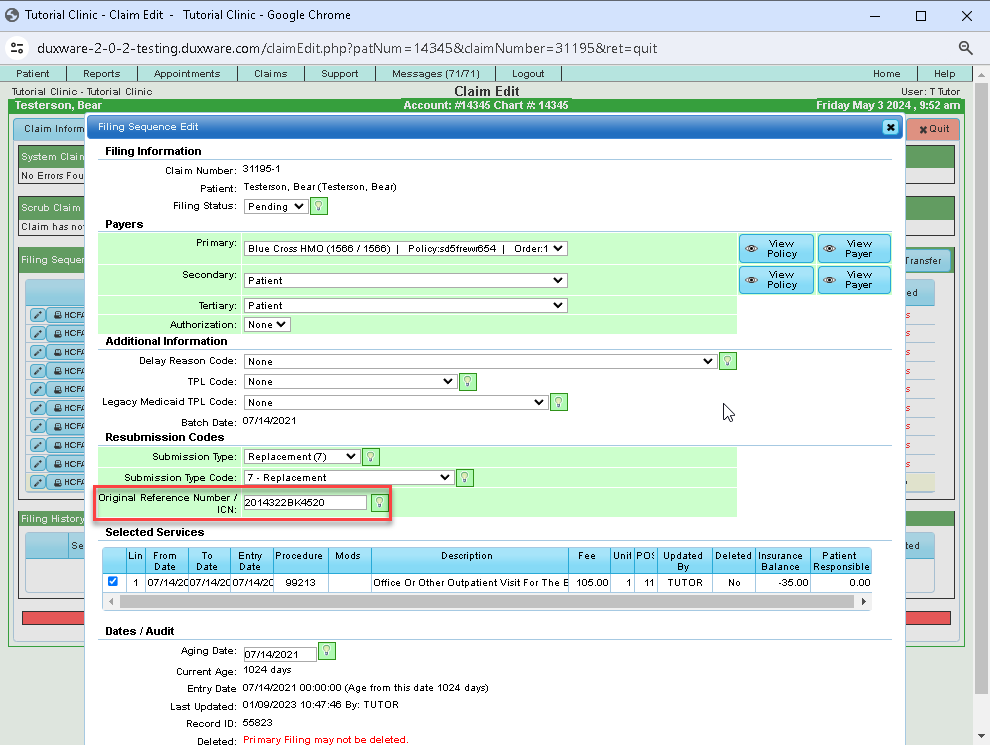
- When posting payments/adjustments from an electronic remit file, the system now automatically updates the Original Reference Number (ICN) of the associated filing sequence with the value in the CLP-7 field of the remit.
If the remit file is unposted, the ICN value in the filing sequence will be cleared, provided the current ICN value still matches the one from the remit file. This ensures accurate tracking of ICN values even if they have been manually updated after the remit was posted. Please note this change in your workflow. The ICN is stored in the Claim Filing Sequence.
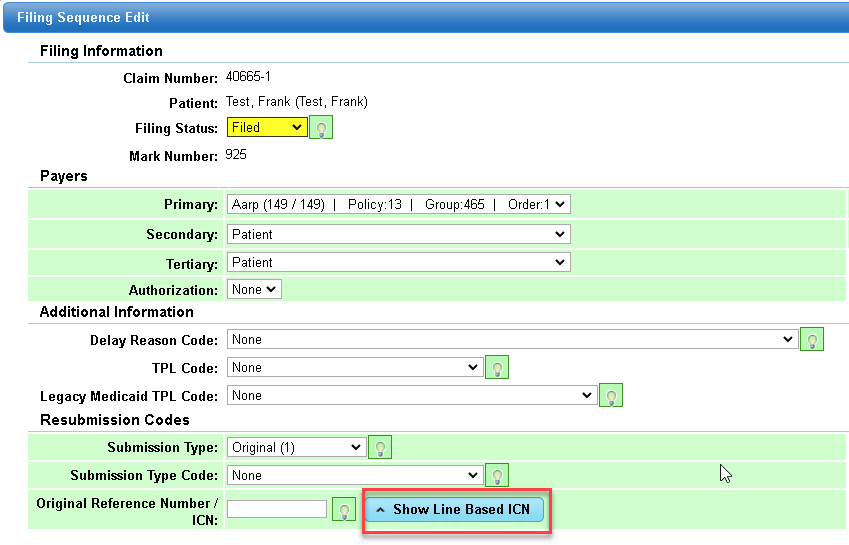
“Show Line Based ICN” has been removed from view. It is no longer supported. The screen shot below is prior to the update.
Collections
Statements with Invoice ID:
- Added a system generated Invoice ID to PDF statements generated by the Collection Manager.
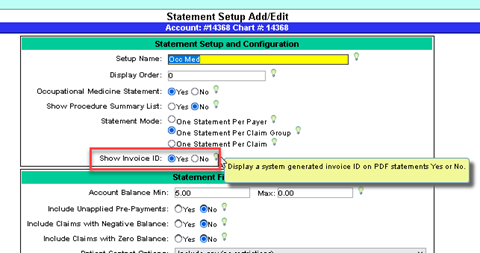
- Added a new Statement Default called Show Invoice ID to the Statement Setup and Configuration:
- Select Yes to show the Invoice Id on all PDF statements that can be generated by the Collection Manager
- Select No to not show the Invoice Id on all PDF statements that can be generated by the Collection Manager
- The Invoice Id is a system generated ID based on the Statement Batch ID
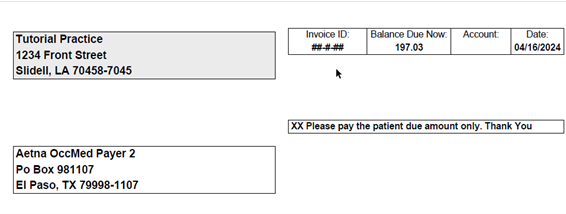
- If Invoice IDs are configured to be displayed on statements through the Statement Setup, display the Invoice ID on PDF statements that can be generated by the Collection Manager:
- Patient Statements
- Advanced Statements
- Occupational Medicine Statements
Example Statement:
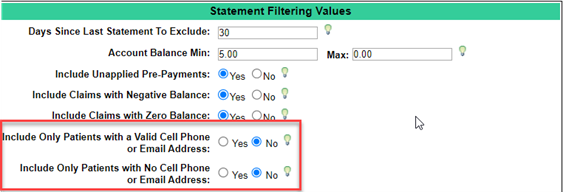
Patient Statements – Update to Contact Settings:
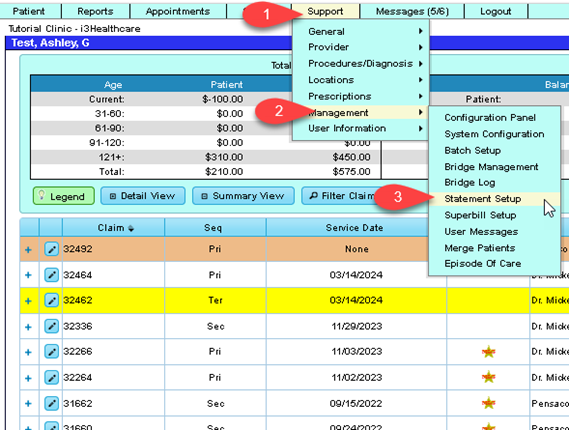
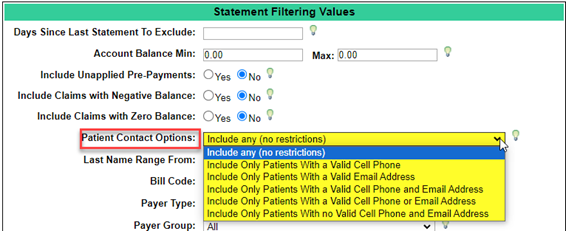
To access the Statement setup, go to Support tab>Management>Statement Setup.
Prior Statement Setup:
Dashboard (Home)
Widget: Yesterday’s Visits
Updates to the Yesterday’s Visits Dashboard Widget:
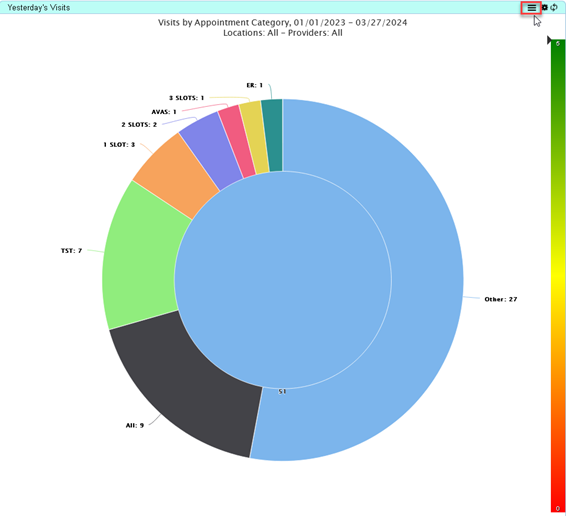
- Removed the existing feature that allows the user to click inside the chart to display the number of visits by provider (feature is moved to menu)
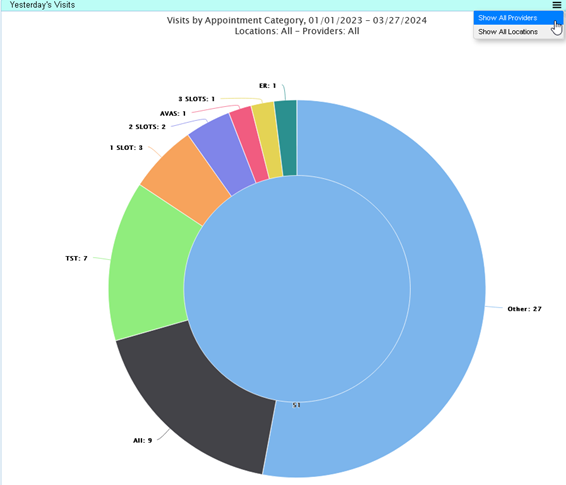
- Added Action Menu to the widget title bar next to the Widget Settings button. The menu has the following items:
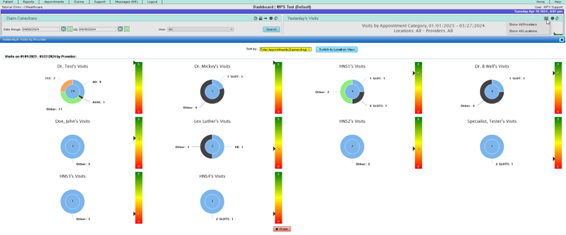
- Show All Providers – select this item to show the number of visits by Provider.
- Opens Yesterday’s Visits by Provider dialog.
- Shows the number of visits by each provider, and whether their break-even goals were met.
- Able to sort the results by provider name, or by the number of appointments.
- Able to switch from provider view to location view.
- Show All Locations – select this item to show the number of visits by Location.
- Opens Yesterday’s Visits by Location dialog.
- Shows the number of visits by each location, and whether or not its break-even goals were met
- Able to sort the results by location name, or by the number of appointments.
- Able to switch from location view to provider view.
- Updated the Widget Settings:
- Added the ability to display visits for all locations (the default), or for only the selected locations – available through the Location/Location Group multi selector:
- Leave empty to select all locations.
- Select one or more locations/location groups.
- Added the ability to display visits for all providers (the default), or for only the selected providers – available through the Provider/Provider Group multi selector:
- Leave empty to select all providers.
- Select one or more provider/provider groups.
- Added the ability to set break even goals for each provider in the practice – available through the Set Break Even Goals by Provider button:
- Opens the Edit Provider Goals dialog.
- If Provider Goals are set, Yesterday’s Visits by Provider dialog will show whether each provider has met their goals.
- If no provider goals are set, the default practice level Break Even Goal will be used.
- Added the ability to display visits for all locations (the default), or for only the selected locations – available through the Location/Location Group multi selector:
- Added the ability to set break even goals for each location in the practice – available through the Set Break Even Goals by Location button:
- Opens the Edit Location Goals dialog.
- If Location Goals are set, Yesterday’s Visits by Location dialog will show whether each location has met its goals.
- If no location goals are set, the default practice level Break Even Goal will be used.
Patient
- Patient Demographics
- When updating a guarantor’s bill code, an option was added to also update the bill codes of all the patients linked to the guarantor.
- When updating a patient’s bill code, and the patient is linked to a guarantor other than self, the option was added to also update the bill codes of the guarantor and any other patients linked to that guarantor.
Note: When saving a patient/guarantor, the Patient/Guarantor Address Update Dialog has been used to update the addresses and phone numbers of guarantors and their patients. To satisfy the issue of updating the Patient/Guarantor Bill Codes, we will allow the Bill Codes to also be updated through the Patient/Guarantor Address Update Dialog. Since now more than just addresses and phone numbers can be updated through the dialog, the dialog will be renamed to the Patient/Guarantor Info Update Dialog.
Once ‘Save’ has been selected, the following dialog will appear with the guarantor and dependent(s) with an option to update the Bill Code.
Payments
Batch Payment Apply
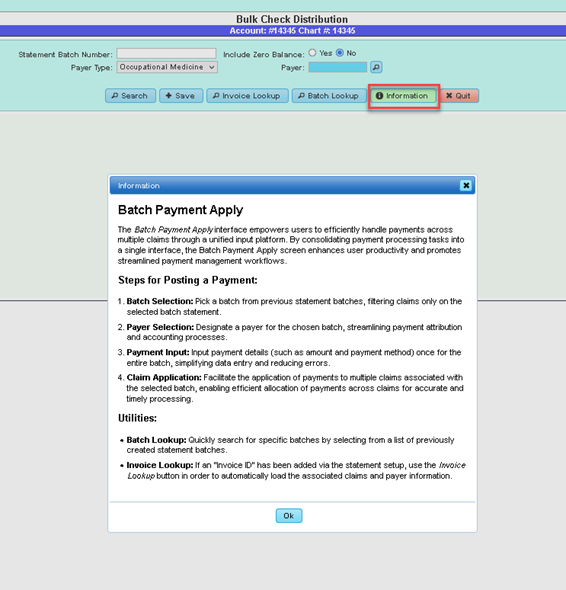
The Batch Payment Apply interface empowers users to efficiently handle payments across multiple claims through a unified input platform. Within this interface, users can select a specific batch ID and payer, facilitating seamless payment application to numerous claims. Key Features:
- Batch Selection: Users can pick a batch ID from a predefined list, allowing them to focus on a specific batch for payment processing.
- Payer Selection: Users have the flexibility to designate a payer for the chosen batch, streamlining payment attribution and accounting processes.
- Payment Input: Users can input payment details, such as amount and payment method, once for the entire batch, simplifying data entry and reducing errors.
- Claim Application: The interface facilitates the application of payments to multiple claims associated with the selected batch, enabling efficient allocation of payments across claims for accurate and timely processing.
- Invoice Lookup: Users can now add an "Invoice ID" via the statement setup screen, which will be visible and printed on statements. By utilizing the "Invoice Lookup" button on the batch payment screen, claims that were part of that batch will automatically load in the grid.
By consolidating payment processing tasks into a single interface, the Batch Payment Apply screen enhances user productivity and promotes streamlined payment management workflows.
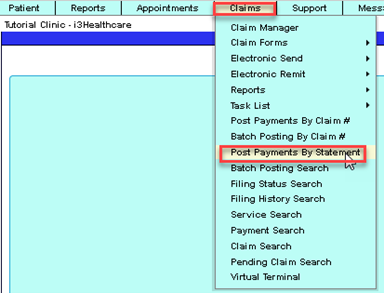
To access, go to: Claims>Post Payments by Statement:
You will be redirected to Bulk Check Distribution.
- Service Adjustment
Altered the “Service Adjustment” UI dialog so that pay codes flagged as type “Payment” will appear last in the “Adjustment Code” select box. Before:
After update:
Claims Fund Transfer Module (NEW FEATURE):
The Claim Fund Transfer module facilitates the effortless movement of funds between claims and unapplied buckets or between claims themselves, providing users with intuitive functionality for managing financial transactions.
Key Features:
1. Transfer Between Claims and Unapplied Buckets:
- Users can transfer funds from a claim to an unapplied bucket or vice versa, allowing for flexible allocation of financial resources.
- This feature streamlines the process of managing unapplied funds and ensures efficient utilization of available funds across claims.
2. Transfer Between Claims:
- Users have the option to transfer funds directly between different claims, simplifying financial adjustments and transactions.
- This capability enables users to reconcile balances and redistribute funds as needed to maintain accurate accounting records.
3. User-Friendly Interface:
- The module features an intuitive interface designed to enhance user experience and facilitate smooth navigation.
- Users can easily initiate fund transfers and complete transactions with minimal effort, reducing the time and complexity associated with financial management tasks.
Usage:
1. Choose the claim from which funds will be transferred within the patient's ledger:
2. Ensure that the selected claim contains available funds for the transfer.
3. Click on the "Credit Transfer" button to open a dialog displaying all accessible buckets and claims.
4. Provide Transfer Information:
- Enter the desired amount of funds to transfer and include any relevant transaction details.
5. Begin Transfer:
- Finalize the transfer procedure to execute the transaction and accurately update financial records.nefits:
Level 5 user can navigate to the “Payments/Adjustments” section of the system configuration module (Support → Management → Configuration Panel → Payments/Adjustments) Expand the Accordion titled “Feature Management” There are two new input fields:
- Internal Credit Pay Code (text field) - defaulted blank.
- Internal Debit Pay Code (text field) - defaulted blank.
Note: The Level 5 (management user) will need to select the Internal Pay Code for Debit and or Credit transaction from their Payment/Adjustment Code Search. If one does not exist, then it can be added. The Paying Entity should be set to ‘Patient’. You will need a designated pay code type: Credit and designated pay code type: Debit.
Let’s take a look:
NOTE: Pay Code Setup/Validations
Scope:
- Feature unavailable if patientDebitPayCode or patientCreditPayCode is empty/invalid.
- denied if transfer from the credit available < 0.
- denied if the claim is unapplied/conv fee.
- denied if trying to transfer to/from a locked batch.
- denied if transfer debit causes negative balance (sets line balance negative)
- denied if transfer credit causes negative balance (sets line balance negative, exception: unapplied claims
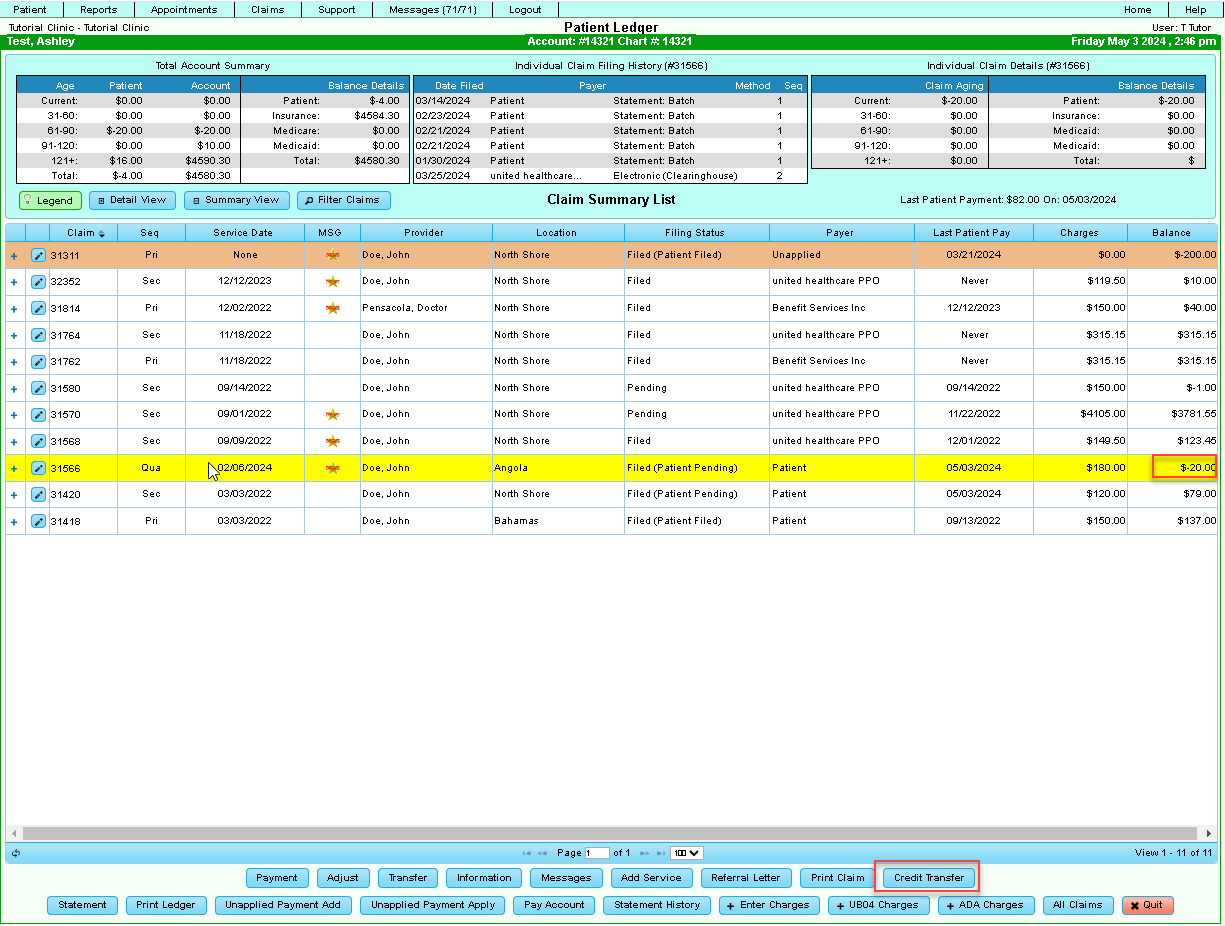
Navigate to the Patient Ledger for any patient. There is a new “Credit Transfer” button to the right of the “Print Claim” button.
If a pay code has not been input into the System Configuration Panel as illustrated above, then the following error will appear:
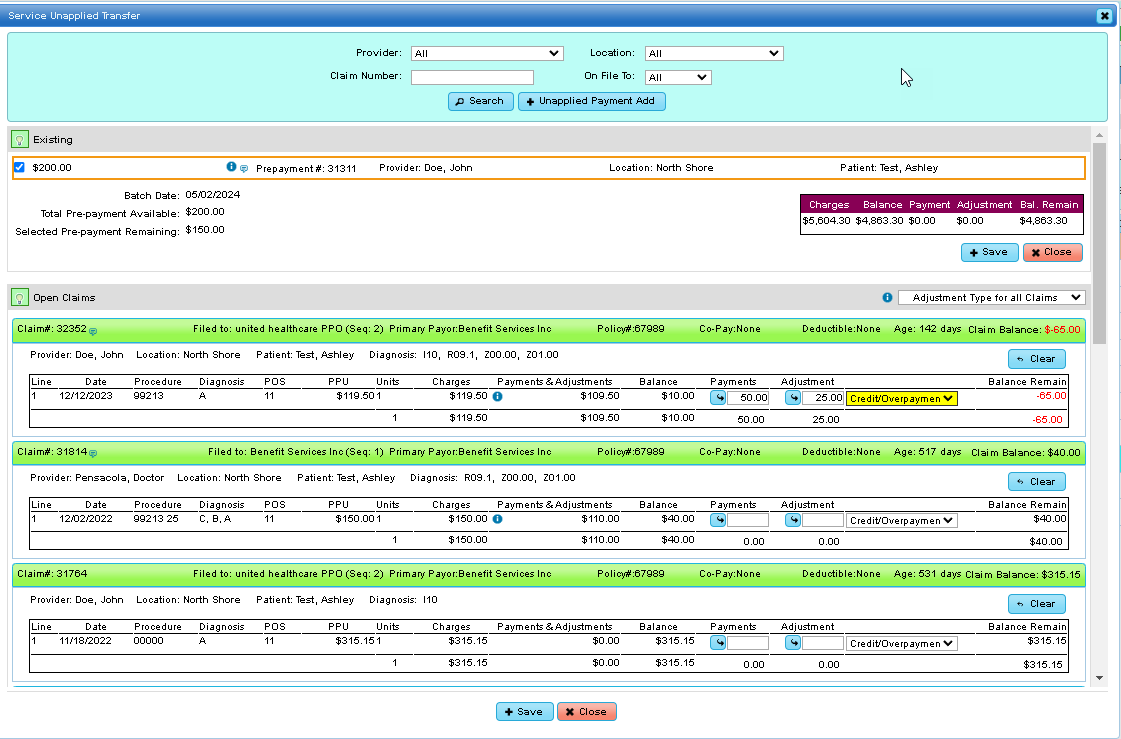
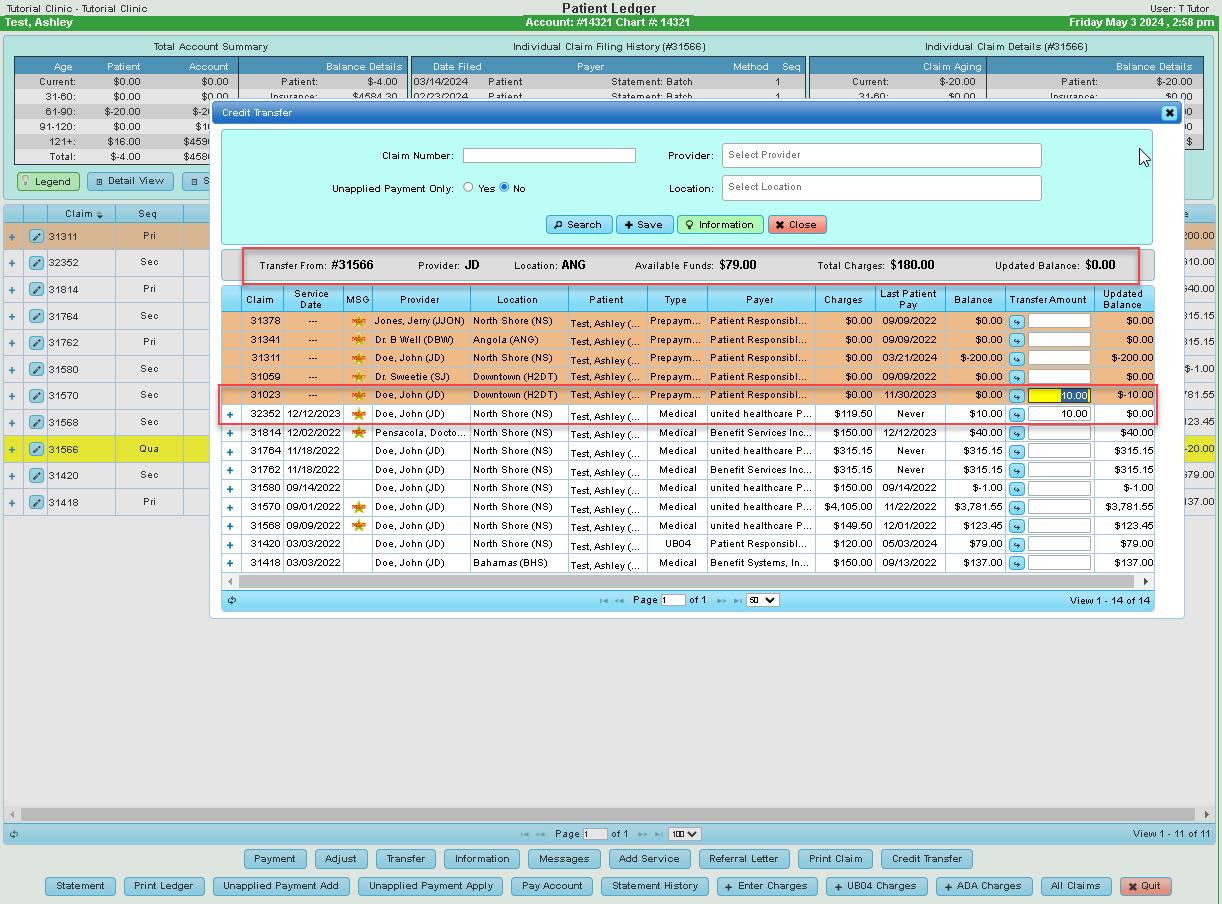
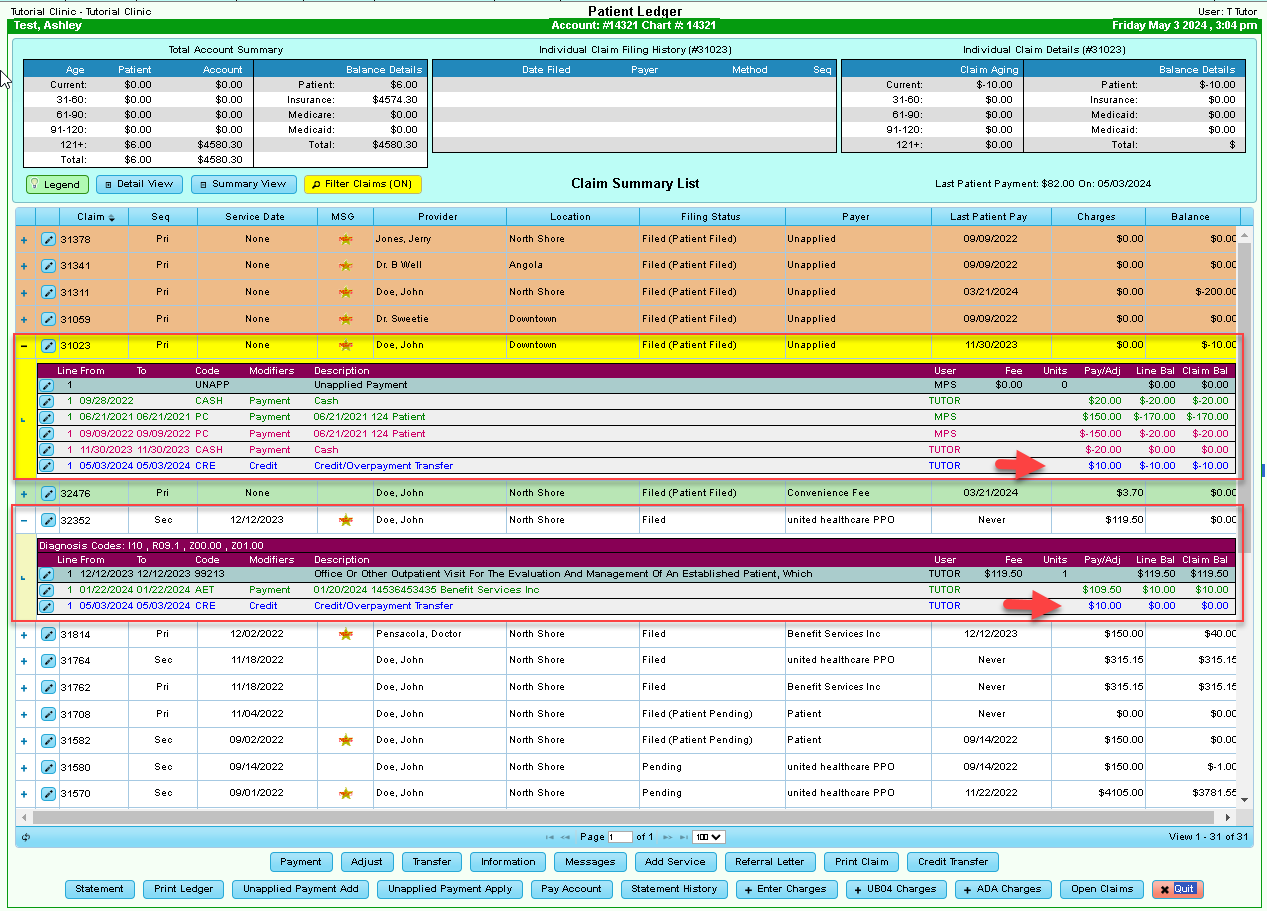
Case Example: We will move $20.00 credit on file to patient to unapplied account.
Highlight the claim with the credit, then select, “Credit Transfer”.
$10.00 is being applied to Dr. Doe’s unapplied claim and $10.00 to claim # 32352 with balance of $10.00.
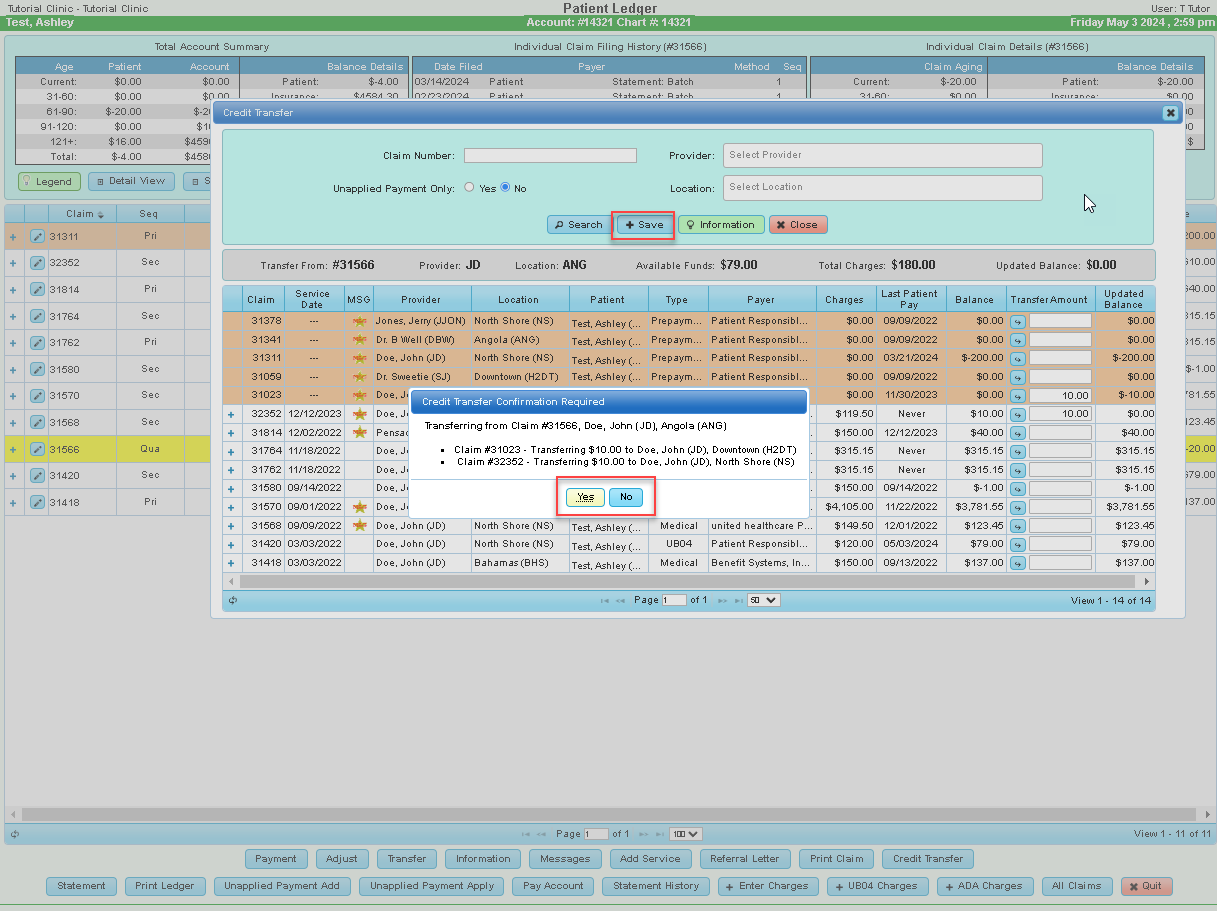
A confirmation dialog appears. If all is good, then select ‘Yes’. If ‘No’, then select ‘No’, and the transaction will cancel.
Ledger view after selecting yes for the move to unapplied and to the selected claim:
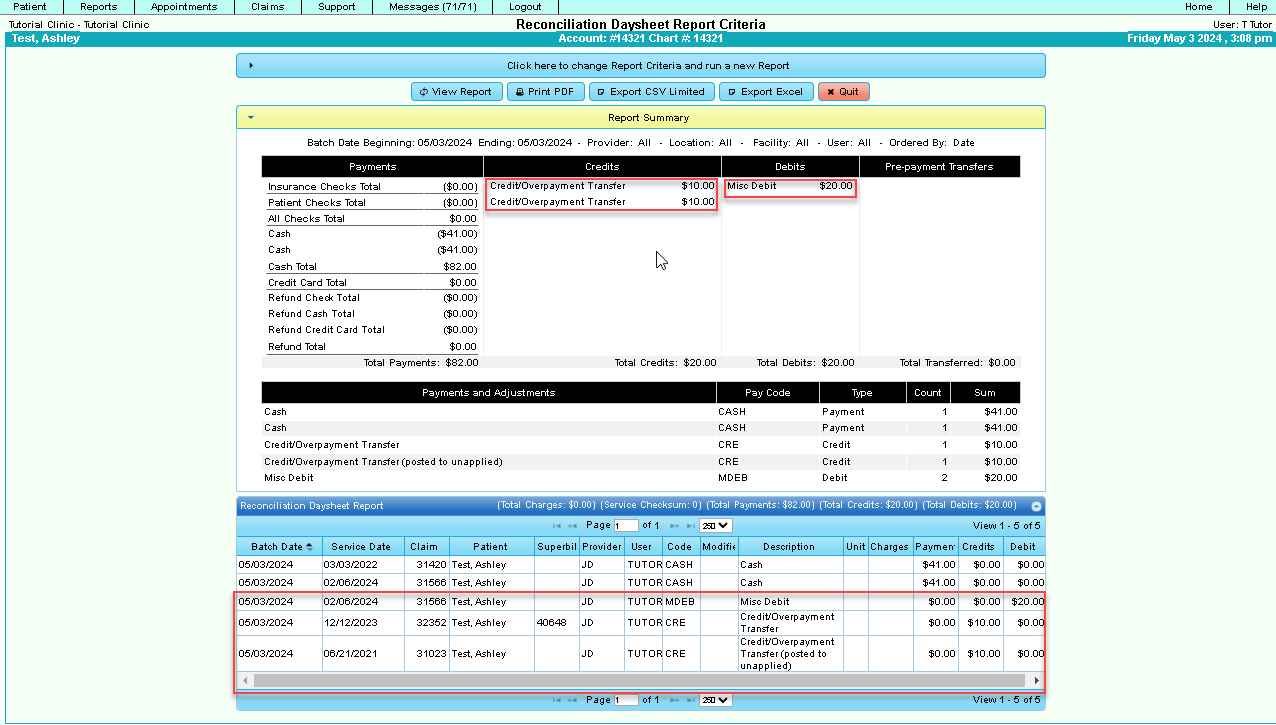
Below is how it is represented on the Reconciliation DaySheet:
Reports
Updates have been made to the following reports:
Claim Data Report – To access, go to: Support tab>Reports>Listing> Claim Data Report.
- Added Primary and Secondary Filed to Payer Policy Number to Output
- Added the ability to find claims that have services with a combination of procedure codes on the same claim.
- Apply search to any service that has one or more of the selected procedures. This is the default mode and is how the Procedure Search always functioned. When this option is selected, the Procedure Search applies to any service that has one or more of the selected procedures, regardless of whether the services associated with the procedures belong to the same claim.
- Apply search to all selected procedures on the same claim. When this option is selected, the Procedure Search will find only the claims that have services with the selected procedure codes on the same claim.
Reconciliation Daysheet – To access this report, go to: Reports tab>Daily>Reconciliation DaySheet.
- Added the payment check numbers to the list of payments on the Excel report.
Patient Demographic Report – To access this report, go to: Reports tab>Patient> Patient Demographic Report.
- Added the ability to display patients that have more than one credit card on file.
- Added a new filter section titled Credit Card Related Selections
- Can choose to perform a credit card related search or not.
- Can search for patients that have credit cards on file.
- Can search for patients that do not have credit cards on file.
- Can search by credit card brand (Visa, Mastercard, Discover, etc.)
- Can choose to ignore expired cards.
- Added additional output fields related to credit cards.
- Credit Card Brand
- Credit Card Expiration Date
- Can only be selected when selecting “Yes” for the Perform a Credit Card Related Search filter option.
- The report output will not display a list of all the cards that a patient has on file. Each patient appears on the report once, and only the details for the patient’s card that has its expiration date farthest in the future will be shown.
Practice Activity Report – To access this report, go to: Reports>Practice>Practice Activity Report
- Added the ability to group activity by User only.
Patient by Procedures Report – To access this report, go to: Reports tab>Patient> Patient by Procedure.
- Added Payer Search report criteria validation.
- If the Payer Search report criteria is set to Single but no single payer has been selected via the Payer Lookup button, then display an error message when user clicks on the Generate Report buttons warning the user that Payer Search is set to Single, but no Payer has been selected.
Merchant Services
- The most recent DuxPortal release introduced the ability for a patient to make a payment directly onto a claim rather than into the unapplied claim (Available for Pace/Transafe Merchant services). This functionality adds the refund/void functionality to these payments rather than forcing the user to refund/void out an unapplied claim.
- Convenience Fee Updates – Added the ability to detect HSA/FSA cards with Pace and Transafe transactions. This is used in conjunction with the Convenience Fees.
- The convenience fee setup empowers users to configure payment accept acceptance and convenience fees according to their business needs and regulatory requirements.
Within the setup dialog, users can configure:
- Card Present (for transactions over a terminal)
- Reoccurring Charges (currently not implemented)
- Installment Charges (currently not implemented)
- Applied on debit cards (Fuze/Transafe only)
- Applied on HAS/FSA (Fuze /Transafe only)
- Accepted Card Brands: Users can disable specific card companies, resulting in a failure when processing transactions with disabled cards.
- Assignment of the fee to specific merchant account configuration or leaving it blank to apply it as a default for the system.
- “User Override” acknowledgment: Allows users to override system rules and configure the fee according to their preferences.
- Each fee can be assigned to a merchant account or left blank to apply it as a default for the system. Each merchant account can have only one assigned convenience fee along with a single default fee. This restriction prevents fees from being categorized as “tiered”.
- The system automatically disables setting that do not comply with the “Convenience Fee Guidelines” unless the user selects the “Acknowlegment” checkbox.
All changes including who enabled the acknowledgement are visible via the “Show Changes” button on the dialog.
To review and update Convenience fees, go to the Support tab>Configuration Panel>Credit Card Setup.
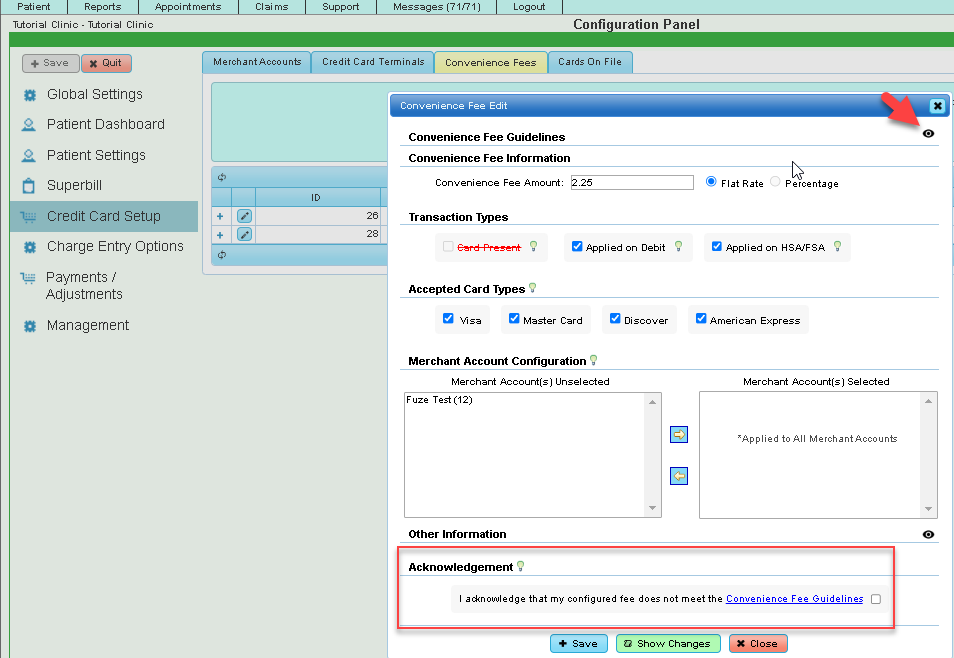
You should see the following when selecting the Convenience Fee tab, select “Add” to set up a new fee or an existing record.
In this example, the Convenience Fee is set to a flat fee. To apply percentage fee, the user will need to review the acknowledgement and check the box as indicated below.
- Note: Clinics that are currently set up and using convenience fees with a percentage will not be allowed an update to the percentage fee without selecting the acknowledgement. We do encourage our clients to review the guidelines and make the best decisions for your clinic.
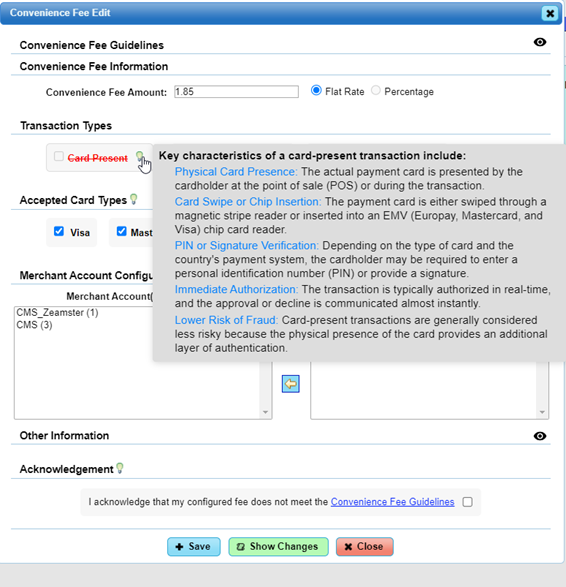
- The info bulbs have valuable information to guide you with your selections. The illustration below provides an example.
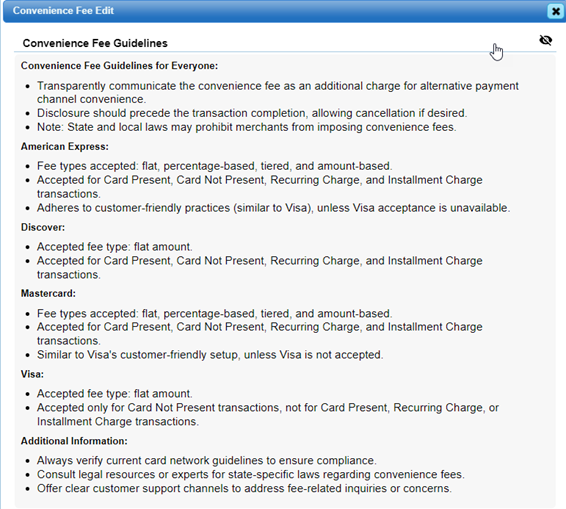
Convenience Fee Guidelines:
Customer Care
If you have questions, please contact your Customer Care Team.
