Difference between revisions of "DuxWare Release Note - 04/09/2017"
(Created page with " Previous Release Note") |
|||
| (40 intermediate revisions by 2 users not shown) | |||
| Line 1: | Line 1: | ||
| + | ====Patient Demographics==== | ||
| + | There’s a new look and feel to adding patients to your Practice Management System. The new and improved version of Patient Add and Patient Quick Add is configurable by Practice Management. | ||
| + | Let’s go out with the old, and in with the new… | ||
| + | First, let’s take a snapshot of the Old Patient Add/Edit so that we can clearly see the difference between the old and new. | ||
| + | Old Patient Add Screens: | ||
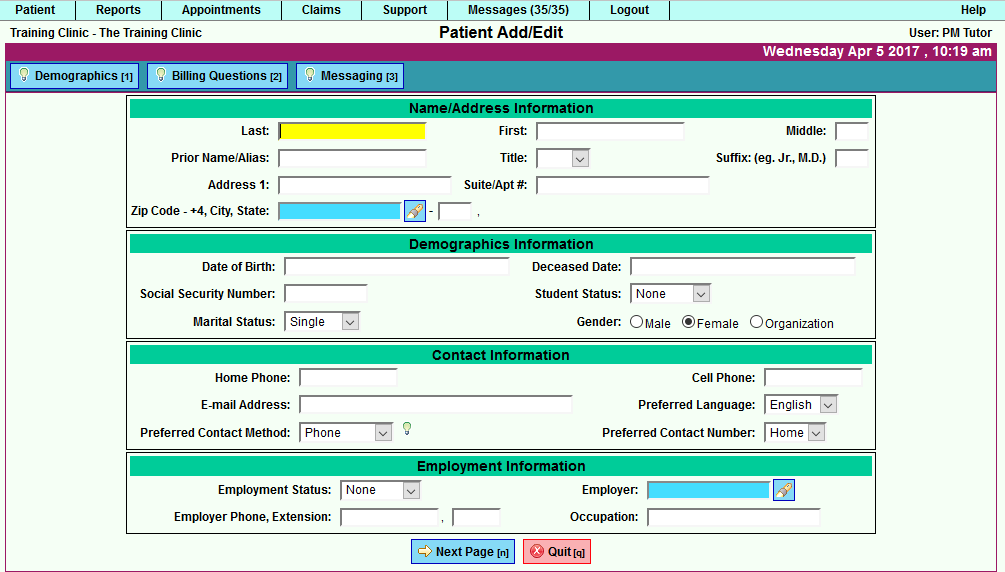
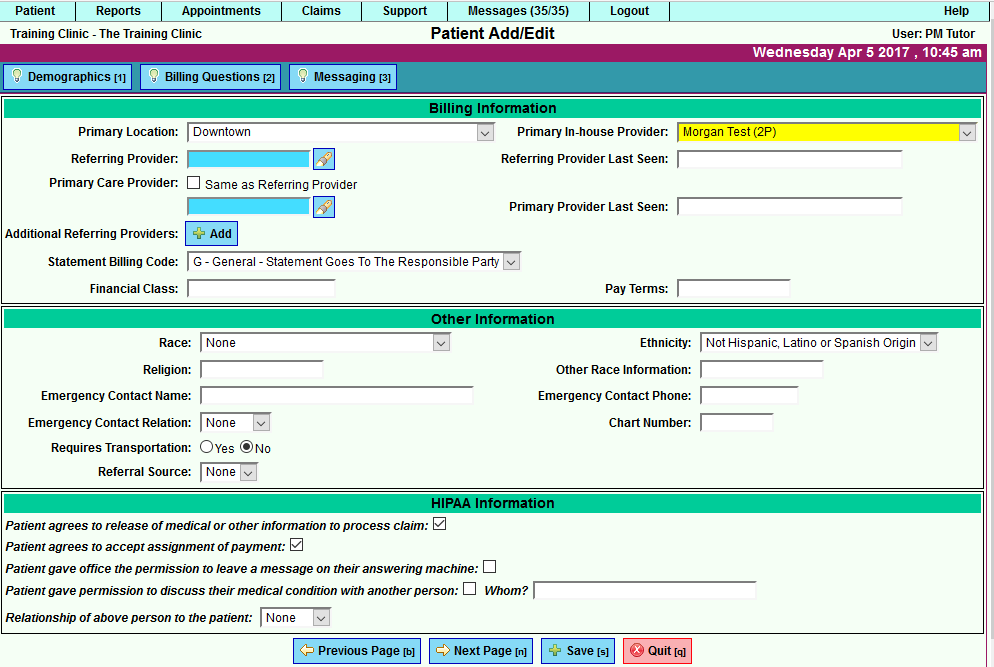
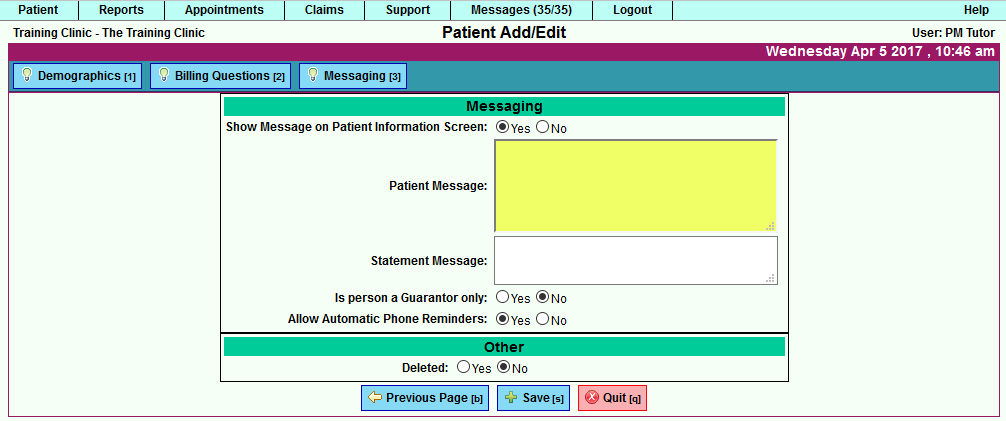
| + | You are presented with three tabs: Demographics, Billing, and Messaging. You select “Next Page” to go to the next set of questions as illustrated below, and you have to contact your Support Team to customize some of the settings in Patient Add. | ||
| + | Demographics (Page 1) | ||
| − | [[DuxWare Release Note - | + | |
| + | [[File:OLDDemog1_1.png]] | ||
| + | |||
| + | |||
| + | Billing Questions (Page 2) | ||
| + | |||
| + | |||
| + | [[File:OLDDemog2_2.png]] | ||
| + | |||
| + | |||
| + | Messaging (Page 3) | ||
| + | |||
| + | |||
| + | [[File:OLDDemog3_3.png]] | ||
| + | |||
| + | |||
| + | In with the new… | ||
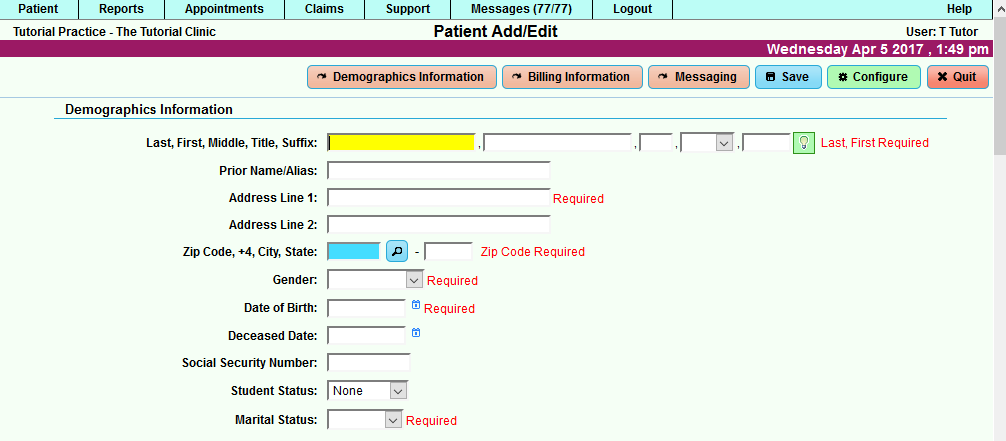
| + | Take a look at the new Patient Add/Edit input screens. There are no “Next Page” or “Previous Page” buttons to select. You get a continuous flow with scrolling up and down the page. You can use the Demographics, Billing and Message buttons at the top to skip down to a particular section. An added bonus is that your practice has the ability to select the required input in the “Configure” section for both the Patient Add and Patient Quick Add input screens (management level access is required). | ||
| + | |||
| + | |||
| + | |||
| + | [[File:NEWDemog1.png]] | ||
| + | |||
| + | [[File:NEWDemog2.png]] | ||
| + | |||
| + | [[File:NEWDemog3.png]] | ||
| + | |||
| + | [[File:NEWDemog4.png]] | ||
| + | |||
| + | [[File:NewDemog5.png]] | ||
| + | |||
| + | Configure your own required fields in Patient Demographics. As a Practice Manager, you will know the information that your staff is required to input for a Full Patient Add and for a Quick Add. Just select the green “Configure” button at the top right of either the Patient Add or Quick Add. Just remember that when you edit the Configuration settings, you will change how patient information is input for all patients that you add into your database. | ||
| + | |||
| + | You will see eight tabs: Name/Address info, Demographics Info, Contact Info, Employment Info, Billing info, Other Info, HIPAA Info, and Messaging. Review each tab for the available configuration settings. | ||
| + | Under the Name/Address Info, you can start using a brand new feature that gives you the option to '''enable Patient Duplicate Checking'''. | ||
| + | |||
| + | |||
| + | [[File:NewDemoSetup.png]] | ||
| + | |||
| + | |||
| + | =====Responsible Party/Guarantor===== | ||
| + | |||
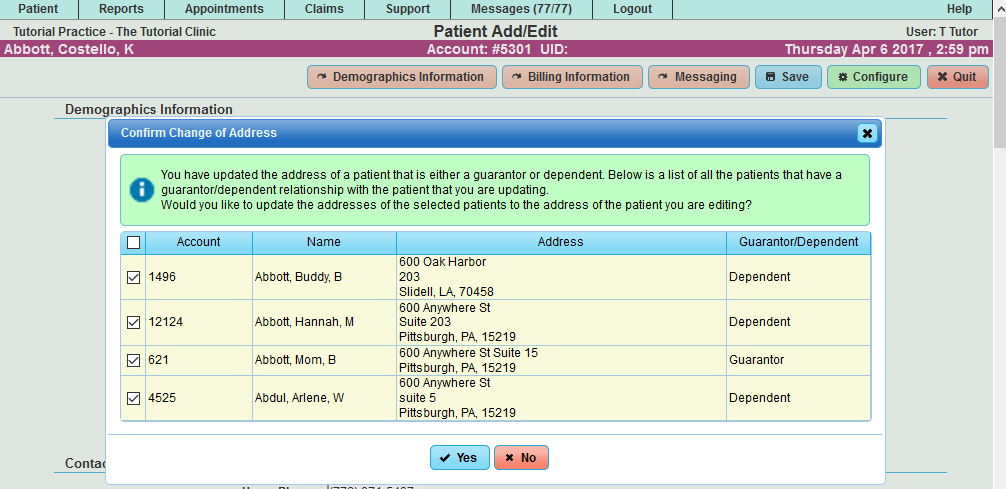
| + | For practices, such as Pediatrics, that utilize assigning patients to a particular responsible party or guarantor, a new feature has been added to assist the Front Desk in editing addresses of other patients linked to the same guarantor without going to each individual account. Once you edit a patient's address that is linked to a Guarantor Account, and select Save, you will see a Confirm Address Change" pop-up. All dependents that are linked by a Guarantor will appear and are selected as illustrated below. Select "Yes", if you want to update all. Remove If you don't wish to update any of the patients in the list, select "No". | ||
| + | |||
| + | |||
| + | [[File:GuarantorAddressEdit.png]] | ||
| + | |||
| + | |||
| + | =====Hot Key===== | ||
| + | |||
| + | When entering into the Patient Information Screen, the user now has the ability to press the "ESC" key to quickly close the Patient Message. | ||
| + | |||
| + | =====Deceased Patients===== | ||
| + | |||
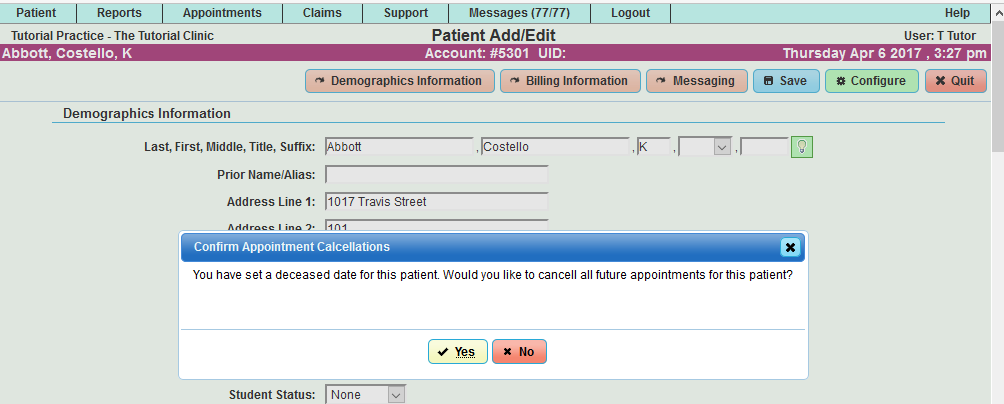
| + | When a Deceased Date has been entered into a patient's demographic record, you will be presented with an option to cancel all future appointments. | ||
| + | |||
| + | [[File:Deceased.png]] | ||
| + | |||
| + | =====Tick Mark for Patient Portal===== | ||
| + | |||
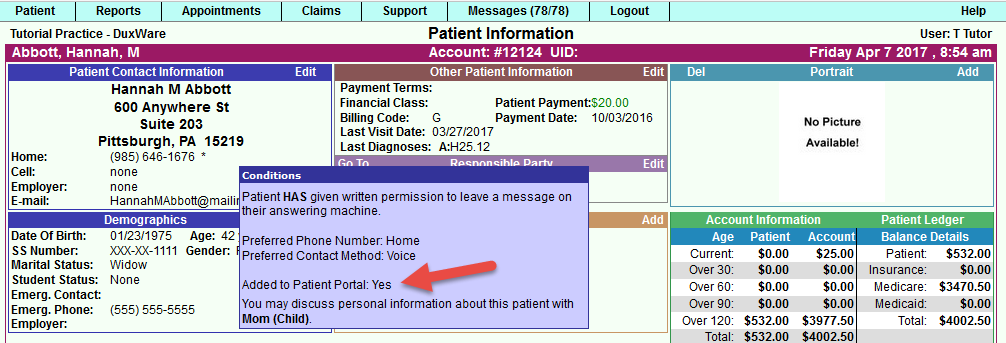
| + | Under the "Configure" section of Patient Add, you have the option to add a Patient Portal tick mark to indicate that the patient has been given credentials to a Patient Portal (e.g. EHR). This option is located under the "Other" tab in Patient Add Setup. | ||
| + | |||
| + | [[File:PatientPortalYes.png]] | ||
| + | |||
| + | When this option is on, mouse hover just under the patient's address to view portal Yes/No: | ||
| + | |||
| + | [[File:PortalYes.png]] | ||
| + | |||
| + | ====Claims Filing/Charge Entry==== | ||
| + | |||
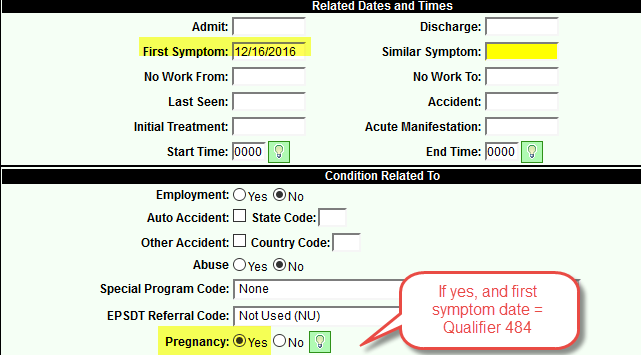
| + | '''HCFA 1500 02/12 - Block 14 Qualifier 484''' has been added for Pregnancy. It will also appear in Loop 2300 DTP segment for electronic claims. | ||
| + | |||
| + | Currently, Montana Medicaid is requiring the pregnancy qualifier 484 with Pregnancy LMP. The input area for Charge Entry is located in the Extended Header area of Charge Entry Screen or Claim Information Edit Screen as illustrated below. | ||
| + | |||
| + | [[File:484.png]] | ||
| + | |||
| + | ====Appointment Schedule==== | ||
| + | |||
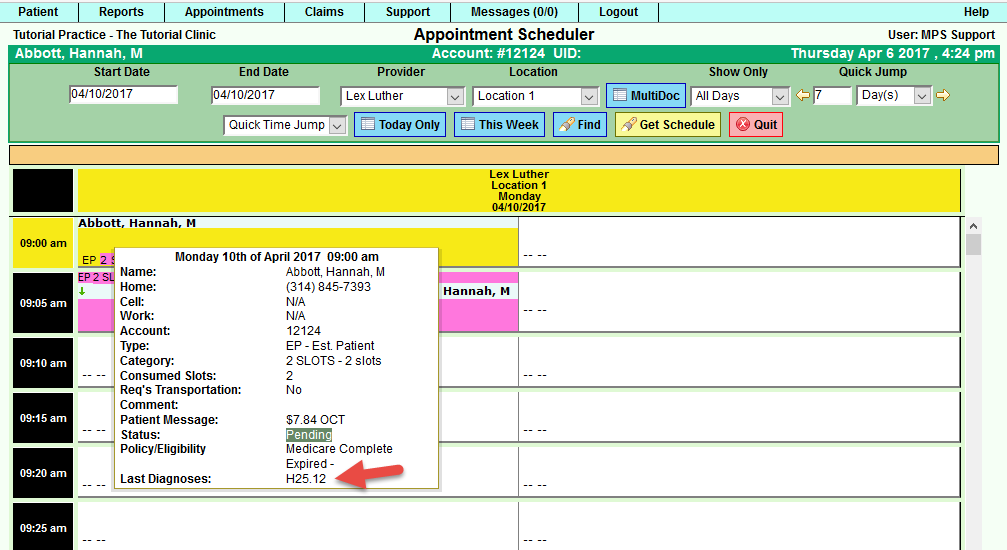
| + | There is a new option available for practices that would like see the last visit's diagnosis on the Appointment hover. If you are interested in this option, your Support Team member can quickly add this feature for you. | ||
| + | |||
| + | [[File:AppointmentDxHover.png]] | ||
| + | |||
| + | ====Reports==== | ||
| + | |||
| + | '''Patient Ledger''' | ||
| + | |||
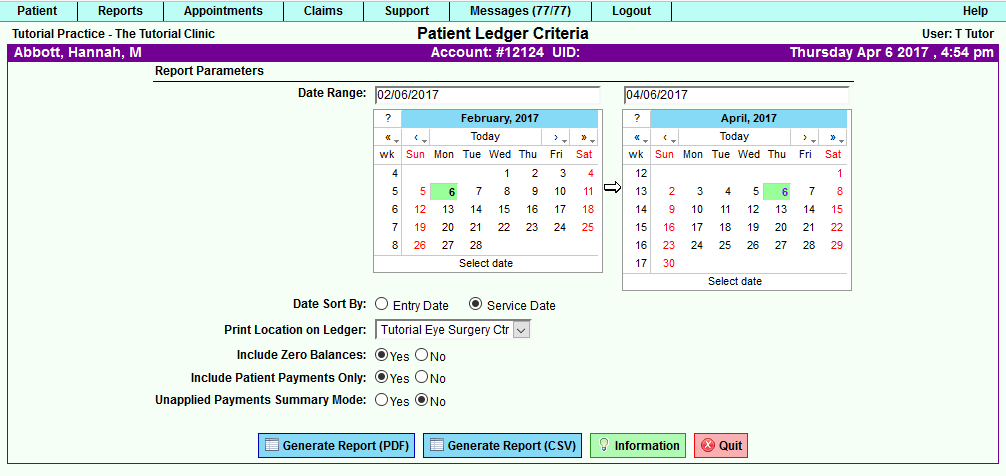
| + | There are new filtering options available for printing Patient Ledger. The new options are: Include Patient Payments Only and Unapplied Payments Summary Mode. The Print Ledger Report is located via the Patient Information Screen>Patient Ledger. | ||
| + | |||
| + | [[File:Patientledgeroptions.png]] | ||
| + | |||
| + | '''Patient Demographics Report''' | ||
| + | |||
| + | Appointment Date and Appointment Time have been added as data to output in the Patients Demographics Report. You can access this report from the Reports tab>Patient>Patient Demographics. | ||
| + | |||
| + | '''Insurance Analysis Report''' | ||
| + | |||
| + | This report will now export into Excel. | ||
| + | |||
| + | ====User Access==== | ||
| + | |||
| + | Users who have their Caps Lock on will now see the following message. Passwords are case sensitive. | ||
| + | |||
| + | |||
| + | [[File:Capslock.png]] | ||
| + | |||
| + | |||
| + | |||
| + | [[DuxWare Release Note - 01/15/2017|Previous Release Note]] | ||
Latest revision as of 15:15, 7 April 2017
Contents
Patient Demographics
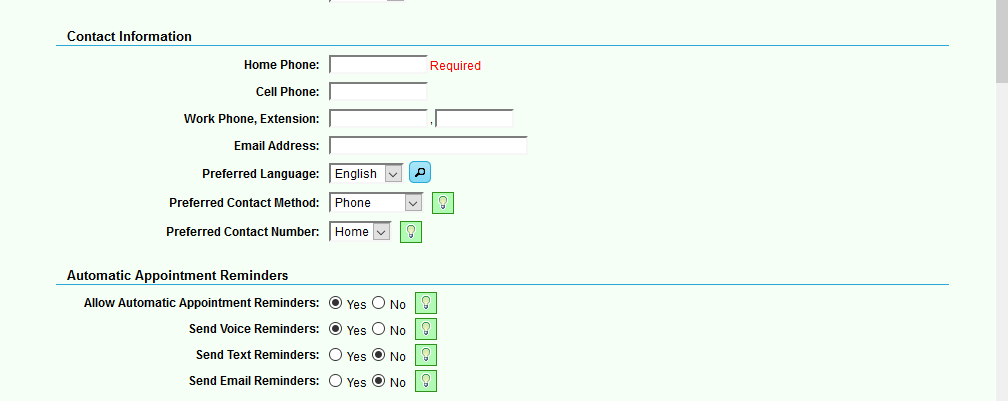
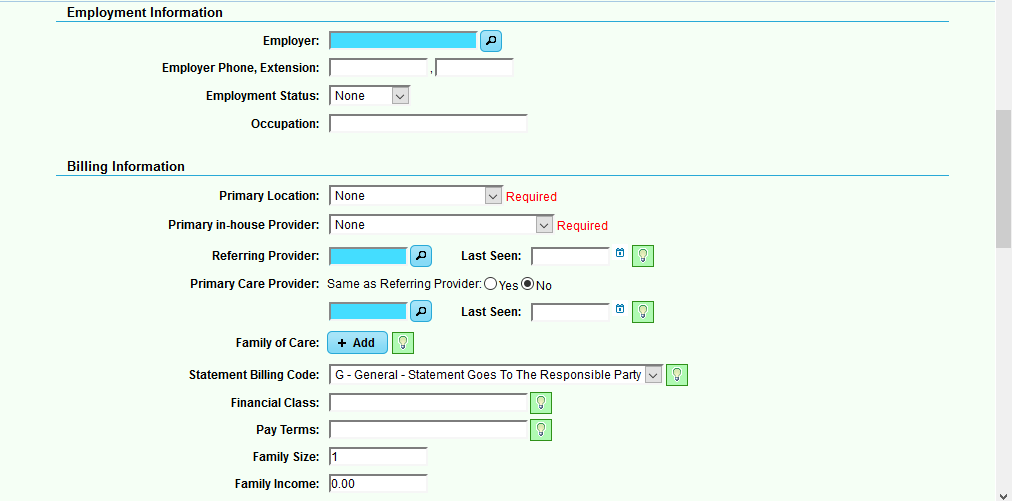
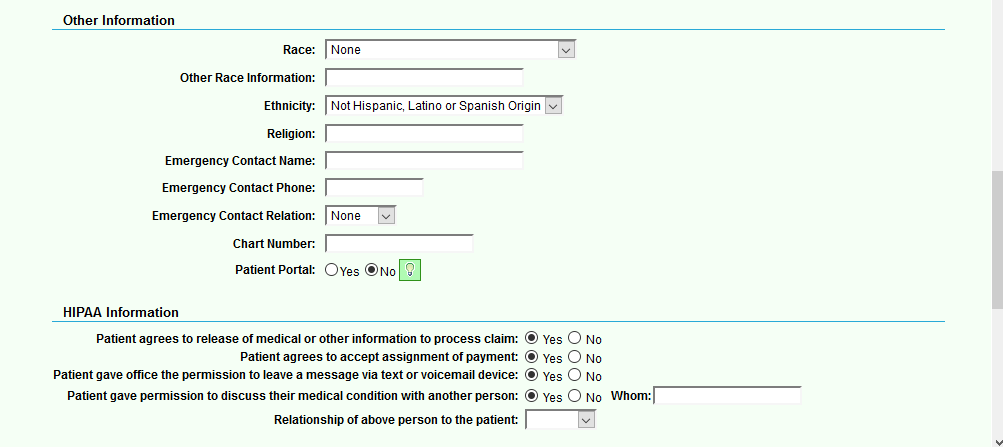
There’s a new look and feel to adding patients to your Practice Management System. The new and improved version of Patient Add and Patient Quick Add is configurable by Practice Management.
Let’s go out with the old, and in with the new…
First, let’s take a snapshot of the Old Patient Add/Edit so that we can clearly see the difference between the old and new.
Old Patient Add Screens: You are presented with three tabs: Demographics, Billing, and Messaging. You select “Next Page” to go to the next set of questions as illustrated below, and you have to contact your Support Team to customize some of the settings in Patient Add.
Demographics (Page 1)
Billing Questions (Page 2)
Messaging (Page 3)
In with the new…
Take a look at the new Patient Add/Edit input screens. There are no “Next Page” or “Previous Page” buttons to select. You get a continuous flow with scrolling up and down the page. You can use the Demographics, Billing and Message buttons at the top to skip down to a particular section. An added bonus is that your practice has the ability to select the required input in the “Configure” section for both the Patient Add and Patient Quick Add input screens (management level access is required).
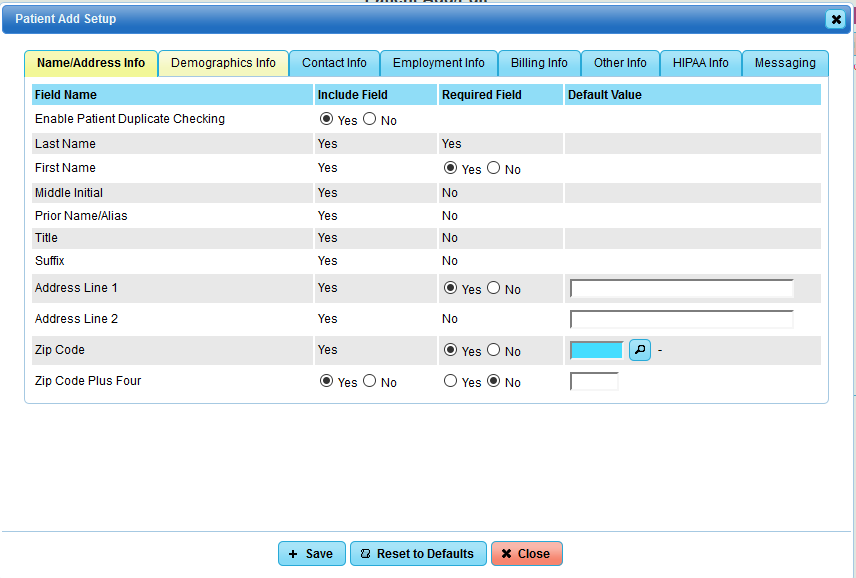
Configure your own required fields in Patient Demographics. As a Practice Manager, you will know the information that your staff is required to input for a Full Patient Add and for a Quick Add. Just select the green “Configure” button at the top right of either the Patient Add or Quick Add. Just remember that when you edit the Configuration settings, you will change how patient information is input for all patients that you add into your database.
You will see eight tabs: Name/Address info, Demographics Info, Contact Info, Employment Info, Billing info, Other Info, HIPAA Info, and Messaging. Review each tab for the available configuration settings. Under the Name/Address Info, you can start using a brand new feature that gives you the option to enable Patient Duplicate Checking.
Responsible Party/Guarantor
For practices, such as Pediatrics, that utilize assigning patients to a particular responsible party or guarantor, a new feature has been added to assist the Front Desk in editing addresses of other patients linked to the same guarantor without going to each individual account. Once you edit a patient's address that is linked to a Guarantor Account, and select Save, you will see a Confirm Address Change" pop-up. All dependents that are linked by a Guarantor will appear and are selected as illustrated below. Select "Yes", if you want to update all. Remove If you don't wish to update any of the patients in the list, select "No".
Hot Key
When entering into the Patient Information Screen, the user now has the ability to press the "ESC" key to quickly close the Patient Message.
Deceased Patients
When a Deceased Date has been entered into a patient's demographic record, you will be presented with an option to cancel all future appointments.
Tick Mark for Patient Portal
Under the "Configure" section of Patient Add, you have the option to add a Patient Portal tick mark to indicate that the patient has been given credentials to a Patient Portal (e.g. EHR). This option is located under the "Other" tab in Patient Add Setup.
When this option is on, mouse hover just under the patient's address to view portal Yes/No:
Claims Filing/Charge Entry
HCFA 1500 02/12 - Block 14 Qualifier 484 has been added for Pregnancy. It will also appear in Loop 2300 DTP segment for electronic claims.
Currently, Montana Medicaid is requiring the pregnancy qualifier 484 with Pregnancy LMP. The input area for Charge Entry is located in the Extended Header area of Charge Entry Screen or Claim Information Edit Screen as illustrated below.
Appointment Schedule
There is a new option available for practices that would like see the last visit's diagnosis on the Appointment hover. If you are interested in this option, your Support Team member can quickly add this feature for you.
Reports
Patient Ledger
There are new filtering options available for printing Patient Ledger. The new options are: Include Patient Payments Only and Unapplied Payments Summary Mode. The Print Ledger Report is located via the Patient Information Screen>Patient Ledger.
Patient Demographics Report
Appointment Date and Appointment Time have been added as data to output in the Patients Demographics Report. You can access this report from the Reports tab>Patient>Patient Demographics.
Insurance Analysis Report
This report will now export into Excel.
User Access
Users who have their Caps Lock on will now see the following message. Passwords are case sensitive.
